
Współpraca
SZTUKA
Piękno i dobre samopoczucie
RZEMIOSŁO
KULTURA I HISTORIA
ROZRYWKA
ŚRODOWISKO
JEDZENIE I NAPOJE
INŻYNIERIA ODWROTNA
NAUKI
LEKKOATLETYKA
TECHNOLOGIA
URZĄDZENIA DO NOSZENIA
Homemade Wood Lathe: Hardwood Bed, Sliding Headstock and Tailstock, Steel Spindle With Stepped Pulley (Boy Mechanic, 1915)
Woody

Autor

Woody

13. listopad 2026NO
10
0
0
0
0

Homemade Wood Lathe: Hardwood Bed, Sliding Headstock and Tailstock, Steel Spindle With Stepped Pulley (Boy Mechanic, 1915)

E. E. Hulgan's lathe from The Boy Mechanic, Book 2 (1915), "in which wood and light metal articles may be turned": a 5 ft bed of two 2 by 4 in hardwood rails, a headstock clamped by bolts with a 3/4 in steel spindle in brass bearings and a three-step pulley, a bolted hardwood tailstock with a screw-fed dead centre, a sliding tool rest, and a screw-on chuck. Driven from a countershaft or by foot.
Zaawansowany
About 1-2 weeks

Instrukcje

1

His sizes, and the pulley speeds

Wczytywanie notatnika Jupyter…
2

Read The Boy Mechanic, Book 2

"A strong, substantial lathe in which wood and light metal articles may be turned can be made by carefully following the description below and the detailed drawings of the parts."
3

Make the bed

Cut two pieces of straight-grained, smooth 2 by 4 in hardwood, 5 ft long, and hold them apart at each end with blocks of wood 2 in wide (Fig. 9 shows 2 in rails with a 2 in gap). The bed can be longer or shorter.

Materiały do tego kroku:

Deska z drewna liściastegoDeska z drewna liściastego2 sztuk
Wkręty do drewnaWkręty do drewna1 sztuka

Potrzebne narzędzia:

Piła ręcznaPiła ręczna

Strug ręcznyStrug ręczny
Wiertarka ręcznaWiertarka ręczna
Miara zwijanaMiara zwijana
4

Build the headstock frame

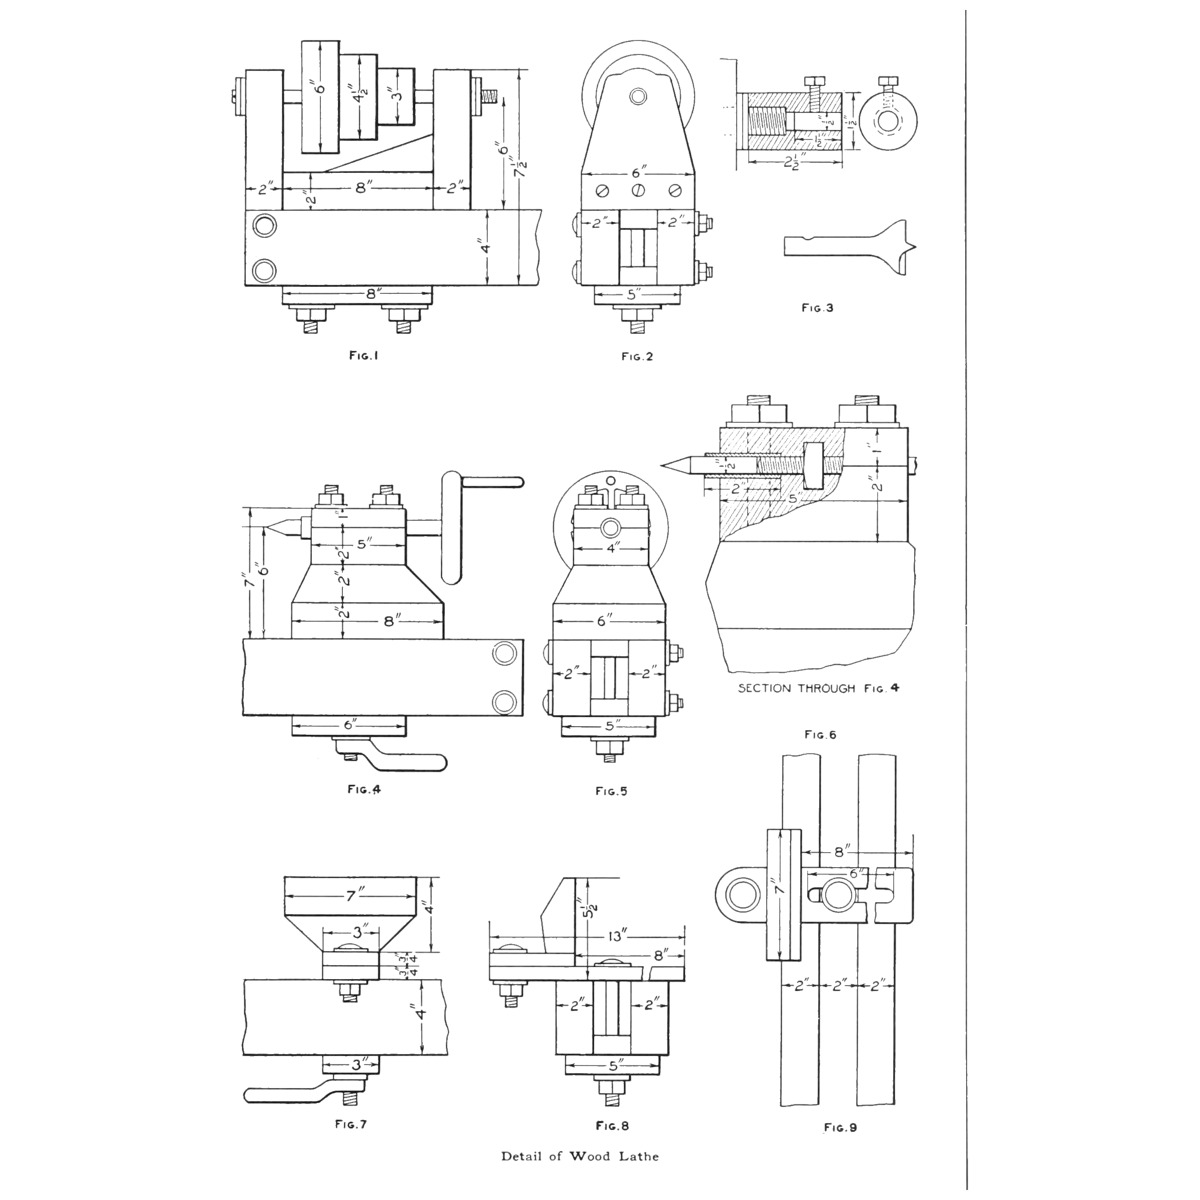
Make the two hardwood end pieces to the shape of Figs. 1 and 2 (2 in thick, 2 in apart on an 8 in base, 7-1/2 in high, 6 in wide at the bottom) and screw them to the base. Nail a slider 1 in thick and 10 in long, just wide enough to slide between the bed rails, under the base, 2 in from its rear end. Bore two 1/2 in holes through base and slider and put two 1/2 in bolts through them and through another slide and board under the bed, so tightening the nuts clamps the headstock. Screw a half-round wedge-shaped brace inside the frame against the front end.

Materiały do tego kroku:

Deska z drewna liściastegoDeska z drewna liściastego1 sztuka
Śruba zamkowaŚruba zamkowa2 sztuk
Nakrętka sześciokątnaNakrętka sześciokątna2 sztuk
Wkręty do drewnaWkręty do drewna1 sztuka
GwoździeGwoździe1 sztuka

Potrzebne narzędzia:

Piła ręcznaPiła ręczna
DłutaDłuta
Świder korbowy z wiertłemŚwider korbowy z wiertłem
Wiertarka ręcznaWiertarka ręczna
5

Make the spindle and bearings

Make the spindle of tool steel or steel tubing, 3/4 in in diameter and 14 in long, and cut a thread on one end. Rivet on a hardened steel collar, 1/4 by 1-1/2 in, to turn against another collar of the same size on the headstock; screw a third collar to the rear end piece and fix a collar with a removable pin on the spindle, fitted to turn easily with no end play. Drill brass tubing for the spindle as bearings and wedge them into the headstock 6 in above the bed, in line; drill small oil holes from the top.

Materiały do tego kroku:

Pręt ze stali narzędziowejPręt ze stali narzędziowej1 sztuka
Rura stalowa konstrukcyjnaRura stalowa konstrukcyjna1 sztuka
Shaft CollarShaft Collar4 sztuk
Nity staloweNity stalowe1 sztuka
Rura mosiężnaRura mosiężna1 sztuka

Potrzebne narzędzia:

Piła do metaluPiła do metalu
Zestaw do gwintowaniaZestaw do gwintowania
Wiertarka ręcznaWiertarka ręczna
Pilniki (pilnik ręczny)Pilniki (pilnik ręczny)
Imadło warsztatoweImadło warsztatowe
MłotekMłotek
6

Fit the stepped pulley

Make the pulleys 2 in wide, with the diameters on the drawing: 6, 4-1/2 and 3 in. Fasten them to the spindle with a removable pin. (Turned hardwood is our choice of material; he does not say.)

Materiały do tego kroku:

Deska z drewna liściastegoDeska z drewna liściastego1 sztuka

Potrzebne narzędzia:

Piła ręcznaPiła ręczna
Świder korbowy z wiertłemŚwider korbowy z wiertłem
Wiertarka ręcznaWiertarka ręczna
7

Make the chuck and centres

For the chuck (Fig. 3), take shafting 1-1/2 in in diameter and 2-1/2 in long, drill a 1/2 in hole through its centre, ream and thread one end to fit the spindle, and fit a setscrew over the 1/2 in hole. Make a wood-turning centre, and other centres and drills, from 1/2 in tool steel.

Materiały do tego kroku:

Pręt okrągły ze stali niskowęglowejPręt okrągły ze stali niskowęglowej1 sztuka
Pręt ze stali narzędziowejPręt ze stali narzędziowej1 sztuka
Wkręt dociskowy z końcówką wklęsłąWkręt dociskowy z końcówką wklęsłą1 sztuka

Potrzebne narzędzia:

Piła do metaluPiła do metalu
Wiertarka ręcznaWiertarka ręczna
RozwiertakRozwiertak
Zestaw do gwintowaniaZestaw do gwintowania
Pilniki (pilnik ręczny)Pilniki (pilnik ręczny)
Imadło warsztatoweImadło warsztatowe
8

Build the tailstock

Build the tailstock (Figs. 4-6) of three pieces of hardwood 2 in thick and one 1 in thick, shaped as drawn, held together with four bolts 7-1/2 in long. Give it sliders and clamp it to the bed like the headstock, but with one bolt, and weld a handle to its nut for easy clamping. Drill a piece of tubing 2 in long for a 1/2 in dead centre and set it 1-1/2 in into the joint between the two upper pieces. Bore for a 1/2 in bolt to slide in the tube; chisel a recess behind the tube for a 1/2 in nut; turn a bolt 7 in long, threaded for 2 in, into nut and tube, and rivet a handle or wheel on its end. Make the centre of 1/2 in tool steel with a tapered point.

Materiały do tego kroku:

Deska z drewna liściastegoDeska z drewna liściastego2 sztuk
Śruba zamkowaŚruba zamkowa5 sztuk
Nakrętka sześciokątnaNakrętka sześciokątna2 sztuk
Rura stalowa konstrukcyjnaRura stalowa konstrukcyjna1 sztuka
Pręt ze stali narzędziowejPręt ze stali narzędziowej1 sztuka
Nity staloweNity stalowe1 sztuka

Potrzebne narzędzia:

Piła ręcznaPiła ręczna
DłutaDłuta
Świder korbowy z wiertłemŚwider korbowy z wiertłem
Wiertarka ręcznaWiertarka ręczna
Kuźnia węglowaKuźnia węglowa
KowadłoKowadło
Młotek kowalskiMłotek kowalski
Pilniki (pilnik ręczny)Pilniki (pilnik ręczny)
9

Make the tool rest

The tool rest (Figs. 7-9) has a slide 3/4 by 3 by 13 in with a slot 1/2 by 6 in. Bolt the rest base on the slide so it can be adjusted, and screw the rest to the base. Raise or lower it with wedges between slide and base, and clamp it to the bed like the tailstock.

Materiały do tego kroku:

Deska z drewna liściastegoDeska z drewna liściastego1 sztuka
Śruba zamkowaŚruba zamkowa1 sztuka
Nakrętka sześciokątnaNakrętka sześciokątna1 sztuka
Wkręty do drewnaWkręty do drewna1 sztuka

Potrzebne narzędzia:

Piła ręcznaPiła ręczna
DłutaDłuta
Świder korbowy z wiertłemŚwider korbowy z wiertłem
10

Troubleshooting

Wood lathe troubleshooting.

Flow

Loading...
11

History and honest limits

From "How to Make a Wood Lathe" by E. E. Hulgan, Marion, Ind., in **The Boy Mechanic, Book 2**, Popular Mechanics, 1915 (Project Gutenberg 44585; checked on the archive.org scan boymechanicbook200chic2, pp. 434-436). Part shapes come from his Figs. 1-9; he gives no pulley material and no countershaft or foot-drive details. The pulley material, tools and metric figures are ours.

Materiały

12

Wymagane narzędzia

15

Według tego planu powstaje

CC0 Domena publiczna

Ten plan jest udostępniany na licencji CC0. Możesz go swobodnie kopiować, modyfikować, rozpowszechniać i wykorzystywać do dowolnych celów, bez konieczności uzyskiwania zgody.

Wesprzyj Makera kupując produkty przez jego plan, za co zarabia Prowizja Makera ustalony przez sprzedawców, lub stwórz nową iterację tego planu i dołącz go jako połączenie w swoim własnym planie, aby dzielić się przychodami.

Dyskusja

(0)

Zaloguj się aby dołączyć do dyskusji

Ładowanie komentarzy...