Współpraca
SZTUKA
Piękno i dobre samopoczucie
RZEMIOSŁO
KULTURA I HISTORIA
ROZRYWKA
ŚRODOWISKO
JEDZENIE I NAPOJE
INŻYNIERIA ODWROTNA
NAUKI
LEKKOATLETYKA
TECHNOLOGIA
URZĄDZENIA DO NOSZENIA
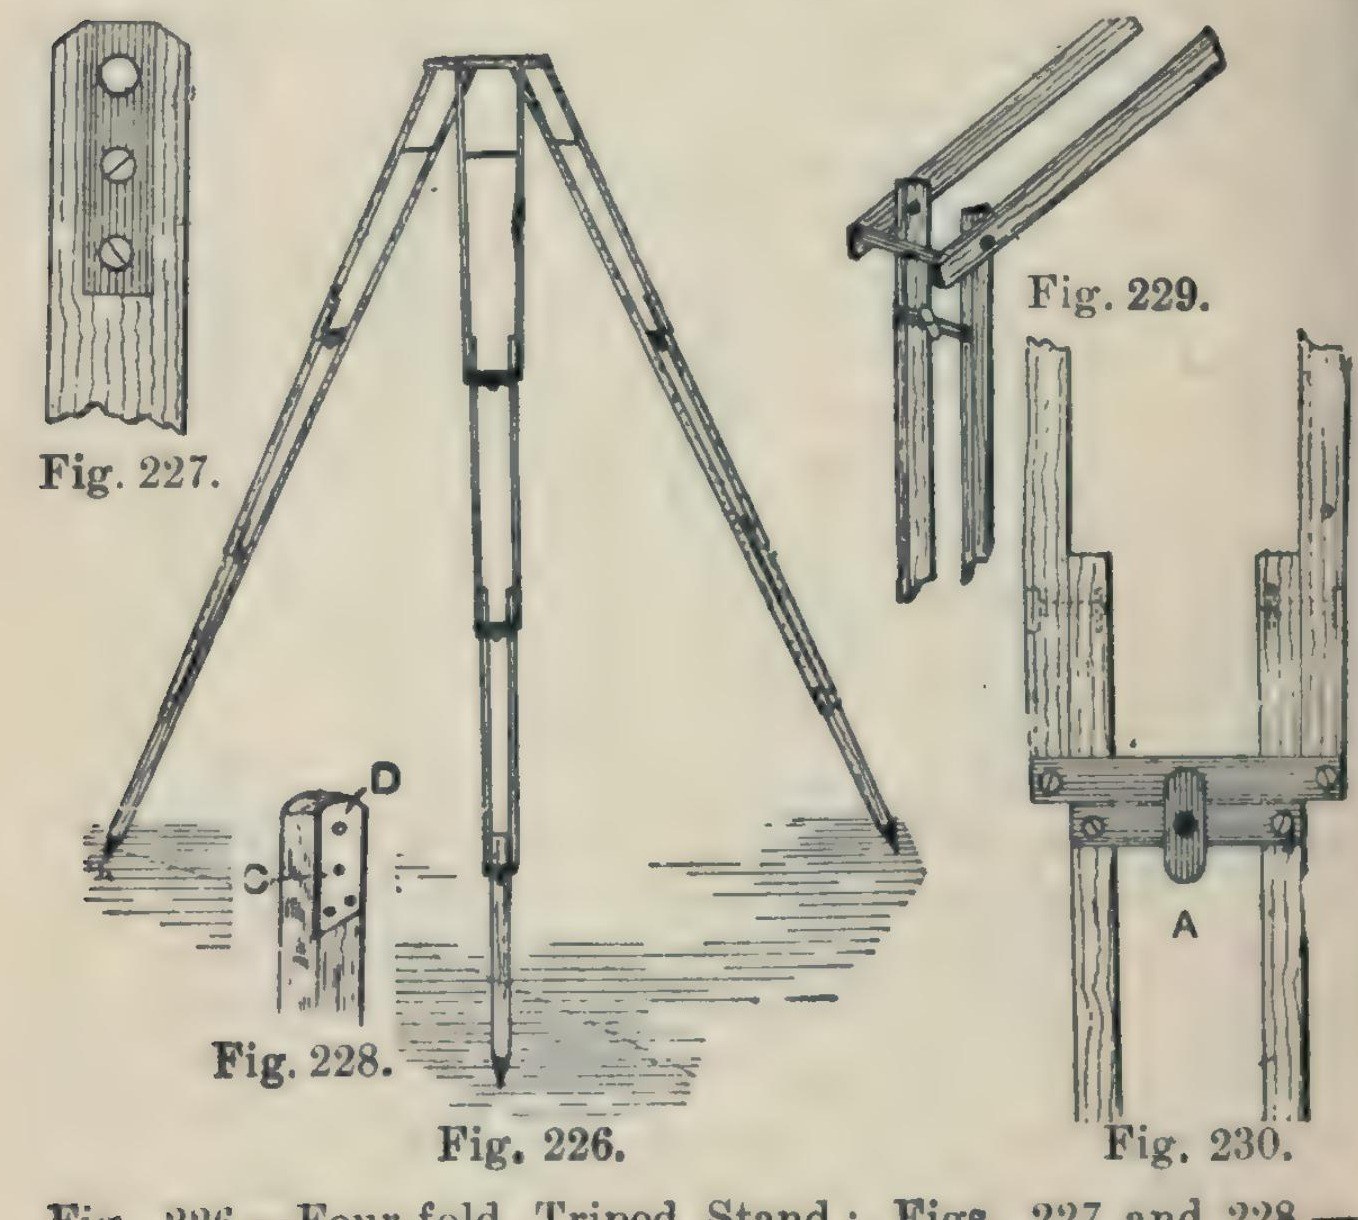


Camera Tripod: a Four-Fold Ash Tripod Stand (Hasluck, 1902)
A light, compact folding camera stand: three legs, each of seven ash laths riveted so it folds in four, locked open by brass buttons, on a triangular ash top with brass pins and a hole for the camera screw.
Hasluck says the same method makes stands that fold in three or two.
Source: Paul N. Hasluck, Photographic Cameras and Accessories (1902), pp. 153-157. Picture: Figs. 226-230 of the book.
Średniozaawansowany
Unknown
Instrukcje
1
1
Cut the ash laths
Cut the ash laths
Cut laths of good ash, true and square or the stand won't be rigid, and round the edges slightly: six 17 1/4 x 5/8 x 3/8 in, six 16 x 5/8 x 3/8 in, six 15 1/2 x 5/8 x 3/8 in, and three 14 x 5/8 x 5/8 in.
Materiały do tego kroku:
 Deska jesionowa1 21 laths
Potrzebne narzędzia:
 Piła grzbietnica
 Strug jednoręczny
2
2
Fit the top ends and stretcher
Fit the top ends and stretcher
On each 17 1/4 in lath let in flush a 1/16 in brass plate, 1 1/4 in long, with a 3/16 in hole 1/4 in from the top, held by two countersunk brass screws; bore the wood to match and take off the top corners. On one lath of each pair cut a groove inside, about 3/16 in deep and 3 1/2 in long, starting 2 in from the top, and hinge a 1/8 in brass rod stretcher in it on a pin. On the other lath cut a curved groove 1 1/2 in long, 3/16 in wide, with a small hole at the bottom where the rod catches.
Materiały do tego kroku:
 Blacha mosiężna1 1/16 in plates
 Wkręty do drewna1 small brass screws
 Pręt mosiężny1 1/8 in stretcher
Potrzebne narzędzia:
 Ramka do piły do metalu z brzeszczotami
 Pilnik do metalu
 Wiertarka ręczna
 Dłuta
 Wkrętak płaski
3
3
Bore and rivet the legs
Bore and rivet the legs
Bore the rivet holes: in the long laths 1 3/4 in from the lower end, counterbored so the copper rivet head sits flush, then 1/8 in through; in the 16 in and 15 1/2 in laths 1/2 in and 1 3/4 in from the ends; in each 14 in piece 1/2 in from one end, and taper its other end for a pointed iron shoe or a steel point and ferrule. Rivet the 21 laths into three legs with 1/8 in copper rivets and washers: a 16 in lath inside each 17 1/4 in one, a 15 1/2 in lath inside that, the 14 in foot between the last pair. Rivets flush, just tight enough to fold but not loose.
Materiały do tego kroku:
 Nity miedziane1 1/8 in, with washers
 Nieznany metal3 iron shoes or steel points
Potrzebne narzędzia:
 Świder korbowy z wiertłemWiertarka ręczna
 Młotek nitowniczy
4
4
Add cross strips and lock buttons
Add cross strips and lock buttons
Screw 1/16 in brass strips across the bottom ends of each pair of laths (Fig. 229). Under them screw strips carrying a small brass button riveted at the centre; turned, the button hooks over the strip above and locks the joint open (Fig. 230).
Materiały do tego kroku:
Blacha mosiężna1 cross strips, buttonsWkręty do drewna1 sztukaPotrzebne narzędzia:
Ramka do piły do metalu z brzeszczotamiPilnik do metaluWkrętak płaskiMłotek nitowniczy5
5
Make the top
Make the top
Plane ash to 1/2 in and draw an equilateral triangle with 8 1/2 in sides. Bisect the angles; 2 in from each corner draw a line at right angles, go 1/2 in in along the sides, and mark three rectangles 2 7/8 x 3/4 in; cut the outline (Fig. 231). Fix a 3/16 in brass rod, one end tapered, across each rectangle, bored 3/8 in from the outer edge and projecting about 1/2 in, for the legs to hang on. Bore a 1/4 in hole in the centre for the camera screw and glue felt on top.
Materiały do tego kroku:
Deska jesionowa1 topPręt mosiężny3 3/16 in pins Filc wełniany1 sztuka
 Klej zwierzęcy1 sztuka
Potrzebne narzędzia:
Strug jednoręcznyPiła grzbietnicaŚwider korbowy z wiertłemWiertarka ręczna6
6
Finish
Finish
Glasspaper and varnish the wood, and lacquer the brass.
Materiały do tego kroku:
 Politura szelakowa1 varnish
 Nieznany materiał1 brass lacquer
Potrzebne narzędzia:
 Papier ścierny
Materiały
10- 1 topZastępnik
- 1 cross strips, buttonsZastępnik
- 1 sztukaZastępnik
- 3 3/16 in pinsZastępnik
- 1 1/8 in, with washersZastępnik
- 3 iron shoes or steel pointsZastępnik
- 1 sztukaZastępnik
- 1 sztukaZastępnik
- 1 varnishZastępnik
- 1 brass lacquerZastępnik
Wymagane narzędzia
10- Zastępnik
- Zastępnik
- Zastępnik
- Zastępnik
- Zastępnik
- Zastępnik
- Zastępnik
- Zastępnik
- Zastępnik
Według tego planu powstaje

CC0 Domena publiczna
Ten plan jest udostępniany na licencji CC0. Możesz go swobodnie kopiować, modyfikować, rozpowszechniać i wykorzystywać do dowolnych celów, bez konieczności uzyskiwania zgody.
Wesprzyj Makera kupując produkty przez jego plan, za co zarabia Prowizja Makera ustalony przez sprzedawców, lub stwórz nową iterację tego planu i dołącz go jako połączenie w swoim własnym planie, aby dzielić się przychodami.