Współpraca
SZTUKA
Piękno i dobre samopoczucie
RZEMIOSŁO
KULTURA I HISTORIA
ROZRYWKA
ŚRODOWISKO
JEDZENIE I NAPOJE
INŻYNIERIA ODWROTNA
NAUKI
LEKKOATLETYKA
TECHNOLOGIA
URZĄDZENIA DO NOSZENIA
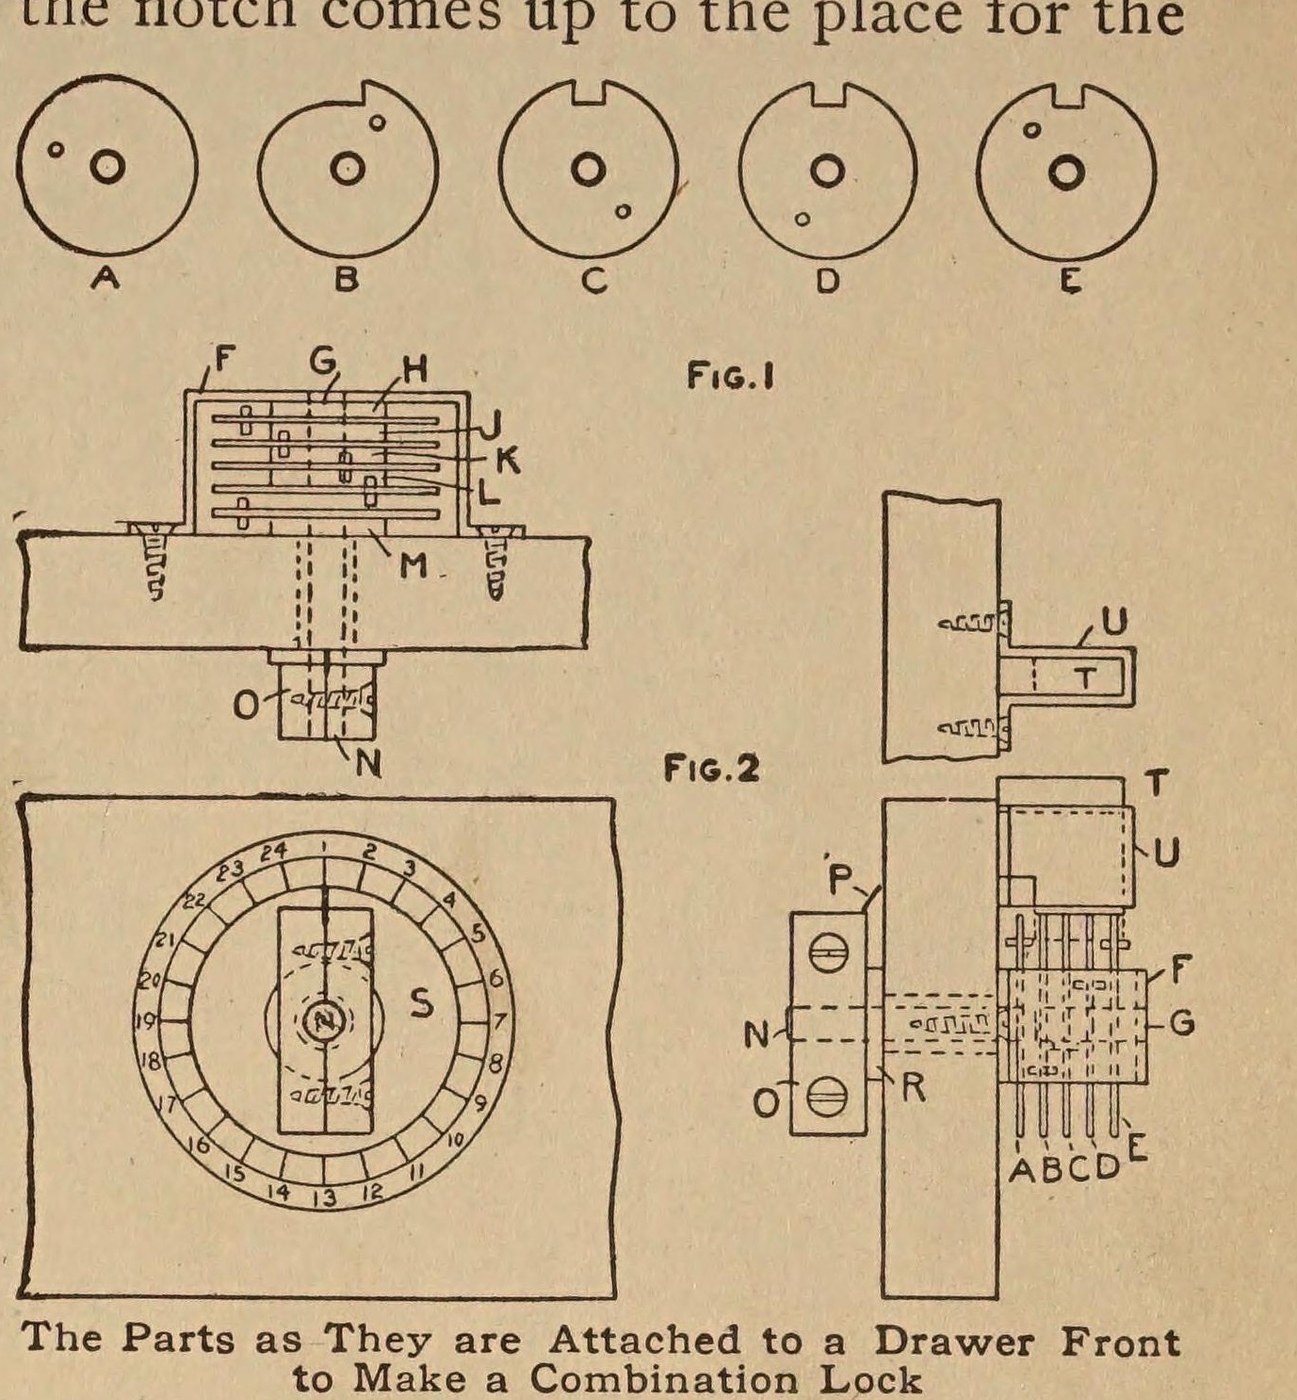


Combination Lock: a Five-Disc Drawer Lock (Boy Mechanic, 1915)
A keyless lock fitted inside a drawer front: five brass discs on a pin, turned by pins from a knob and dial outside. When the notches line up the latch drops; turning back raises it into its keeper.
The combination is changed by moving the pins in the discs.
Source: The Boy Mechanic, Book 2 (1915), p. 169. Picture: Figs. 1-2 of the book.
Średniozaawansowany
Unknown
Instrukcje
1
1
Cut the five discs
Cut the five discs
Cut five discs of sheet brass about 1/16 in thick and 1 1/2 in across. Drill each for a driving pin 15/32 in from the centre and press the pin in. Notch discs C, D and E for the latch; shape disc B as a cam to lift the latch into its keeper; leave disc A plain with only its pin (Fig. 1).
Materiały do tego kroku:
 Blacha mosiężna1 discs
 Nieznany metal1 driving pins
Potrzebne narzędzia:
 Cyrkiel traserski
 Nożyce do blachy
 Pilnik do metalu
 Wiertarka ręczna
 Młotek
2
2
Mount the discs
Mount the discs
Inside the drawer front fit a U-shaped metal bracket F carrying a 1/4 in pin G. Thread the discs on it with rubber washers H to M between them so they don't turn too freely. Fix disc A tight on the end of a 1/4 in rod N that passes out through the front.
Materiały do tego kroku:
 Blacha stalowa1 U-bracket F
 Pręt ze stali niskowęglowej1 pin G, rod N
 Nieznany materiał5 rubber washers
Potrzebne narzędzia:
Wiertarka ręczna Świder korbowy z wiertłemNożyce do blachy
3
3
Fit knob, dial and latch
Fit knob, dial and latch
Make the knob of two pieces of wood screwed together with a pointer between them, fit it on rod N with a washer against the drawer. Paste on a paper dial with division marks and numbers. Fit the latch T in a U-shaped metal piece U inside the drawer end so its heel rests on the disc edges, with its keeper above. To find the combination, open the drawer and turn the knob until each notch comes under the latch heel, noting the number under the pointer each time.
Materiały do tego kroku:
 Klocek z drewna twardego2 knobNieznany metal1 pointer, latch, keeper
 Podkładka płaska1 sztuka
 Papier1 dialBlacha stalowa1 U-piece
 Wkręty do drewna1 sztuka
Potrzebne narzędzia:
 Wkrętak płaskiNożyce do blachy
Materiały
9- 1 discsZastępnik
- 1 pointer, latch, keeperZastępnik
- 1 U-pieceZastępnik
- 1 pin G, rod NZastępnik
- 5 rubber washersZastępnik
- 2 knobZastępnik
- 1 sztukaZastępnik
- 1 dialZastępnik
- 1 sztukaZastępnik
Wymagane narzędzia
7- Zastępnik
- Zastępnik
- Zastępnik
- Zastępnik
- Zastępnik
- Zastępnik
- Zastępnik
Według tego planu powstaje

CC0 Domena publiczna
Ten plan jest udostępniany na licencji CC0. Możesz go swobodnie kopiować, modyfikować, rozpowszechniać i wykorzystywać do dowolnych celów, bez konieczności uzyskiwania zgody.
Wesprzyj Makera kupując produkty przez jego plan, za co zarabia Prowizja Makera ustalony przez sprzedawców, lub stwórz nową iterację tego planu i dołącz go jako połączenie w swoim własnym planie, aby dzielić się przychodami.