SZTUKA
Piękno i dobre samopoczucie
RZEMIOSŁO
KULTURA I HISTORIA
ROZRYWKA
ŚRODOWISKO
JEDZENIE I NAPOJE
INŻYNIERIA ODWROTNA
NAUKI
LEKKOATLETYKA
TECHNOLOGIA
URZĄDZENIA DO NOSZENIA
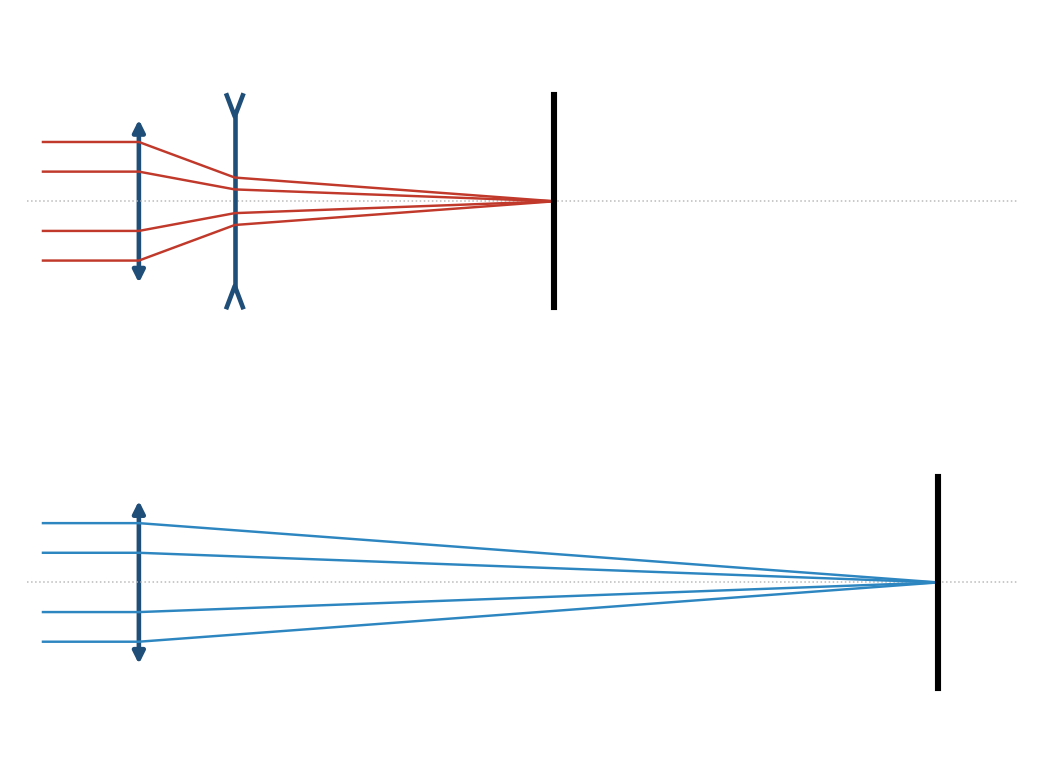
Youblob · CC0


Telephoto Lens
To photograph a distant subject large, you need a long focal length - and a long lens means a long camera. In 1891 Thomas Rudolphus Dallmeyer in London, and Adolf Miethe in Germany, independently put a negative lens behind a positive one. The pair acts like a single lens of much longer focal length, yet it is physically shorter than that focal length. That is what 'telephoto' means, and nearly every long camera lens since uses it.
**No patent number is cited here**: Dallmeyer patented it in Britain, and no US patent for his design was verified, so none is claimed.
**You build one on an optical bench**, measure its focal length from the size of a distant image, and let a ray-trace notebook redesign it.
Początkujący
90 minutes
Instrukcje
1
1
Know your lenses
Know your lenses
Focus a distant window onto paper with each convex lens; the lens-to-paper distance is its focal length. Pick one about 100 mm. Take a concave lens about half that (its label gives it; it will not focus alone).
Materiały do tego kroku:
 Zestaw soczewek skupiających1 zestaw
 Soczewka wklęsła1 sztuka
Potrzebne narzędzia:
 Linijka stalowa
2
2
Set up the bench
Set up the bench
Mount the convex lens in a holder at one end of the bench, pointing out of a window at something far away. Tape tracing paper to a holder as the screen.
Materiały do tego kroku:
 Rolka kalki krawieckiej1 arkusz
 Taśma malarska1 rolka
Potrzebne narzędzia:
 Ława i szyna optyczna
 Zestaw uchwytów na soczewki
3
3
Image with one lens
Image with one lens
Slide the screen until the far scene is sharp. Measure the height of one chosen feature on the screen - a window, a chimney.
Potrzebne narzędzia:
Linijka stalowa4
4
Add the negative lens
Add the negative lens
Put the concave lens 60 mm behind the convex one. The image is now far behind; move the screen back until it is sharp again and measure the same feature. Try 55 and 65 mm spacing too.
Potrzebne narzędzia:
 Miara zwijana
5
5
Design it on paper
Design it on paper
Wczytywanie notatnika Jupyter…
6
6
History & Context
History & Context
**What the 1891 designs did:** a positive front group and a negative rear group, spaced so the system focal length exceeds its length. **Modern build (derived):** two stock lenses on a bench.
Early telephoto attachments screwed behind ordinary lenses; modern long lenses build the idea in. Its limits: spacing is critical, the negative group adds distortion (pincushion), and the image is dimmer at the same aperture diameter because the focal length grew.
Materiały
4- 1 zestawZastępnik
- 1 sztukaZastępnik
- 1 arkuszZastępnik
- 1 rolkaZastępnik
Wymagane narzędzia
4- Zastępnik
- Ława i szyna optyczna10% prowizjiZastępnik
- Zestaw uchwytów na soczewki10% prowizjiZastępnik
- 1 vendor sell this, none ship to you yetZastępnik
Powiązane blueprinty
Te blueprinty dzielą się wiedzą — technikami, materiałami lub zasadami
CC0 Domena publiczna
Ten plan jest udostępniany na licencji CC0. Możesz go swobodnie kopiować, modyfikować, rozpowszechniać i wykorzystywać do dowolnych celów, bez konieczności uzyskiwania zgody.
Wesprzyj Makera kupując produkty przez jego plan, za co zarabia Prowizja Makera ustalony przez sprzedawców, lub stwórz nową iterację tego planu i dołącz go jako połączenie w swoim własnym planie, aby dzielić się przychodami.