Współpraca
SZTUKA
Piękno i dobre samopoczucie
RZEMIOSŁO
KULTURA I HISTORIA
ROZRYWKA
ŚRODOWISKO
JEDZENIE I NAPOJE
INŻYNIERIA ODWROTNA
NAUKI
LEKKOATLETYKA
TECHNOLOGIA
URZĄDZENIA DO NOSZENIA
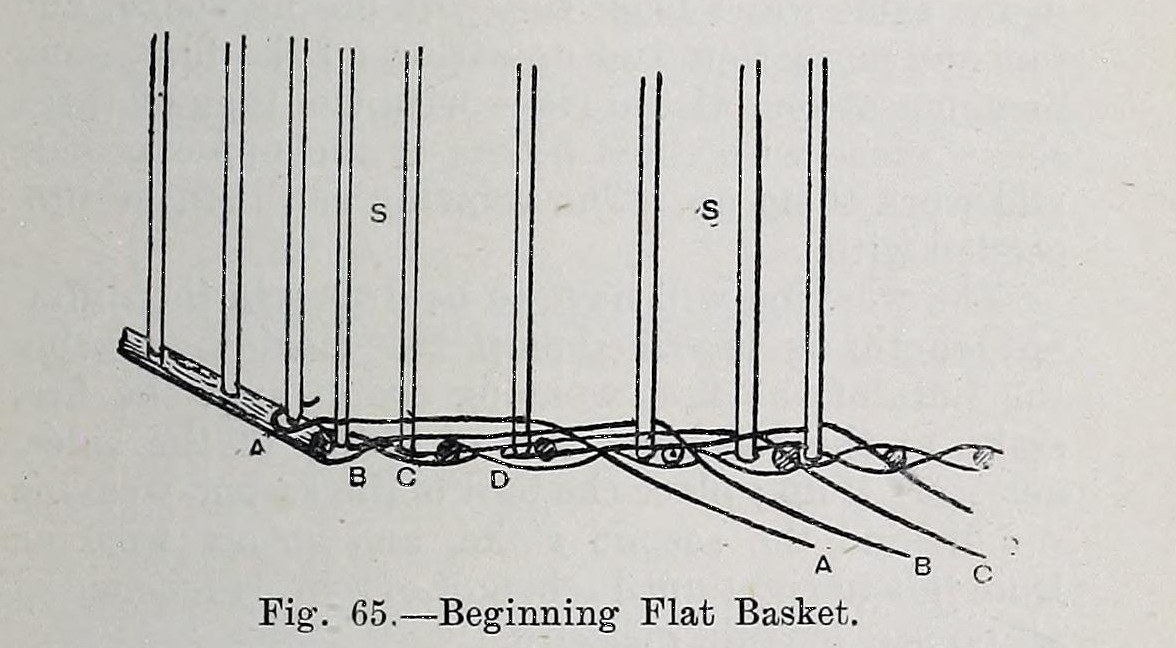


Flat Harvesting Basket: the Willow 3-Peck Fruit Flat (Hasluck, 1903)
The basket-maker's 'flat' for the fruit season: an oblong willow basket with a woven stick bottom about 19 1/2 in wide, straight sides 8 in high, a rope handle at each end and its own flat lid on a bent bow.
Rough brown osiers do for the bottom; eight white ones start the sides.
Source: Paul N. Hasluck, Basket Work of All Kinds (1903), pp. 64-69. Picture: Fig. 65 of the book.
Zaawansowany
Unknown
Instrukcje
1
1
Soak the osiers and weave the bottom
Soak the osiers and weave the bottom
Soak the osiers until pliable. Cut eight sticks about 17 in long; set the two thickest in the screw-block 19 1/2 in apart outside, the rest between, and weave the bottom with the roughest osiers as for Hasluck's square basket. Take it out and trim it with the picking knife.
Materiały do tego kroku:
 Grubsze witki wierzbowe8 17 in
 Witka wierzbowa1 weavers
Potrzebne narzędzia:
 Woda
 Sekator jednoręczny
 Płaska deska drewniana
2
2
Stake up
Stake up
Drive nine stakes into the weaving beside the sticks along each side, and seven through the sticks at each end after opening holes with the bodkin, the eight thickest at the corners. Prick them up and gather them in a hoop.
Materiały do tego kroku:
 Kołki wierzbowe32 9 per side, 7 per end
Potrzebne narzędzia:
 PrzewlekaczSekator jednoręczny
3
3
Upset the sides
Upset the sides
Point eight white osiers. With no foot rim, start by driving four in beside the first stakes at the left of one 19 1/2 in side. Sitting high with the work between your knees, upset with four rods pulled tight into the bend of each stake, each in front of three stakes, behind the fourth and out (Fig. 65). Start the other four at the opposite corner, finish the tops round the corners, then add one more round with three rods.
Materiały do tego kroku:
Witka wierzbowa8 white, upsettingPotrzebne narzędzia:
Sekator jednoręcznyPrzewlekacz Młotek
4
4
Weave and add handles
Weave and add handles
Weave with rods in their lengths, each butt behind the next stake, left to right, until the sides are 8 in high all round outside. For each end handle push a stiff rod down beside the third stake, twist it rope-like, push its top through about 1 1/2 in below the top by the fifth stake, leave a bow, and twist it over the bow three times (Fig. 66).
Materiały do tego kroku:
Witka wierzbowa1 weavingWitka wierzbowa2 handlesPotrzebne narzędzia:
MłotekPrzewlekacz5
5
Pair off and border
Pair off and border
Pair off a round with two rods from the back. Make the border by laying down stakes and working them round the corners (Fig. 67), finish by cramming, and trim inside and out.
Materiały do tego kroku:
Witka wierzbowa2 pairingPotrzebne narzędzia:
 NożyceSekator jednoręczny
6
6
Make the lid
Make the lid
Notch a bow stick at the corners, bend it to the basket's shape and tie a strainer across to hold the width. Bind in two thick split sticks a little longer than the flat, flat side inward, on four scallom rods lapped round the bow (Figs. 68-69), and weave the lid between them.
Materiały do tego kroku:
Grubsze witki wierzbowe3 bow, two lid sticksWitka wierzbowa1 scalloms, weaversPotrzebne narzędzia:
Sekator jednoręcznyMłotekMateriały
3- 3 bow, two lid sticksZastępnik
- 1 scalloms, weaversZastępnik
- 32 9 per side, 7 per endZastępnik
Materiały z połączonych planów

Według tego planu powstaje

CC0 Domena publiczna
Ten plan jest udostępniany na licencji CC0. Możesz go swobodnie kopiować, modyfikować, rozpowszechniać i wykorzystywać do dowolnych celów, bez konieczności uzyskiwania zgody.
Wesprzyj Makera kupując produkty przez jego plan, za co zarabia Prowizja Makera ustalony przez sprzedawców, lub stwórz nową iterację tego planu i dołącz go jako połączenie w swoim własnym planie, aby dzielić się przychodami.