SZTUKA
Piękno i dobre samopoczucie
RZEMIOSŁO
KULTURA I HISTORIA
ROZRYWKA
ŚRODOWISKO
JEDZENIE I NAPOJE
INŻYNIERIA ODWROTNA
NAUKI
LEKKOATLETYKA
TECHNOLOGIA
URZĄDZENIA DO NOSZENIA
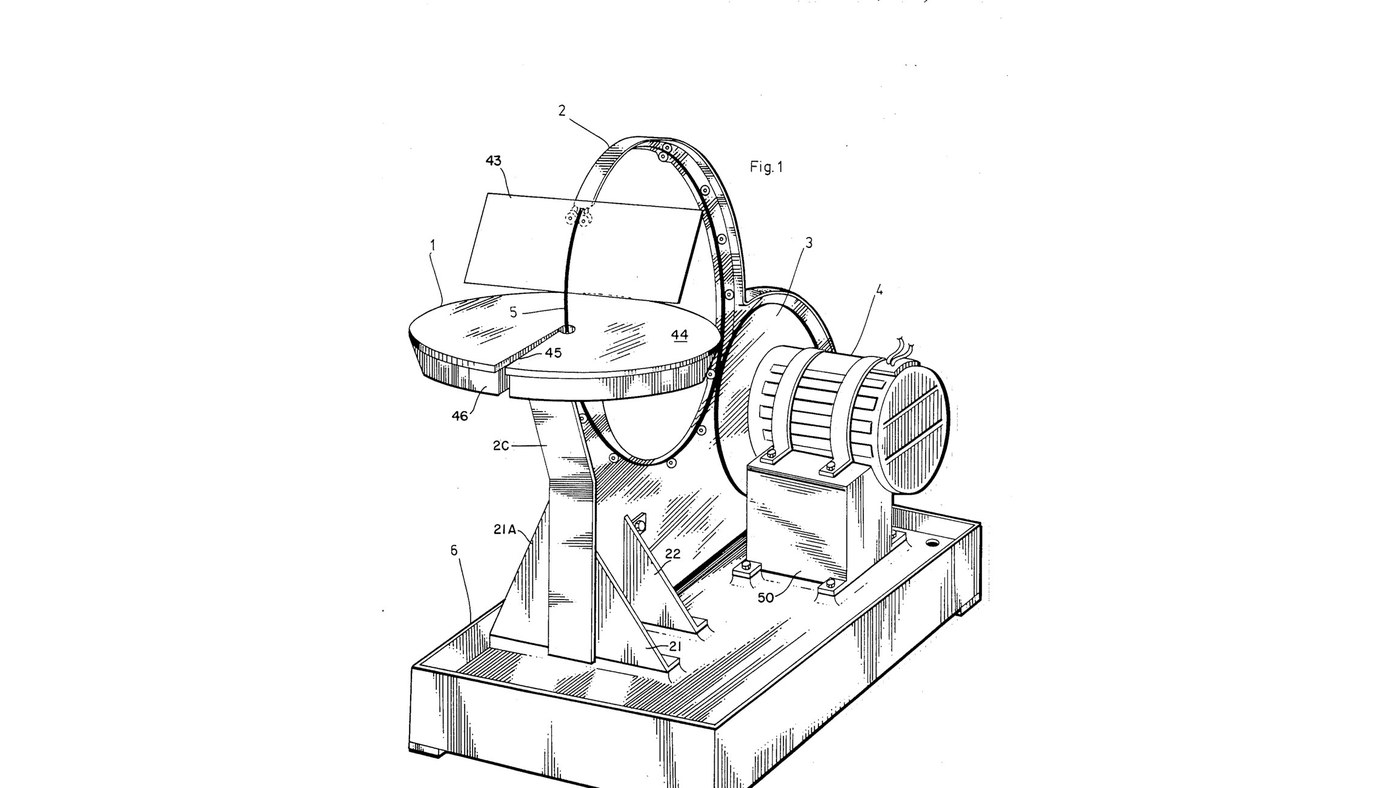


Glass Saw: Rigid Diamond Wire Ring Driven by Its Rim
Jesse Cogswell's ring saw (US 4,576,139, 1986) for glass, ceramics and stone. The blade is a rigid circle of wire coated with bonded diamond, standing upright through a cutting table. A rubber-tyred wheel on the motor drives it by friction round its own rim at 3000 ft/min or more, and twelve guide wheels on slots round an aluminium back-plate hold it true. Because it cuts with any part of its rim, the work can be turned freely for curves and inside shapes; a sponge in a water tray wets the wire.
The patent sizes the ring from the thickest work to be cut (8 in ring for 3/16 in); the notebook does the sums. The picture: the patent's Fig. 1.
Zaawansowany
3 days
Instrukcje
1
1
Cut and brace the back-plate
Cut and brace the back-plate
Cut the back-plate (2A) from aluminium plate, its upper part curved as an arc to shield the saw, stiffened by an angle (2B) along the top and a flat splatter strip (2C) at the front. Bolt on two front struts (21, 21A) and two side struts (22) and bolt them to the base. Ours: drill press.
Materiały do tego kroku:
 Płyta aluminiowa1 sztuka
 Kątownik aluminiowy1 sztuka
 Śruba z łbem sześciokątnym - klasa 8.81 sztuka
Potrzebne narzędzia:
 Wiertarka stołowa
 Klucz nastawny
2
2
Cut the wheel-slider apertures
Cut the wheel-slider apertures
Cut slots (32) through the back-plate's arc at 0, 30, 60, 90, 120, 210, 240, 270, 300 and 330° round the ring's centre: two slots at 90° and 210° for the guide pairs, one at each of the others. The slots let each guide wheel slide to the ring.
Potrzebne narzędzia:
Wiertarka stołowa3
3
Assemble the guide wheels
Assemble the guide wheels
For each of the twelve guide wheels, stretch two rubber O-rings (27) into the grooves of a bearing wheel (26) with sealed roller bearings, and mount it on a shoulder bolt (28) with a washer, lockwasher and nut.
Materiały do tego kroku:
 Rolka prowadząca12 sztuk
 O-ring24 sztuk
 Śruba pasowana z podbiciem12 sztuk
 Podkładka płaska12 sztuk
 Spring Washer12 sztuk
 Nakrętka sześciokątna12 sztuk
Potrzebne narzędzia:
Klucz nastawny4
4
Turn the drive wheel
Turn the drive wheel
Turn an aluminium disk with a hub, a bored axle hole and a deep groove round its rim, and seat a large rubber O-ring (23) in the groove as its driving tyre. Ours: lathe.
Materiały do tego kroku:
Płyta aluminiowa1 sztukaO-ring1 sztukaPotrzebne narzędzia:
 Tokarka do metalu
5
5
Mount the motor and drive axle
Mount the motor and drive axle
Strap the electric motor (51) onto its pillow block (50) with fastening bands (52) and bolt the block to the base. Fix the drive wheel on the motor's axle (24) and carry the axle's end in an axle pillow block (24A, 24B).
Materiały do tego kroku:
 Silnik elektryczny1 sztuka
 Opaska mocująca silnik2 sztuk
 Oprawa łożyska2 sztuk
 Wał stalowy1 sztukaŚruba z łbem sześciokątnym - klasa 8.81 sztuka
Potrzebne narzędzia:
Klucz nastawny6
6
Fit the ring and its guides
Fit the ring and its guides
Stand the ring saw on the drive wheel's tyre. Bolt the guide wheels through their slots: each pair with a tension spring between its two wheels, each single with a spring to the back-plate's lower rim, the one at 330° pressing the ring onto the drive wheel. Set them against the ring, then tighten the nuts. Fit two horizontal roller-guides (17) at 150°, sprung together, just before the cut.
Materiały do tego kroku:
 Diamentowa piła pierścieniowa1 sztuka
 Sprężyna naciągowa11 sztukRolka prowadząca2 sztuk
Potrzebne narzędzia:
Klucz nastawny7
7
Fit the table, tray and sponge
Fit the table, tray and sponge
Bolt the water tray (46) on four bracket supports (19, 20) by its four studs; put a ring-shaped sponge (47) in it and the cutting table (44) over it, the ring passing through centre holes reached by slots offset half an inch from a radius. Set the table top below the ring's centre line by the thickest work you will cut. Add water to the tray.
Materiały do tego kroku:
 Taca1 sztuka
 Gąbka1 sztukaPłyta aluminiowa1 sztuka
 Woda1 batch
Potrzebne narzędzia:
Klucz nastawny8
8
Fit the face shield and drip pan
Fit the face shield and drip pan
Bolt the shield arm (41) to the back-plate and pivot a clear acrylic face shield (43) in its holder (42) on a locking screw. The base is a catchment for the coolant with a drain hole in one corner.
Materiały do tego kroku:
 Płyta akrylowa1 sztukaPłyta aluminiowa1 sztuka
 Wanna ociekowa1 sztuka
Potrzebne narzędzia:
Klucz nastawny9
9
Ring size and drive speed
Ring size and drive speed
Wczytywanie notatnika Jupyter…
Materiały
20- 1 sztukaZastępnik
- 1 sztukaZastępnik
- Zastępnik
- 12 sztukZastępnik
- 25 sztukZastępnik
- 12 sztukZastępnik
- 12 sztukZastępnik
- 12 sztukZastępnik
- 12 sztukZastępnik
- 1 sztukaZastępnik
- 2 sztukZastępnik
- 2 sztukZastępnik
- 1 sztukaZastępnik
- 1 sztukaZastępnik
- 11 sztukZastępnik
- 1 sztukaZastępnik
- 1 sztukaZastępnik
- 1 batchZastępnik
- 1 sztukaZastępnik
- 1 sztukaZastępnik
Według tego planu powstaje

CC0 Domena publiczna
Ten plan jest udostępniany na licencji CC0. Możesz go swobodnie kopiować, modyfikować, rozpowszechniać i wykorzystywać do dowolnych celów, bez konieczności uzyskiwania zgody.
Wesprzyj Makera kupując produkty przez jego plan, za co zarabia Prowizja Makera ustalony przez sprzedawców, lub stwórz nową iterację tego planu i dołącz go jako połączenie w swoim własnym planie, aby dzielić się przychodami.