
Współpraca
SZTUKA
Piękno i dobre samopoczucie
RZEMIOSŁO
KULTURA I HISTORIA
ROZRYWKA
ŚRODOWISKO
JEDZENIE I NAPOJE
INŻYNIERIA ODWROTNA
NAUKI
LEKKOATLETYKA
TECHNOLOGIA
URZĄDZENIA DO NOSZENIA
Twin-Saw Table: A Rip Saw and a Crosscut Saw at Opposite Corners, One Motor, Each Depth Set by Tilting the Top (Gottschalk, 1926)
Forge

Autor

Forge

13. listopad 2026NO
8
0
0
0
0

Twin-Saw Table: A Rip Saw and a Crosscut Saw at Opposite Corners, One Motor, Each Depth Set by Tilting the Top (Gottschalk, 1926)

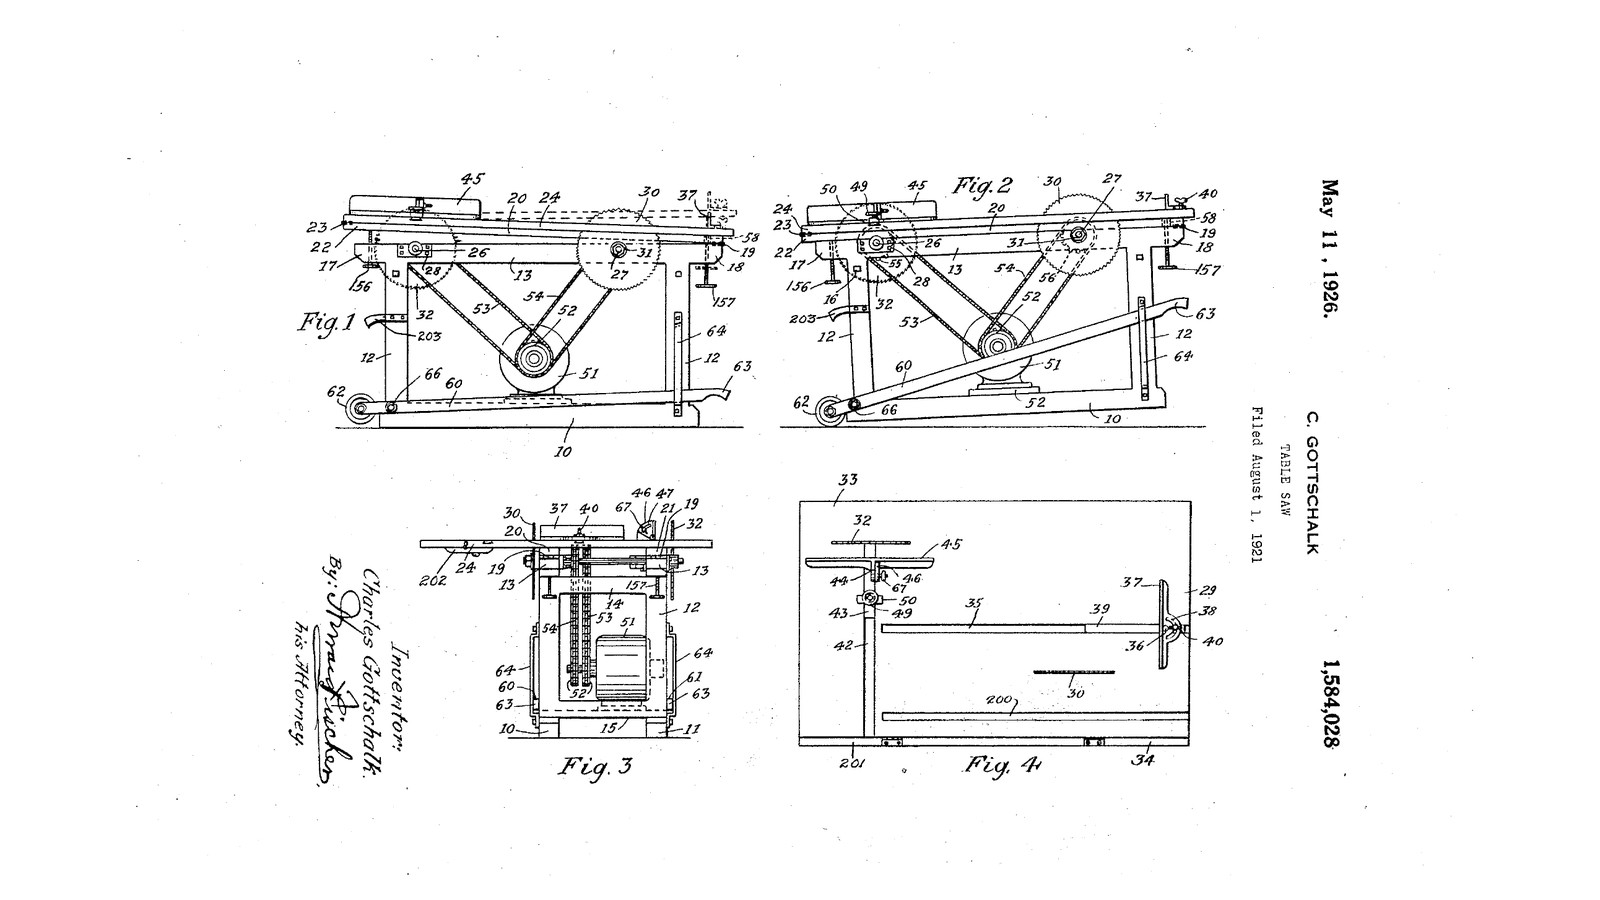
Charles Gottschalk of St. Paul, Minnesota, received US 1,584,028, dated 11 May 1926, for a table saw with two saws. A crosscut saw and a rip saw stand at opposite corners of one table, so either or both can be used without changing blades. An electric motor inside the frame drives both through two chains. The top is hinged twice and lifted by a hand screw at either end, which sets each saw's depth of cut on its own. A lever with wheels lets two people truck the whole machine about. The patent gives no sizes; every size here is ours.
Zaawansowany
About 1 week

Instrukcje

1

Setting each saw's depth

Wczytywanie notatnika Jupyter…
2

Read US 1,584,028

"Inasmuch as the saws are positioned fairly close to the hinges 19 and 23 the movement of the table for one of the saws does not appreciably affect the positioning of the same in regard to the other saw so that the depth of cut of either of the two saws may be adjusted independently or simultaneously if desired."
3

Frame on skids

From 45 x 95 mm pine: two skids 10, 11 1200 mm long; four uprights 12 775 mm long; two top rails 13 1300 mm long, their ends 50 mm past the uprights (17 at the rear, 18 at the front); cross rails 14, 15 between the uprights; a motor bed 52 across the skids. Glue and bolt the joints with carriage bolts, square and level, so the rails' tops stand 820 mm above the floor and 600 mm apart.

Materiały do tego kroku:

Tarcica sosnowaTarcica sosnowa10 sztuk
Śruba zamkowaŚruba zamkowa24 sztuk
Podkładka płaskaPodkładka płaska24 sztuk
Nakrętka sześciokątnaNakrętka sześciokątna24 sztuk
Klej do drewnaKlej do drewna1 sztuka

Potrzebne narzędzia:

WyrzynarkaWyrzynarka
Wiertarko-wkrętarka akumulatorowaWiertarko-wkrętarka akumulatorowa
Zestaw wiertełZestaw wierteł
Zestaw wierteł łopatkowychZestaw wierteł łopatkowych
Klucz nastawnyKlucz nastawny
Ścisk stolarski listwowyŚcisk stolarski listwowy
Kątownik nastawnyKątownik nastawny
Miara zwijanaMiara zwijana
4

Turn the two arbors

From 30 mm steel bar turn two arbors 26, 27, each 400 mm long. On one end of each turn a collar 40 mm across and 6 mm thick 30 mm from the end, and screw-cut the last 25 mm M20 on the lathe; turn a loose flange 60 mm across with a 20 mm bore for each. Drill and tap the sprockets' hubs for set screws if they have none.

Materiały do tego kroku:

Pręt okrągły ze stali niskowęglowejPręt okrągły ze stali niskowęglowej2 sztuk
Nakrętka sześciokątnaNakrętka sześciokątna4 sztuk

Potrzebne narzędzia:

Tokarka do metaluTokarka do metalu
Uchwyt tokarski 3-szczękowyUchwyt tokarski 3-szczękowy
Nóż tokarskiNóż tokarski
Suwmiarka cyfrowa 6 caliSuwmiarka cyfrowa 6 cali
Piła do metaluPiła do metalu
Wiertarka stołowaWiertarka stołowa
Zestaw wiertełZestaw wierteł
Zestaw do gwintowaniaZestaw do gwintowania
Pokrętło do gwintownikówPokrętło do gwintowników
Okulary ochronneOkulary ochronne
5

Mount the arbors and the saws

Bolt two 30 mm flange bearings 28 to the outsides of the rails for each arbor, its centre 30 mm below the rails' tops: the crosscut saw's arbor 27 250 mm from the front ends, the rip saw's arbor 26 250 mm from the rear ends. Push the arbors through so the crosscut saw's threaded end stands out past the left rail and the rip saw's past the right one, seen from the front. Fix a 17-tooth #40 sprocket on each arbor between the rails. Put each 250 mm blade on its collar, the teeth at the top pointing to the front, then the loose flange, a nut and a second nut locked against it.

Materiały do tego kroku:

Łożysko kołnierzoweŁożysko kołnierzowe4 sztuk
Zębatka łańcuchowaZębatka łańcuchowa2 sztuk
Circular Saw Blade SetCircular Saw Blade Set1 sztuka
Zestaw śrub sześciokątnychZestaw śrub sześciokątnych16 sztuk
Wkręt dociskowy z końcówką wklęsłąWkręt dociskowy z końcówką wklęsłą4 sztuk

Potrzebne narzędzia:

Klucz nastawnyKlucz nastawny

Zestaw kluczy imbusowychZestaw kluczy imbusowych
Wiertarko-wkrętarka akumulatorowaWiertarko-wkrętarka akumulatorowa
Zestaw wiertełZestaw wierteł
6

Motor and chains

Bolt the motor 51 to its bed between the skids under the arbors, its shaft parallel to them, and fit two 17-tooth sprockets 52 on its shaft, each in line with one arbor's sprocket. Fit a #40 chain 53, 54 from each to its arbor, tensioned by sliding the motor in slotted bolt holes. Have the motor wired to a switch within reach at the front. Oil the chains.

Materiały do tego kroku:

Silnik elektrycznySilnik elektryczny1 sztuka
Zębatka łańcuchowaZębatka łańcuchowa2 sztuk
Łańcuch rolkowyŁańcuch rolkowy2 sztuk
Wyłącznik zasilaniaWyłącznik zasilania1 sztuka
Olej maszynowyOlej maszynowy1 sztuka

Potrzebne narzędzia:

Klucz nastawnyKlucz nastawny
Zestaw kluczy imbusowychZestaw kluczy imbusowych
7

The hinged members and the top

Cut two hardwood members 20, 21 20 x 70 mm, 1340 mm long, to lie flat on the rails; hinge their front ends to the rails' front ends 19 and let them reach 40 mm past the rear 22. Cut the 18 mm plywood top 24 1400 x 800, with a slot over each blade, and hinge its rear edge to the members' rear ends 23. Rout a square groove 35 for the crosscut guide parallel to the crosscut saw and a second groove 200 on its other side, and a groove 42 across the top for the rip guide's bar.

Materiały do tego kroku:

Deska z drewna liściastegoDeska z drewna liściastego2 sztuk
Płyta sklejkowaPłyta sklejkowa1 sztuka
Zawias czopowyZawias czopowy4 sztuk
Wkręty do drewnaWkręty do drewna40 sztuk

Potrzebne narzędzia:

WyrzynarkaWyrzynarka
Frezarka górnowrzecionowaFrezarka górnowrzecionowa
Zestaw frezów do frezarkiZestaw frezów do frezarki
Wiertarko-wkrętarka akumulatorowaWiertarko-wkrętarka akumulatorowa
Zestaw wiertełZestaw wierteł
Ścisk stolarski listwowyŚcisk stolarski listwowy
Kątownik nastawnyKątownik nastawny
Miara zwijanaMiara zwijana
8

The depth screws

Screw a 6 mm steel plate under each rail's projecting end, drilled and tapped M12. Run a 150 mm M12 threaded rod up through each, with a wing nut locked on its lower end as a handle. The rear pair 156 push up under the members' rear ends 22, lifting members and top on the front hinges 19: this sets the rip saw. The front pair 157 pass through holes 58 in the members and push the top alone up on its rear hinges 23: this sets the crosscut saw.

Materiały do tego kroku:

Płaskownik ze stali miękkiejPłaskownik ze stali miękkiej1 sztuka
Pręt gwintowanyPręt gwintowany4 sztuk
Nakrętka skrzydełkowaNakrętka skrzydełkowa4 sztuk
Nakrętka sześciokątnaNakrętka sześciokątna4 sztuk
Wkręty do drewnaWkręty do drewna16 sztuk

Potrzebne narzędzia:

Piła do metaluPiła do metalu
Wiertarka stołowaWiertarka stołowa
Zestaw wiertełZestaw wierteł
Zestaw do gwintowaniaZestaw do gwintowania
Pokrętło do gwintownikówPokrętło do gwintowników
Klucz nastawnyKlucz nastawny
9

The guides

Crosscut guide: a hardwood bar 39 sliding in groove 35, with an angle fence 37 pivoted on it at 36 and clamped at any angle by a wing nut 40 through an arc slot 38. Rip guide: a bar 43 sliding in groove 42, held by a hand screw 49 through a plate 50, carrying a fence 45 hinged on a bracket 44 and tilted by a wing nut 67 in an arc slot 47.

Materiały do tego kroku:

Deska z drewna liściastegoDeska z drewna liściastego1 sztuka
Śruba zamkowaŚruba zamkowa4 sztuk
Nakrętka skrzydełkowaNakrętka skrzydełkowa3 sztuk
Płaskownik ze stali miękkiejPłaskownik ze stali miękkiej1 sztuka

Potrzebne narzędzia:

WyrzynarkaWyrzynarka
Wiertarko-wkrętarka akumulatorowaWiertarko-wkrętarka akumulatorowa
Zestaw wiertełZestaw wierteł
Kątownik nastawnyKątownik nastawny
10

The truck

Pivot two hardwood arms 60, 61 to the rear ends of the skids at 66, with a wheel 62 on the end of each beyond the pivot. Their front ends 63 are handles sliding in keepers 64 on the front uprights. With the handles down, the wheels are off the floor; lift the handles and the wheels take the weight so the saw can be wheeled away.

Materiały do tego kroku:

Deska z drewna liściastegoDeska z drewna liściastego2 sztuk
Zestaw kół gumowychZestaw kół gumowych1 sztuka
Zestaw śrub sześciokątnychZestaw śrub sześciokątnych4 sztuk
Wkręty do drewnaWkręty do drewna8 sztuk

Potrzebne narzędzia:

WyrzynarkaWyrzynarka
Wiertarko-wkrętarka akumulatorowaWiertarko-wkrętarka akumulatorowa
Zestaw wiertełZestaw wierteł
Klucz nastawnyKlucz nastawny
11

Try it

Wind both screw pairs down and check each blade stands square to the top and parallel to its groove. Set the rip saw's depth with the rear screws and the crosscut's with the front screws, each about 10 mm above the wood. Wearing glasses and ear defenders, rip a board along the rip guide, then cut the end off another against the crosscut guide.

Potrzebne narzędzia:

Kątownik nastawnyKątownik nastawny
Miara zwijanaMiara zwijana
Okulary ochronneOkulary ochronne
Ochronniki słuchu (nauszniki, SNR 30 dB)Ochronniki słuchu (nauszniki, SNR 30 dB)
12

Troubleshooting

Twin-saw table troubleshooting.

Flow

Loading...
13

History and honest limits

**Charles Gottschalk** of St. Paul, Minnesota, US 1,584,028, dated 11 May 1926, filed 1 August 1921. He claimed a frame with two rails, longitudinal members hinged to the rails at one end, a single top hinged to them at the other, a crosscut saw at one end and a rip saw at the other through the top, and means to oscillate the members and top together, and the top alone, "so as to vary the relative depth of cut of either of said saws". He says a gasoline engine may drive it instead of the motor. His grooves are dovetailed; ours are square. He gives no sizes, speeds or sprocket sizes; all of those are ours.

Materiały

23

Wymagane narzędzia

21

Według tego planu powstaje

CC0 Domena publiczna

Ten plan jest udostępniany na licencji CC0. Możesz go swobodnie kopiować, modyfikować, rozpowszechniać i wykorzystywać do dowolnych celów, bez konieczności uzyskiwania zgody.

Wesprzyj Makera kupując produkty przez jego plan, za co zarabia Prowizja Makera ustalony przez sprzedawców, lub stwórz nową iterację tego planu i dołącz go jako połączenie w swoim własnym planie, aby dzielić się przychodami.

Dyskusja

(0)

Zaloguj się aby dołączyć do dyskusji

Ładowanie komentarzy...