Współpraca
SZTUKA
Piękno i dobre samopoczucie
RZEMIOSŁO
KULTURA I HISTORIA
ROZRYWKA
ŚRODOWISKO
JEDZENIE I NAPOJE
INŻYNIERIA ODWROTNA
NAUKI
LEKKOATLETYKA
TECHNOLOGIA
URZĄDZENIA DO NOSZENIA
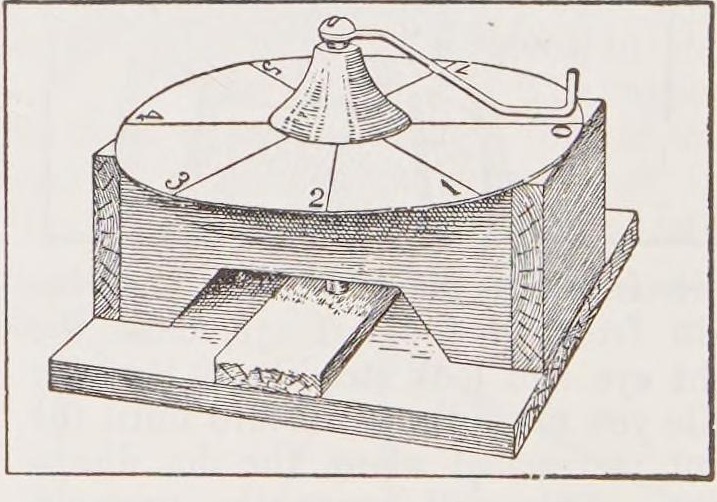


Home-Made Screw Micrometer: a Fine-Threaded Bolt and a Paper Dial (Boy Mechanic, 1913)
A simple micrometer for measuring thin things: a fine-threaded bolt turns through a nut set in a small wooden bench, a wire pointer soldered to its head sweeps a graduated pasteboard dial, and each turn moves the tip down by one thread.
Początkujący
Two hours
Instrukcje
1
1
Reading the dial
Reading the dial
Wczytywanie notatnika Jupyter…
2
2
Read the Boy Mechanic
Read the Boy Mechanic
"A simple, fairly accurate, and easily made apparatus of the micrometer form may be constructed."
3
3
Choose the bolt
Choose the bolt
Get an iron or brass bolt about 1/4 in across and 2-1/2 in long with as fine a thread as possible, threaded nearly to the head, with its nut. Cut a screwdriver slot in the head.
Materiały do tego kroku:
 Śruby maszynowe1 sztuka
 Nakrętka sześciokątna1 sztuka
Potrzebne narzędzia:
 Piła do metalu
 Imadło warsztatowe
4
4
Make the bench
Make the bench
Clamp two square-cornered wood blocks (about 1 x 3/4 x 2-1/2 in) side by side and nail small pieces across the ends; together they are about 2 in wide. Bore a 1/4 in hole through the centre in the 2 in direction. Unclamp, set the nut into one block in line with the hole, then cut a piece out so the blocks form a little bench. Glue its legs to a thin board about 2-1/2 in square.
Materiały do tego kroku:
 Deska z drewna liściastego1 sztuka
 Gwoździe1 sztuka
 Klej do drewna1 sztuka
Potrzebne narzędzia:
 Piła ręczna
 Świder korbowy z wiertłem
 Ścisk stolarski listwowy
 Dłuta
 Młotek
5
5
Pointer and dial
Pointer and dial
Solder a stiff wire about 2 in long to the bolt head at right angles. Cut a disc of heavy pasteboard with a radius equal to the wire, divide its edge into equal spaces, and fix it on top of the bench. Screw the bolt down through the nut.
Materiały do tego kroku:
 Drut żelazny1 sztuka
 Lut cynowo-ołowiowy1 sztuka
 Tektura klejona1 sztuka
Potrzebne narzędzia:
 Lutownica
 Kompas
6
6
Anvil
Anvil
Fix a small piece of wood on the base between the bench legs and glue a small piece of metal on it where the bolt meets it.
Materiały do tego kroku:
Deska z drewna liściastego1 sztukaKlej do drewna1 sztuka7
7
Calibrate and measure
Calibrate and measure
Count the threads in one inch of the bolt on a rule: one turn moves the tip one thread. To measure, screw down onto the object, remove it, screw down to the base, and note how far the wire travels over the dial. Turns (with the part of a turn) divided by threads per inch = thickness in inches.
Potrzebne narzędzia:
 Linijka
8
8
Troubleshooting
Troubleshooting
Micrometer troubleshooting.
Flow
Loading...
9
9
History and honest limits
History and honest limits
From **The Boy Mechanic, Book 1** (Popular Mechanics, 1913), p. 130, credited to the Scientific American (checked on the archive.org scan boymechanic0000unse_n5a8). The 1/4-20 bolt and 50-division dial are our example.
Materiały
8- 1 sztukaZastępnik
- 1 sztukaZastępnik
- 1 sztukaZastępnik
- 1 sztukaZastępnik
- 2 sztukZastępnik
- 1 sztukaZastępnik
- 1 sztukaZastępnik
- 1 sztukaZastępnik
Według tego planu powstaje

CC0 Domena publiczna
Ten plan jest udostępniany na licencji CC0. Możesz go swobodnie kopiować, modyfikować, rozpowszechniać i wykorzystywać do dowolnych celów, bez konieczności uzyskiwania zgody.
Wesprzyj Makera kupując produkty przez jego plan, za co zarabia Prowizja Makera ustalony przez sprzedawców, lub stwórz nową iterację tego planu i dołącz go jako połączenie w swoim własnym planie, aby dzielić się przychodami.