Współpraca
SZTUKA
Piękno i dobre samopoczucie
RZEMIOSŁO
KULTURA I HISTORIA
ROZRYWKA
ŚRODOWISKO
JEDZENIE I NAPOJE
INŻYNIERIA ODWROTNA
NAUKI
LEKKOATLETYKA
TECHNOLOGIA
URZĄDZENIA DO NOSZENIA


Chinese Dragon Kite: Bamboo-Ring Head With Revolving Eyes and 20 Sections on a Seine-Twine Harness (Boy Mechanic, 1919)
C. M. Miller's dragon kite from The Boy Mechanic, Book 3 (1919): a 12 in bamboo-ring head with horns and two paper eyes that spin in the wind, followed by up to 20 round section kites, each with a 36 in balancer stick, tied 30 in apart on three cords of seine twine. Twenty sections make a kite about 50 ft long.
Zaawansowany
Several days
Instrukcje
1
1
Strip lengths and kite length
Strip lengths and kite length
Wczytywanie notatnika Jupyter…
2
2
Read The Boy Mechanic, Book 3
Read The Boy Mechanic, Book 3
"Dragon kites are made as hideous as the maker can possibly conceive, and while the one to be considered is no beauty, it is more droll than fierce-looking."
3
3
Split and pare the bamboo
Split and pare the bamboo
Split bamboo into strips about 3/16 in wide and pare them to less than 1/16 in thick for the head's inner ring A. To bend a strip to a sharp angle, heat it over a candle flame until it gives under pressure, bend it, and it keeps its shape when cold.
Materiały do tego kroku:
 Tyczki bambusowe1 sztuka
Potrzebne narzędzia:
 Stalowy nóż składany
 Świeca
4
4
Frame the head
Frame the head
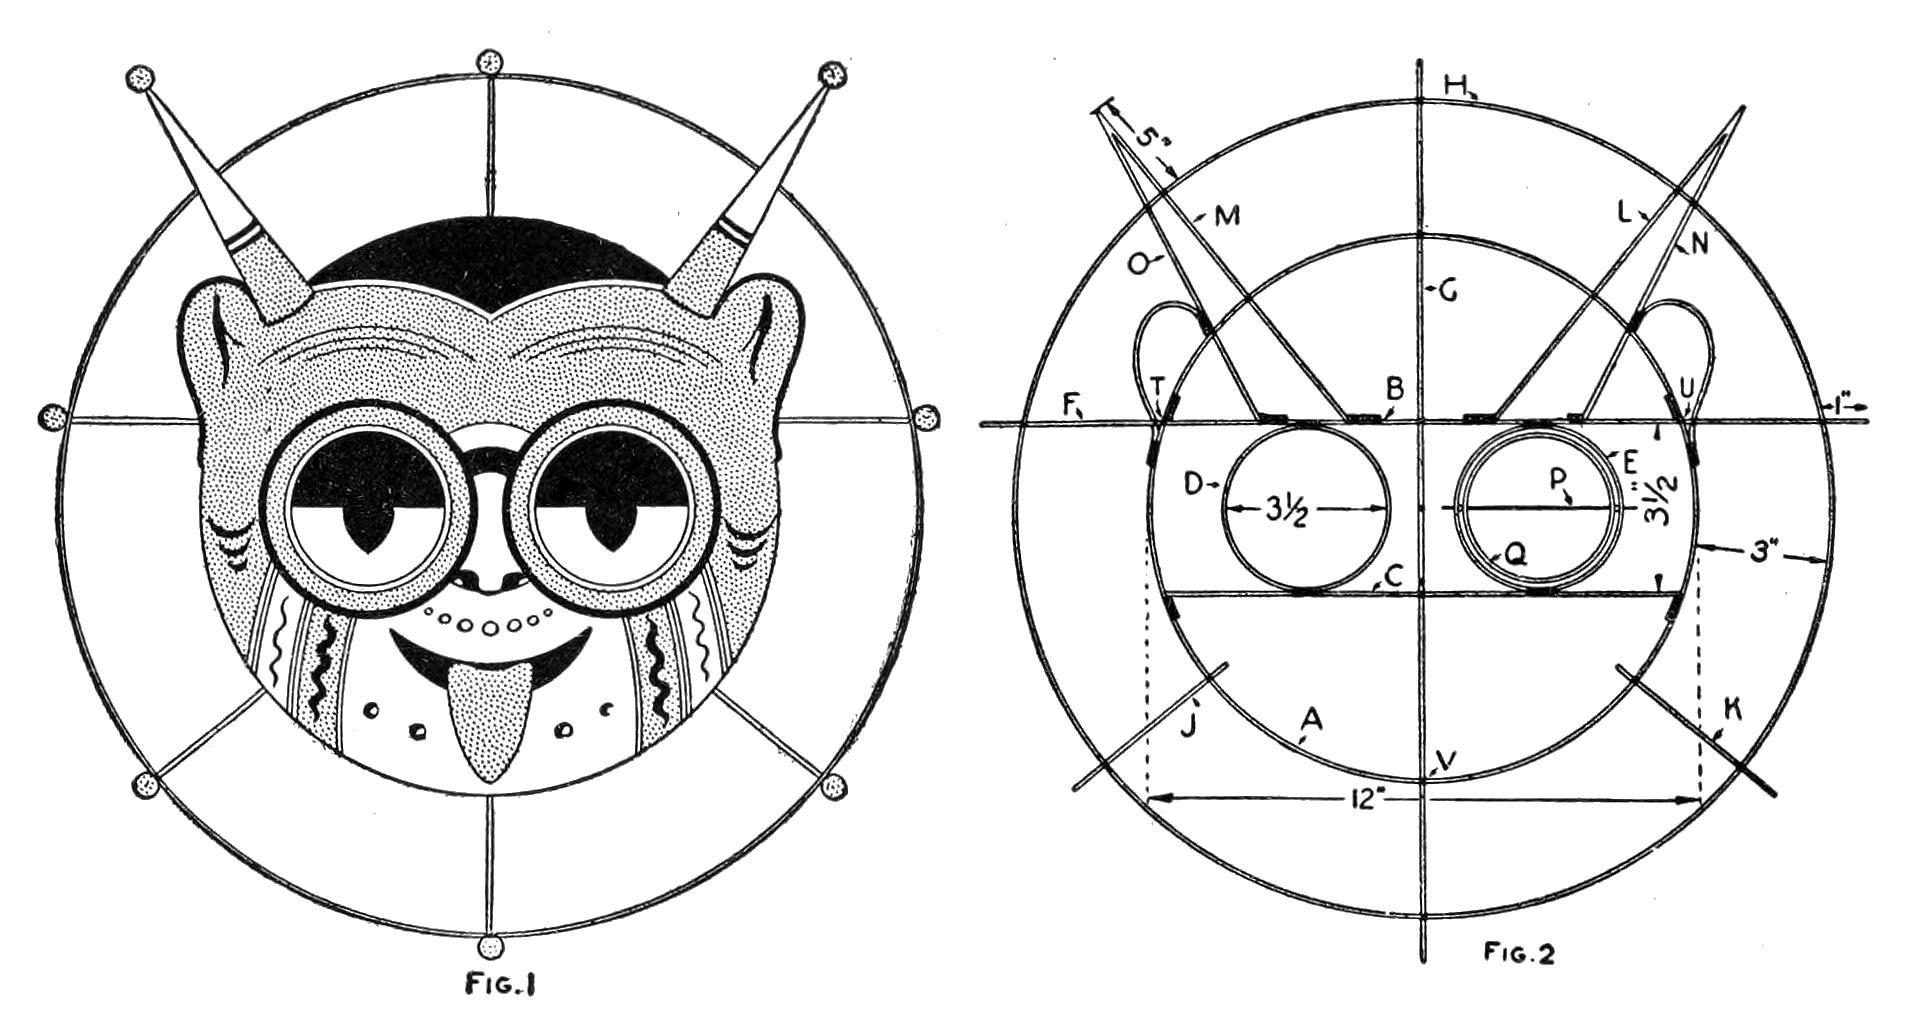
Make ring A 12 in across from a strip about 38 in long, lapping the ends and winding them with linen thread (or with wet pasted strips of rice paper about 1/2 in wide, which bind as they dry). Lash two crosspieces B and C of the same stock 3-1/2 in apart, parallel and equally spaced from the centre, their ends bent sharply and lashed inside the ring. Lash two eye rings D and E, 3-1/2 in across, between them, shaped round a 3-1/2 in cylinder so they are true. Lash stiffeners F and G, 1/16 by 1/8 by 20 in, across the back. Add outer ring H, 3 in outside A (18 in across), of 1/8 in strip under 1/16 in thick, in two pieces if needed, and the short pieces J and K between the rings. Lash the horn supports, 1/8 in wide, to the upper crosspiece and both rings, with L and M halfway between the ends of F and G and radiating from the centre of A, and N and O pointing at the eye-ring centres (Fig. 2).
Materiały do tego kroku:
Tyczki bambusowe1 sztuka Nić lniana1 sztuka
Potrzebne narzędzia:
Stalowy nóż składanyŚwieca Miara zwijana
 Nożyczki
5
5
Cover and paint the head
Cover and paint the head
Cover only the inside of ring A, the horns and the ears with Chinese rice paper, stretched tight with no bagging, leaving the eye rings open. Put the rings on the horns and stick ends, 1/2 to 2 in across, cut from stiff paper (larger ones of bamboo). Shade with a brush and water colours, leaving the face white or tinting it; leave the horns white and colour the tongue red (Fig. 1).
Materiały do tego kroku:
 Papier ryżowy1 sztuka
 Klej pszenny1 sztuka
 Brystol1 sztuka
 Farba akwarelowa1 sztuka
Potrzebne narzędzia:
 Pędzel do kleju
 Zestaw pędzli malarskichNożyczki
6
6
Make the revolving eyes
Make the revolving eyes
Pare bamboo to 1/32 in and form each eye into a true ring 3-1/4 in across. Pass a wire axle exactly on a diameter through the eye ring and through its socket ring D or E, with a glass bead on the wire each side between the two rings; fix the wire to the eye ring with a strip of paper wrapped tight and pasted. Cover each side halfway with rice paper, the front upper half and the back lower half, so the wind turns the eye. Blacken the front upper half and paste a round pupil between the halves so it shows on both sides (Figs. 3, 4).
Materiały do tego kroku:
Tyczki bambusowe1 sztuka Drut żelazny1 sztuka
 Koraliki szklane4 sztukPapier ryżowy1 sztukaKlej pszenny1 sztukaFarba akwarelowa1 sztuka
Potrzebne narzędzia:
Stalowy nóż składany Szczypce płaskieNożyczkiZestaw pędzli malarskich
7
7
Make the section kites
Make the section kites
For each section make a 12 in ring of bamboo 1/8 in wide and 1/16 in thick and cover it tight like the head. Lash on a balancer stick 36 in long, small, light and well balanced, at about the place of cross-stick F, with tufts of tissue paper or feathers at its tips. Colour the discs as you like; give the last section's balancer streamers of light cloth (Figs. 5, 6). Sections may instead be 9 in with 30 in balancers, but uniform sections are better and easier.
Materiały do tego kroku:
Tyczki bambusowe1 sztukaNić lniana1 sztukaPapier ryżowy1 sztukaKlej pszenny1 sztuka Bibuła kolorowa1 sztuka
 Pióra1 sztuka
 Tkanina bawełniana1 sztukaFarba akwarelowa1 sztuka
Potrzebne narzędzia:
Stalowy nóż składanyŚwiecaNożyczkiZestaw pędzli malarskich8
8
Tie the harness and bridle
Tie the harness and bridle
Cut three cords of six-ply hard-twisted seine twine as long as the kite plus the knots. Fasten the head to a wall, tie the three cords to it at T, U and V (Fig. 2), and tie each section at the matching points exactly 30 in from the last (Fig. 7). Tie a three-string bridle to the head at T, U and V, the lower string longer than the two upper ones so the head, and with it every section, leans to the wind. A ball balancer of bamboo strips may hang from the head (Fig. 8).
Materiały do tego kroku:
 Przędza sieciowa1 sztuka
 Sznurek do latawca1 sztukaTyczki bambusowe1 sztuka
Potrzebne narzędzia:
Miara zwijanaNożyczki9
9
Flying and troubleshooting
Flying and troubleshooting
Dragon kite flying.
Flow
Loading...
10
10
History and honest limits
History and honest limits
From "How to Make Combined Kites, Part I: A Dragon Kite" by C. M. Miller, in **The Boy Mechanic, Book 3**, Popular Mechanics, 1919 (Project Gutenberg 71856; checked on the archive.org scan boymechanic0003unse, pp. 145-148). He gives no bridle lengths and no line size beyond "a strong cord". Fig. 2 also marks 5 in at the horn tip and 1 in where F passes ring H. The tools and metric figures are ours.
Materiały
13- 1 sztukaZastępnik
- 2 sztukZastępnik
- 1 sztukaZastępnik
- 1 sztukaZastępnik
- 1 sztukaZastępnik
- 3 sztukZastępnik
- 1 sztukaZastępnik
- 4 sztukZastępnik
- 1 sztukaZastępnik
- 1 sztukaZastępnik
- 1 sztukaZastępnik
- 1 sztukaZastępnik
- 1 sztukaZastępnik
Według tego planu powstaje
Powiązane blueprinty
Te blueprinty dzielą się wiedzą — technikami, materiałami lub zasadami
CC0 Domena publiczna
Ten plan jest udostępniany na licencji CC0. Możesz go swobodnie kopiować, modyfikować, rozpowszechniać i wykorzystywać do dowolnych celów, bez konieczności uzyskiwania zgody.
Wesprzyj Makera kupując produkty przez jego plan, za co zarabia Prowizja Makera ustalony przez sprzedawców, lub stwórz nową iterację tego planu i dołącz go jako połączenie w swoim własnym planie, aby dzielić się przychodami.