Współpraca
SZTUKA
Piękno i dobre samopoczucie
RZEMIOSŁO
KULTURA I HISTORIA
ROZRYWKA
ŚRODOWISKO
JEDZENIE I NAPOJE
INŻYNIERIA ODWROTNA
NAUKI
LEKKOATLETYKA
TECHNOLOGIA
URZĄDZENIA DO NOSZENIA
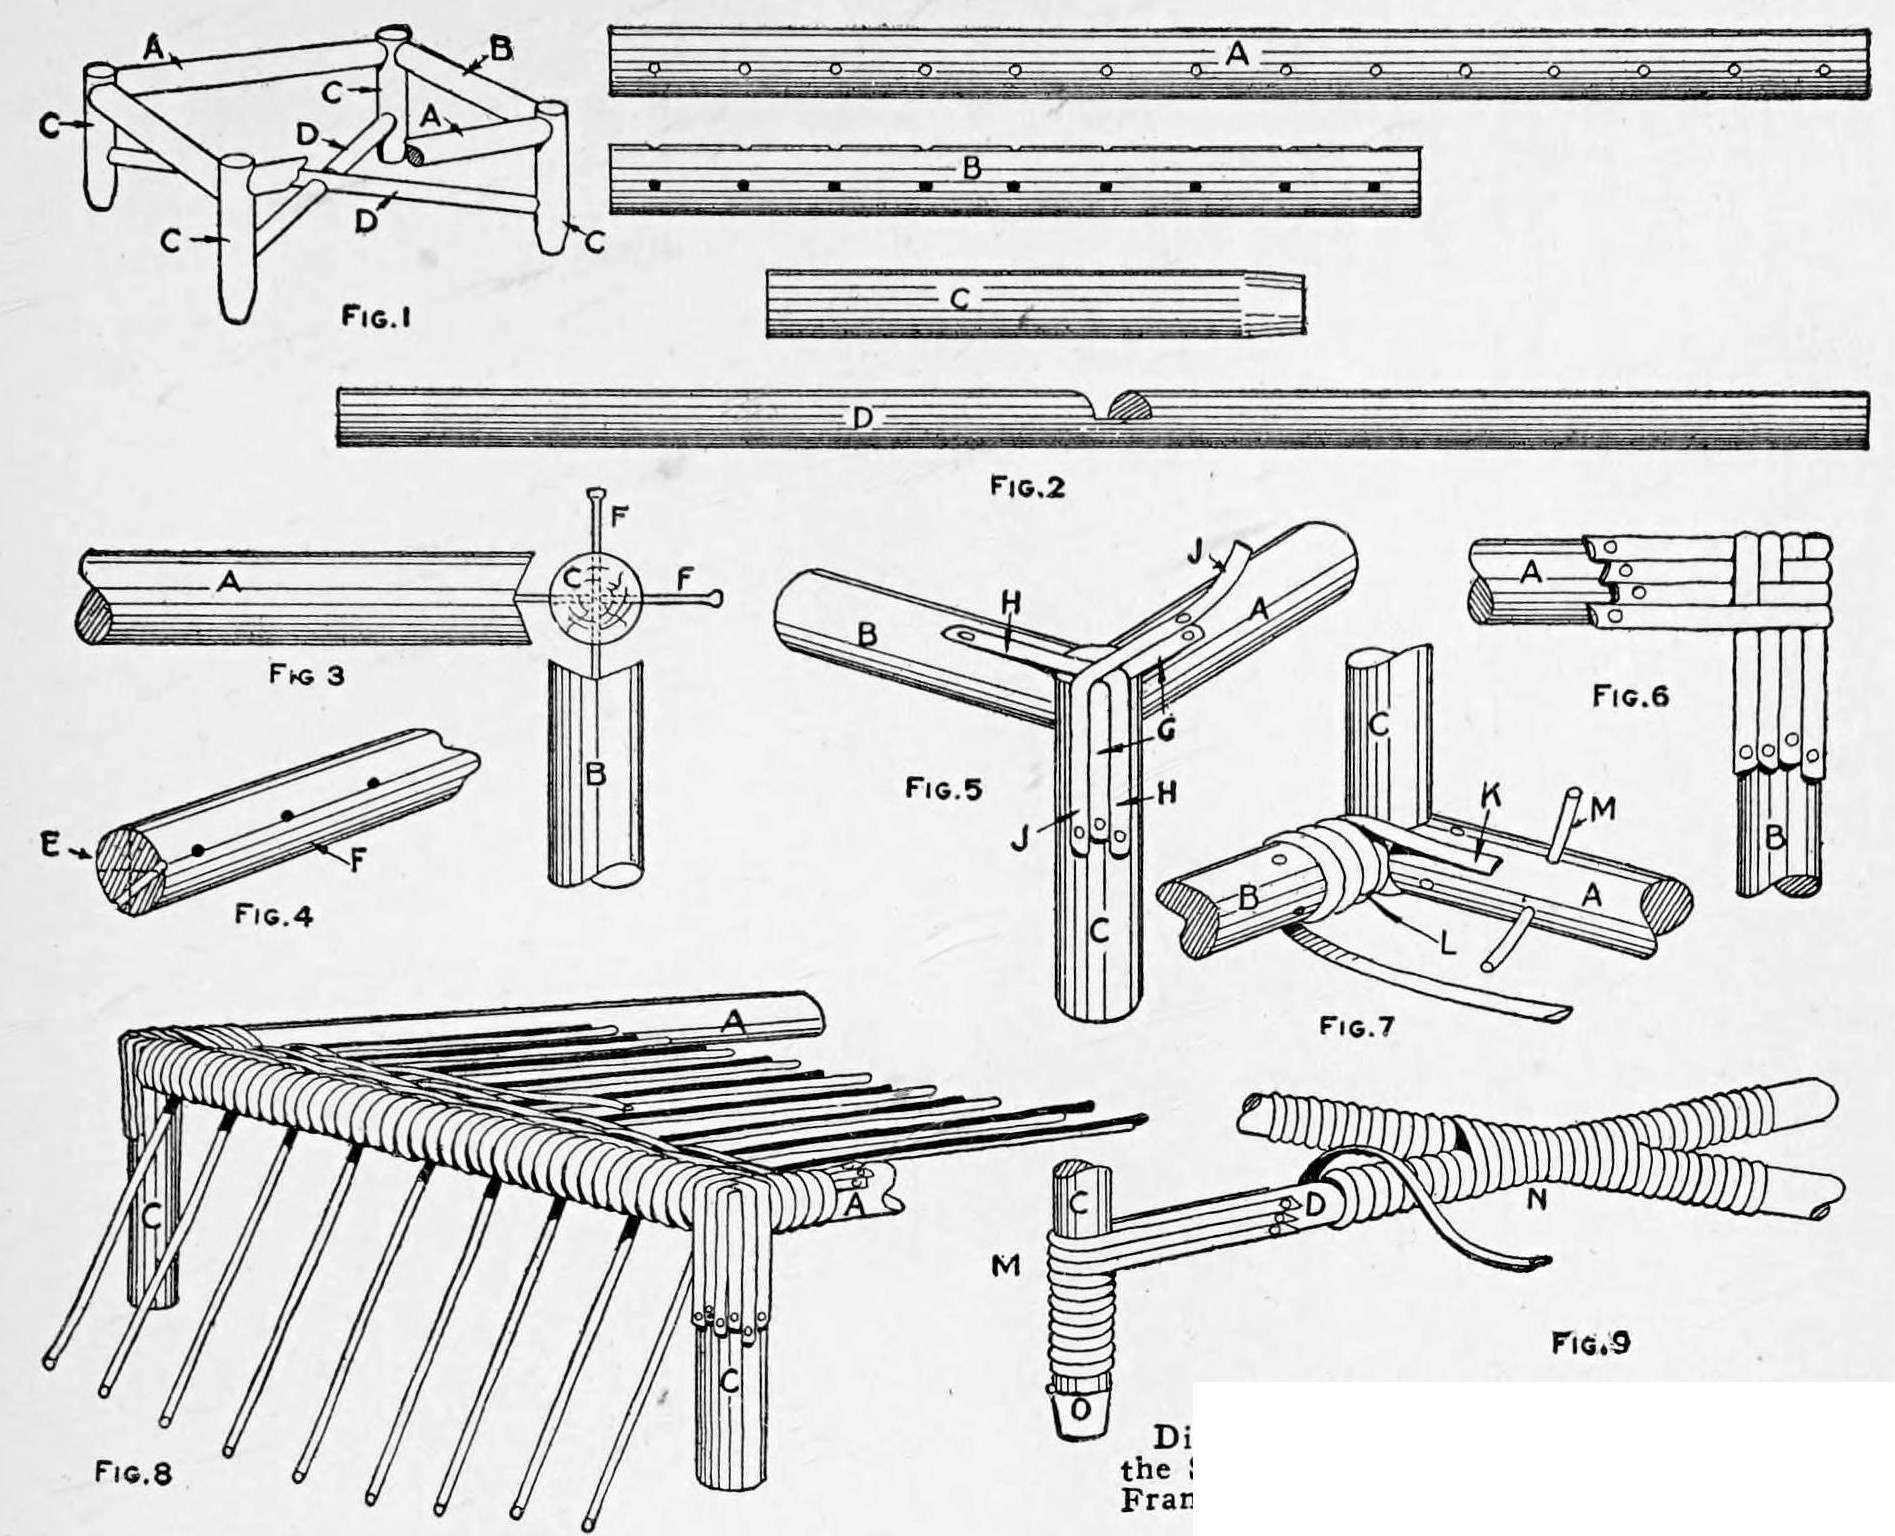


Woven-Reed Footstool: Nailed Dowel Frame, Wound Posts, Woven Top and Pairing-Weave Apron (Boy Mechanic, 1919)
Charles M. Miller's reed footstool from The Boy Mechanic, Book 3 (1919): a frame of 3/4 in dowel rails and posts with crossed 5/8 in braces, nailed through drilled holes, the posts and rails wound with flat reed, the top woven over No. 4 spokes and the apron in pairing weave, finished with a broken-down roll.
Średniozaawansowany
About 2 days
Instrukcje
1
1
Cut list
Cut list
Wczytywanie notatnika Jupyter…
2
2
Read The Boy Mechanic, Book 3
Read The Boy Mechanic, Book 3
"Each piece of reed furniture has a framework, usually of dowels." The reed sizes are those of his reed basket (Boy Mechanic, Book 2).
3
3
Cut and drill the frame
Cut and drill the frame
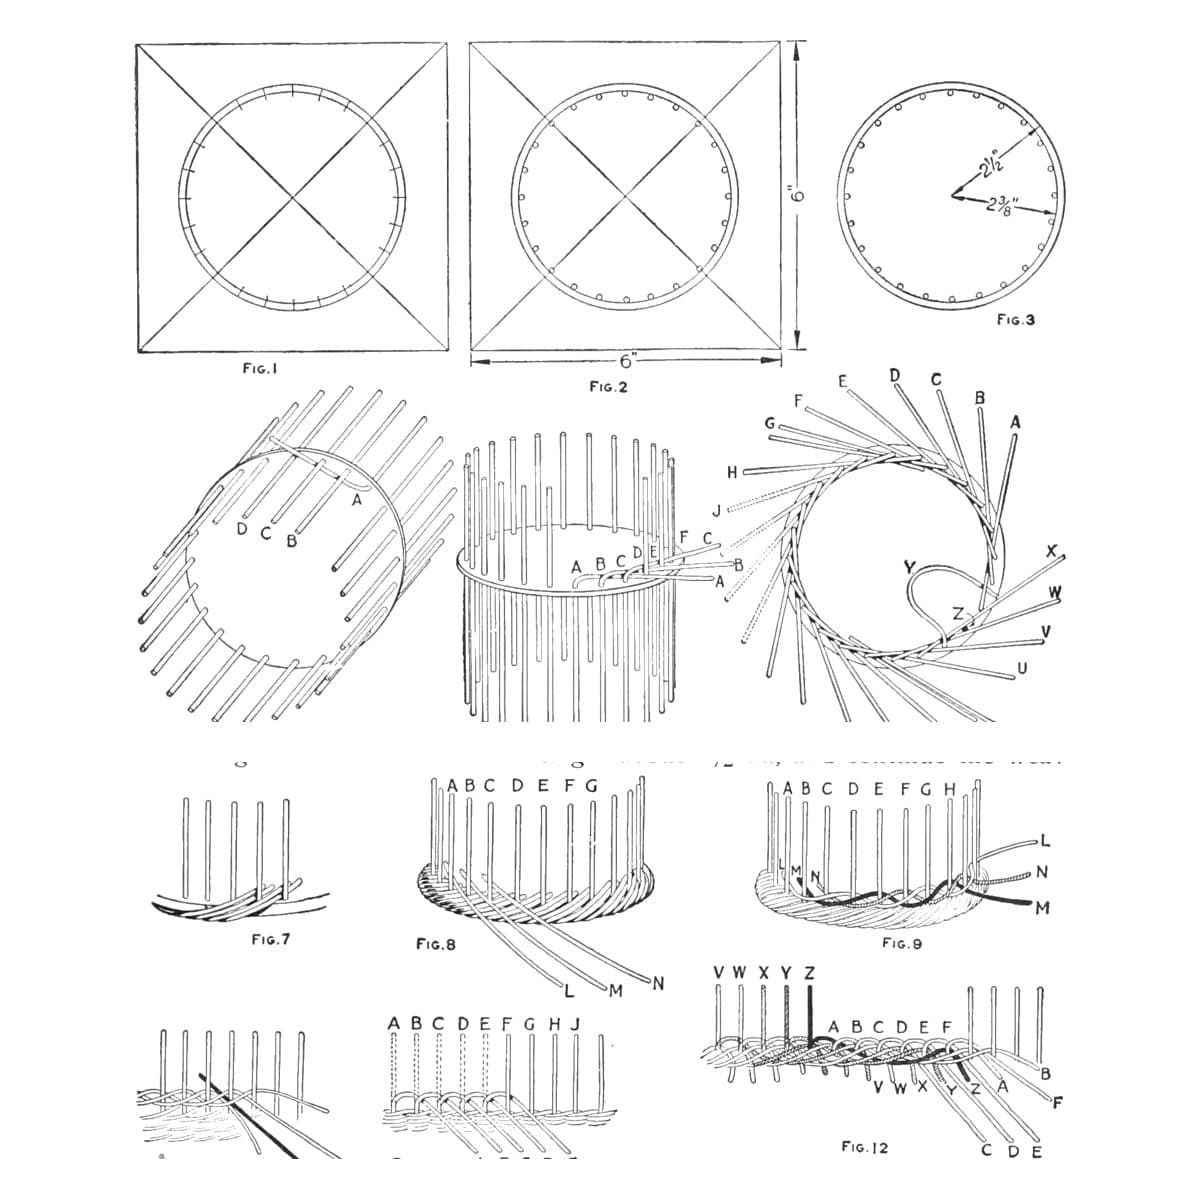
Cut two side rails 3/4 by 14 in, two end rails 3/4 by 9 in, four posts 3/4 by 7 in and two braces 5/8 by 17 in (trimmed to fit later). Notch the rail and brace ends with a coping saw to seat on the posts. Before assembly drill the spoke holes, 1/8 in for No. 4 reed, combining the top and end-side spoke holes as in Fig. 4 and drilling the side-rail holes straight (Fig. 2).
Materiały do tego kroku:
 Kołek drewniany4 sztuk
Potrzebne narzędzia:
 Piłka włosowa
 Wiertarka ręczna
 Ołówek
 Miara zwijana
4
4
Nail the frame
Nail the frame
Run the posts to the top of the frame and nail through them into the rail ends with ordinary 4-penny nails, drilling 1/16 in holes first. Set the side rails about 1/16 in below the post tops. Halve the braces at the centre on a slant so their tops lie level, try them, and nail them without pulling the frame out of square (Fig. 1).
Materiały do tego kroku:
 Gwoździe1 sztuka
Potrzebne narzędzia:
Wiertarka ręczna MłotekPiłka włosowa
5
5
Wind the posts and end rails
Wind the posts and end rails
Cover the post tops with short pieces of winding reed tacked on with shoemaker's tacks, crossing in turn (Figs. 5, 6). Wind the end rails, marking each hole with pencil as the winding passes it; then open each hole through the winding with a bodkin (Fig. 7).
Materiały do tego kroku:
 Łupana trzcina1 sztuka
 Ćwieki montażowe1 sztuka
Potrzebne narzędzia:
Młotek SzydłoOłówek
6
6
Weave the top
Weave the top
Put the 32 in No. 4 spokes through one end rail, down and out at the ends. Weave with a single No. 3 weaver, and after 3/4 in add a short extra spoke beside each spoke, weaving the pair as one; wind the weaver twice round the side rail each time. Insert the spokes in the other end rail before the weaving is within 2 or 3 in of it (Fig. 8).
Materiały do tego kroku:
 Rattan1 sztuka
Potrzebne narzędzia:
 Nożyczki
 Wiadro 20-litrowe
 Gąbka
7
7
Wind braces and posts, weave the apron
Wind braces and posts, weave the apron
Wind the braces and posts, three strips round the post and tacked where each brace meets it, and both braces together where they cross (Fig. 9); finish the posts with brass caps or wind to within 1/8 in of the bottom. With the stool upside down, insert short spokes in the under side of the side rails and weave the apron in pairing weave, always passing one weaver twice round each post (Figs. 10-12). Cut the extra spokes even and break down the spokes into a roll, tucking the ends inside (Figs. 13-15). Singe off stray fibres carefully with a gas flame or blowtorch.
Materiały do tego kroku:
Łupana trzcina1 sztukaRattan1 sztukaĆwieki montażowe1 sztukaPotrzebne narzędzia:
Nożyczki Palnik propanowyGąbkaWiadro 20-litrowe
8
8
Troubleshooting
Troubleshooting
Reed weaving troubleshooting.
Flow
Loading...
9
9
History and honest limits
History and honest limits
From "A Woven-Reed Footstool" by Charles M. Miller, in **The Boy Mechanic, Book 3**, Popular Mechanics, 1919 (Project Gutenberg 71856; checked on the archive.org scan boymechanic0003unse, pp. 255-258). Fig. 2 shows the hole positions without figures, and he mentions an optional chloride-of-lime bleach that we leave out. The tools and metric figures are ours.
Materiały
5- 4 sztukZastępnik
- 1 sztukaZastępnik
- 1 sztukaZastępnik
- 1 sztukaZastępnik
- 1 sztukaZastępnik
Wymagane narzędzia
10- Zastępnik
- Zastępnik
- 1 vendor sell this, none ship to you yetZastępnik
- 1 vendor sell this, none ship to you yetZastępnik
- Zastępnik
- Zastępnik
- Zastępnik
- Zastępnik
- Zastępnik
- Zastępnik
Według tego planu powstaje
Powiązane blueprinty
Te blueprinty dzielą się wiedzą — technikami, materiałami lub zasadami

CC0 Domena publiczna
Ten plan jest udostępniany na licencji CC0. Możesz go swobodnie kopiować, modyfikować, rozpowszechniać i wykorzystywać do dowolnych celów, bez konieczności uzyskiwania zgody.
Wesprzyj Makera kupując produkty przez jego plan, za co zarabia Prowizja Makera ustalony przez sprzedawców, lub stwórz nową iterację tego planu i dołącz go jako połączenie w swoim własnym planie, aby dzielić się przychodami.