Współpraca
SZTUKA
Piękno i dobre samopoczucie
RZEMIOSŁO
KULTURA I HISTORIA
ROZRYWKA
ŚRODOWISKO
JEDZENIE I NAPOJE
INŻYNIERIA ODWROTNA
NAUKI
LEKKOATLETYKA
TECHNOLOGIA
URZĄDZENIA DO NOSZENIA
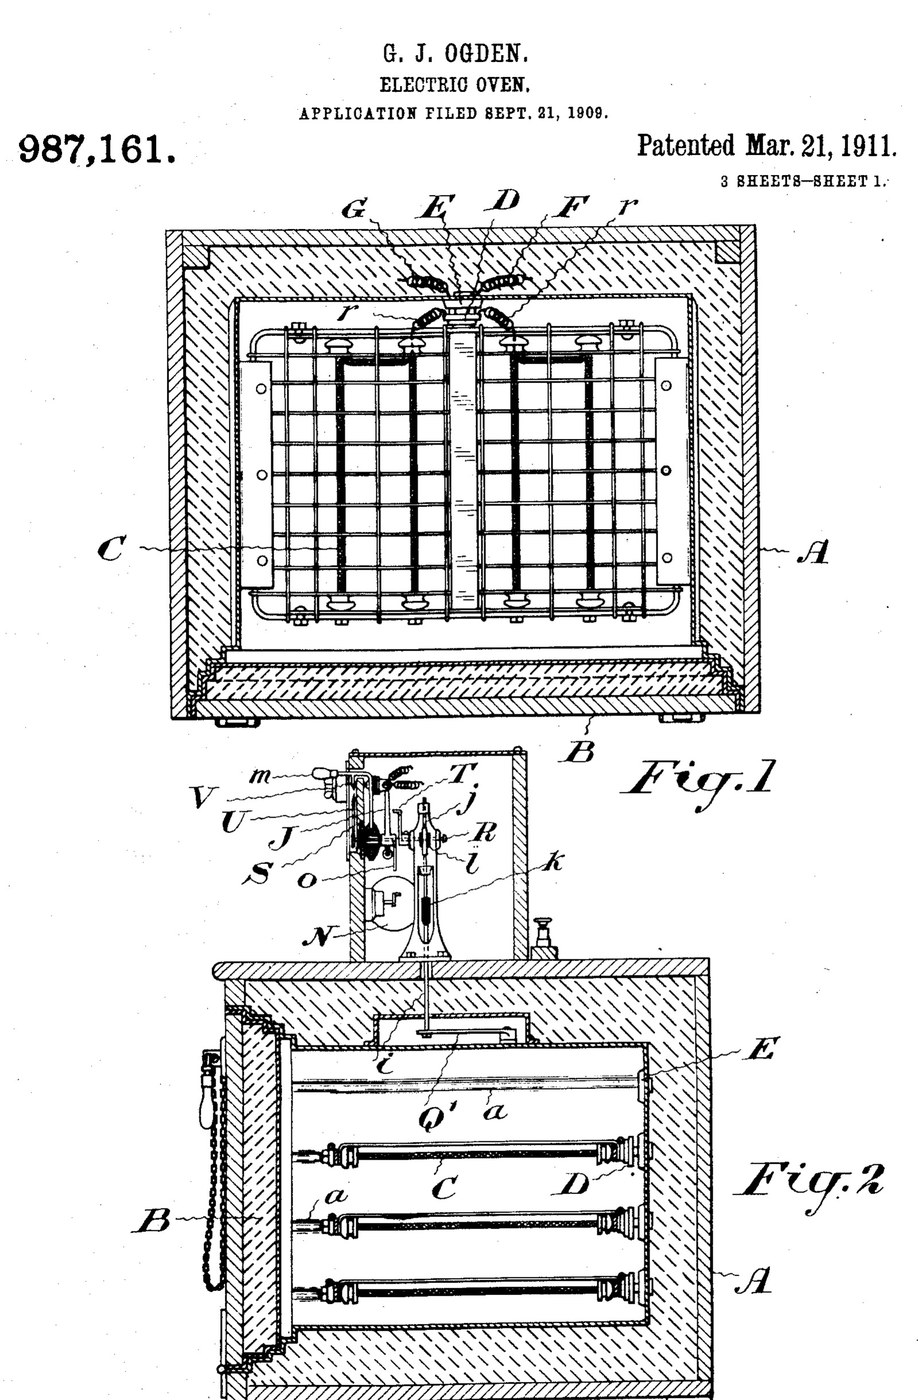


Oven: Insulated Electric Oven with Plug-In Grid Heaters and a Thermostat (Ogden, US 987,161, 1911)
An electric oven built to waste as little heat as possible: a double-walled, packed box with a packed door that seals like a strong-room door. Grid-shaped heating elements slide into grooves in the walls and plug into sockets at the back, and the food rests on them. A thermostat cuts the current when the set temperature is reached and switches it on again as the oven cools.
Result: an oven that bakes, roasts or dries at a set temperature with any number of heating grids.
Source: G. J. Ogden, US 987,161 (1911). Unknown: sizes, metals, packing and temperatures. Picture: the patent drawing.
Zaawansowany
Unknown
Instrukcje
1
1
Build the insulated casing and door
Build the insulated casing and door
Make the oven chamber as a double-walled casing with packing between the walls, and grooves on the inner side walls to take the heating grids. Fit a door that closes like a fire-proof vault door, also packed, so the casing seals closely. Ours: mild steel sheet. Not given: sizes, the packing.
Materiały do tego kroku:
 Blacha ze stali miękkiej1 inner and outer walls, door
 Nieznany materiał izolacyjny1 packing
Potrzebne narzędzia:
 Nożyce do blachy
 Wiertarka stołowa
 Nieznane wymiary
2
2
Make the plug-in heating grids
Make the plug-in heating grids
Make heating elements in the form of grids that slide into the grooves and on which the food can rest. Fix a porcelain plug to each, carrying spring fingers that push into a socket with matching spring fingers in the back wall. Wire the sockets so all the elements are in parallel; use as many as the temperature and amount of food need. Ours: nichrome wire. Not given: the element type.
Materiały do tego kroku:
 Drut oporowy nichromowy1 heating grids
 Nieznany materiał1 porcelain plugs and sockets
 Drut sprężynowy1 spring fingers
 Przewód montażowy1 circuit wiring
Potrzebne narzędzia:
 Lutownica
3
3
Fit the thermostat control
Fit the thermostat control
Put a thermostat that bends with heat inside the oven, working a contact finger that plays between two contacts a few degrees above and below the set temperature. A switch-changing device, a small rotary motor, throws the main switch off and on as the finger touches one contact or the other. Mount a setting arm with a pointer over a scale marked in degrees, and a second pointer driven by the thermostat. Add a hand switch to turn the current on or off independently, and a lamp with its own switch to light the oven. Ours: a bimetal strip, toggle switches. Not given: temperatures.
Materiały do tego kroku:
 Pasek bimetaliczny1 thermostat
 Silnik elektryczny1 switch-changing motor
 Przełącznik dźwigniowy3 main, hand and lamp switches
 Nieznany metal1 contacts, arm, scaleNieznany materiał1 incandescent oven lamp
Potrzebne narzędzia:
Lutownica Termometr
Materiały
10- 1 inner and outer walls, doorZastępnik
- 1 packingZastępnik
- 1 heating gridsZastępnik
- 1 incandescent oven lampZastępnik
- 1 spring fingersZastępnik
- Zastępnik
- 1 thermostatZastępnik
- 1 switch-changing motorZastępnik
- Zastępnik
- 1 contacts, arm, scaleZastępnik
Materiały z połączonych planów

Według tego planu powstaje

CC0 Domena publiczna
Ten plan jest udostępniany na licencji CC0. Możesz go swobodnie kopiować, modyfikować, rozpowszechniać i wykorzystywać do dowolnych celów, bez konieczności uzyskiwania zgody.
Wesprzyj Makera kupując produkty przez jego plan, za co zarabia Prowizja Makera ustalony przez sprzedawców, lub stwórz nową iterację tego planu i dołącz go jako połączenie w swoim własnym planie, aby dzielić się przychodami.