
Współpraca
SZTUKA
Piękno i dobre samopoczucie
RZEMIOSŁO
KULTURA I HISTORIA
ROZRYWKA
ŚRODOWISKO
JEDZENIE I NAPOJE
INŻYNIERIA ODWROTNA
NAUKI
LEKKOATLETYKA
TECHNOLOGIA
URZĄDZENIA DO NOSZENIA
Wishbone-Mast Ice Yacht: 16 ft Backbone, Twin-Pole Mast and Double Lateen Booms (Boy Mechanic, 1919)
Woody

Autor

Woody

13. listopad 2026NO
8
0
0
0
0

Wishbone-Mast Ice Yacht: 16 ft Backbone, Twin-Pole Mast and Double Lateen Booms (Boy Mechanic, 1919)

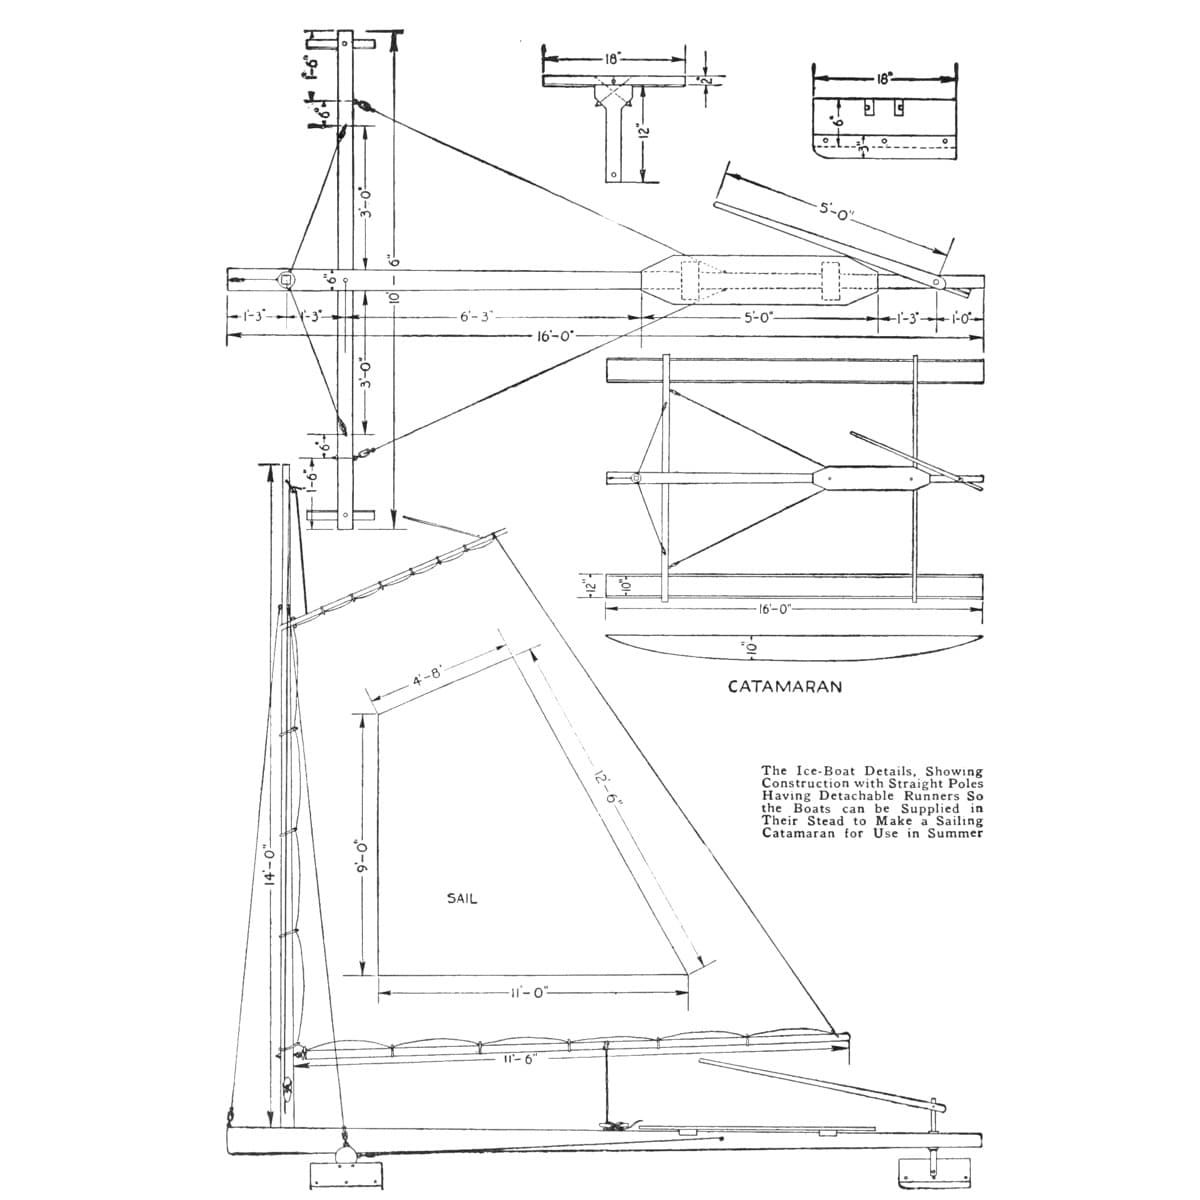
John F. Pjerrou's ice yacht from The Boy Mechanic, Book 3 (1919), for one or two passengers: a 16 ft spruce backbone on a 12 ft 6 in runner plank, oak runners shod with half-round iron, a mast of two 12 ft poles joined at the head, and two lateen sails on a yard and two 16 ft booms that spread into a V when running before the wind. It takes down for storage.
Zaawansowany
Several weeks

Instrukcje

1

Main sizes and the mast's height

Wczytywanie notatnika Jupyter…
2

Read The Boy Mechanic, Book 3

"The dimensions given are for a small yacht, and care must be taken, in adapting the design, to maintain proper proportions for stability and safety."
3

Make the backbone and runner plank

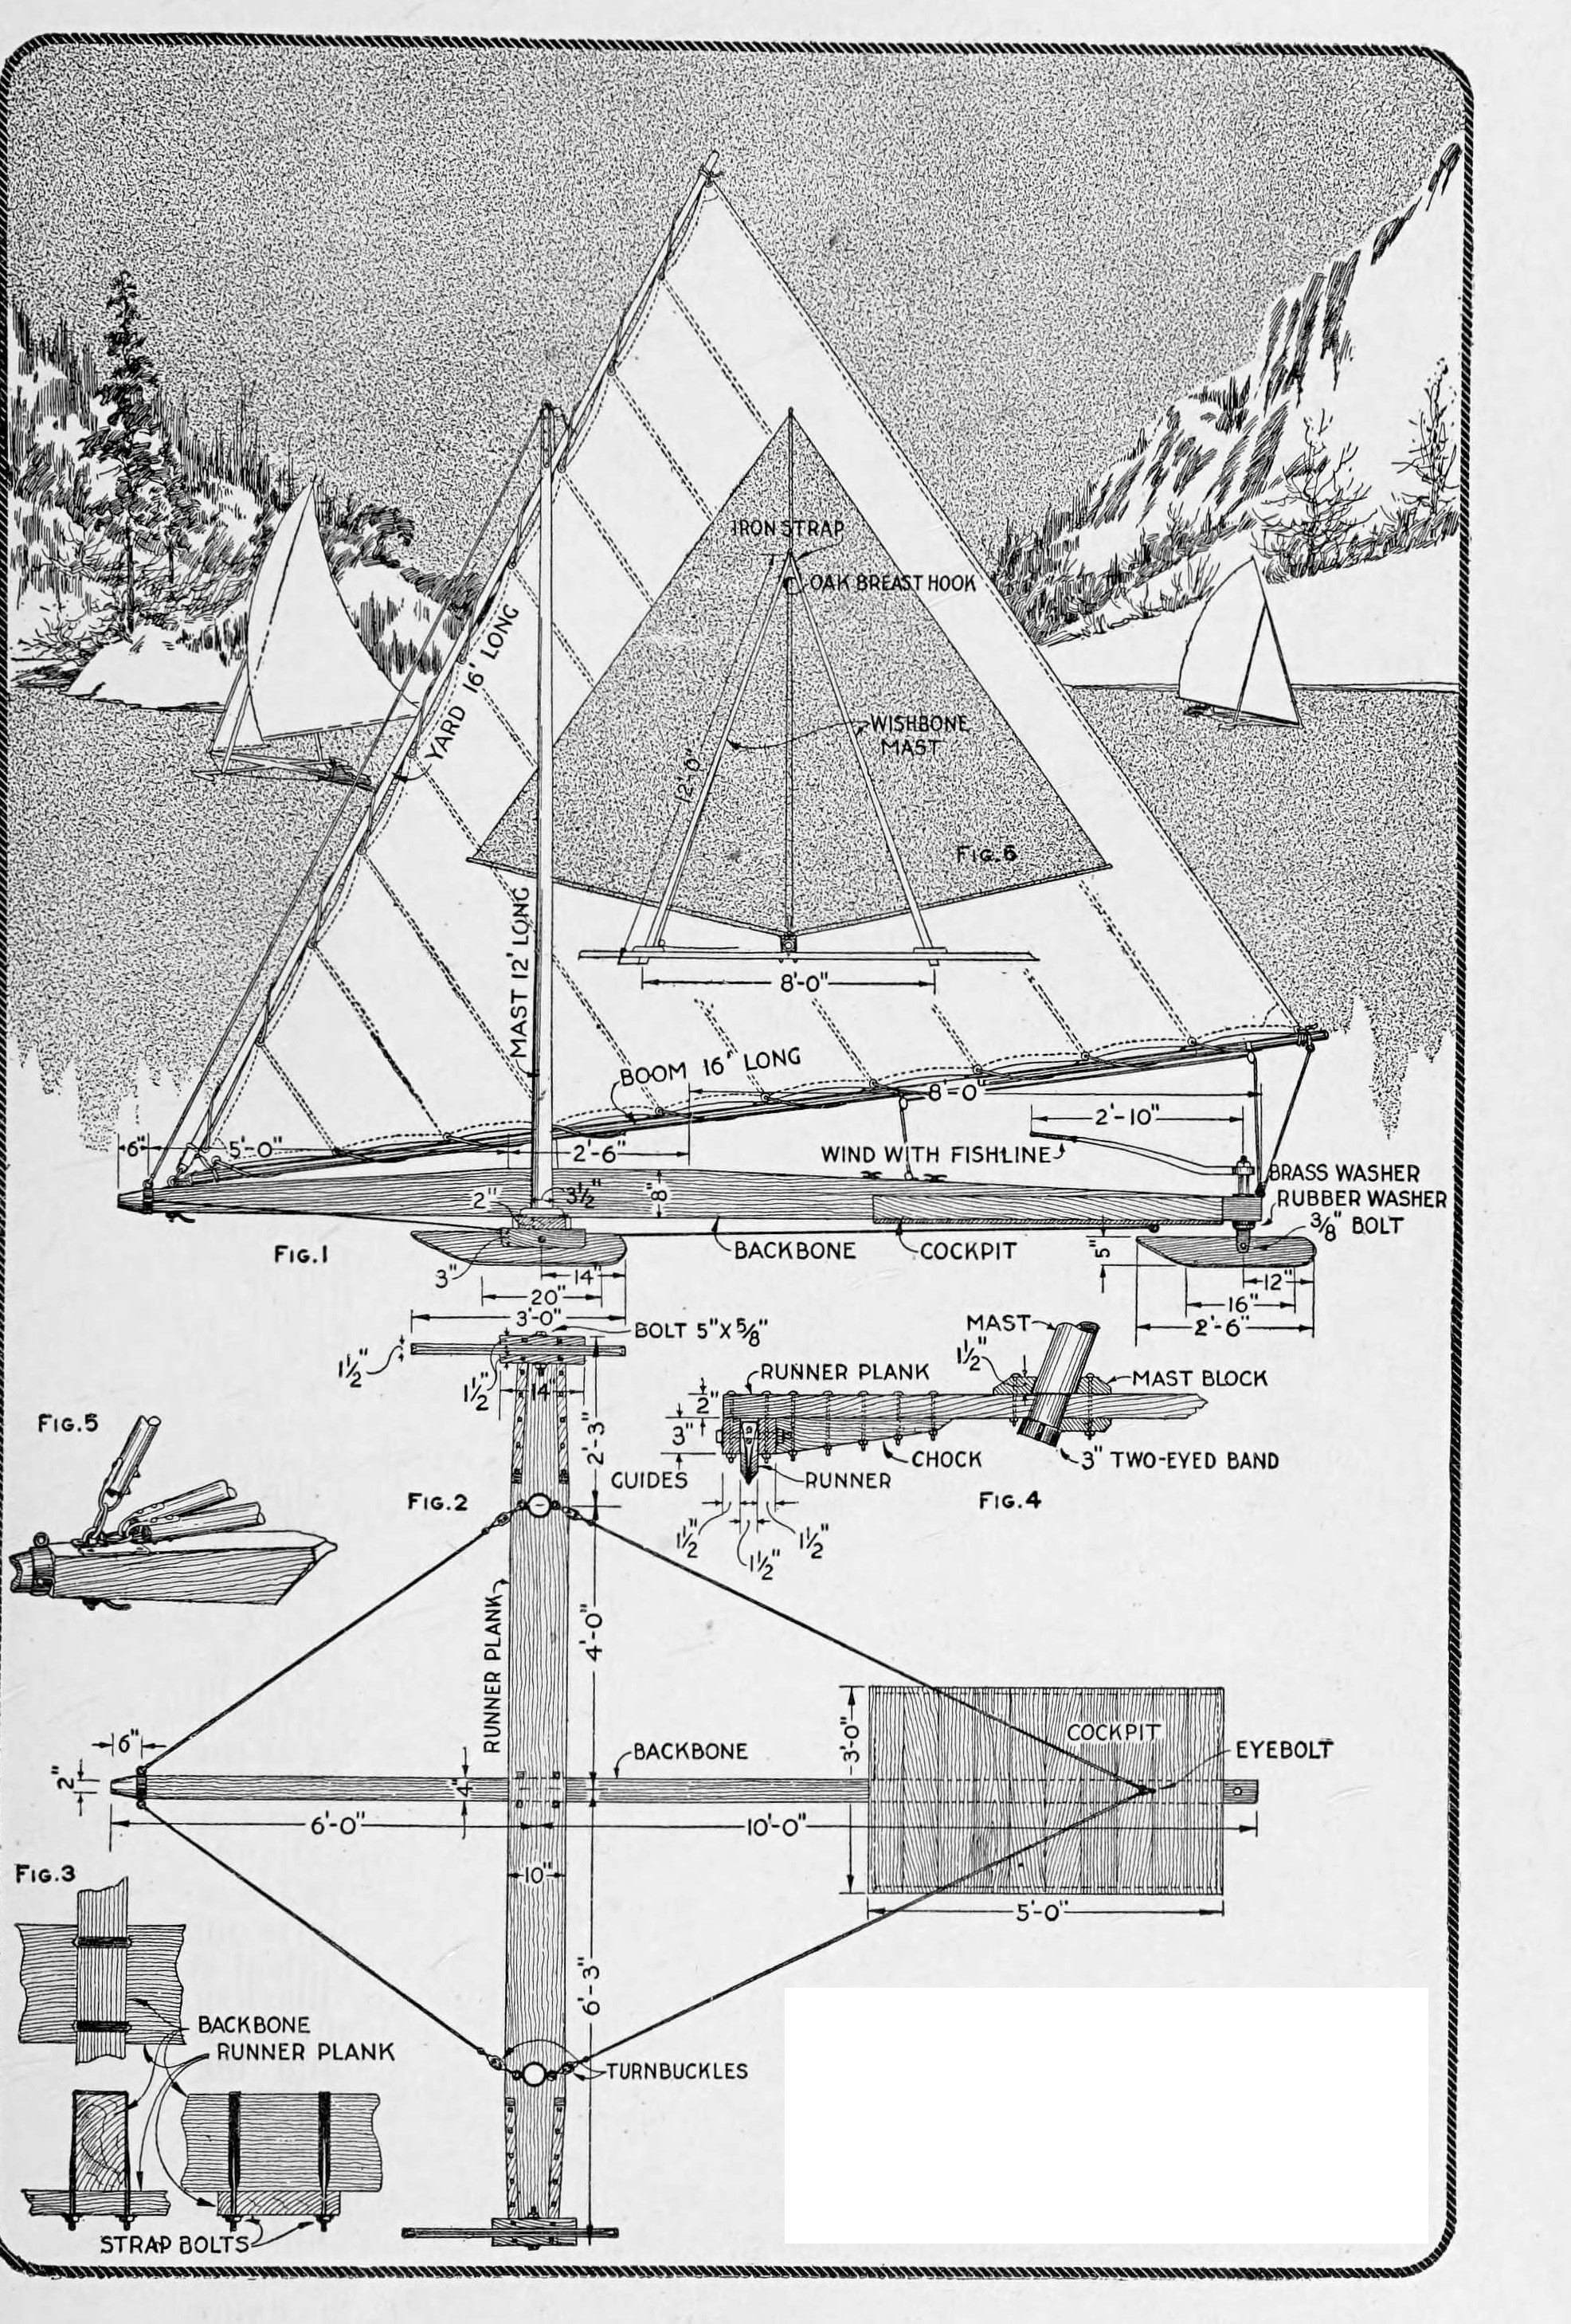
Use only the best straight-grained spruce or white pine. Backbone: 4 in thick, 16 ft long and 8 in high at the centre, with a ridge 8 in high and 2 ft 6 in long; taper it from the middle, 5 ft 6 in from the forward end, to 4 in at each end, and fit a three-eye metal ring at the bow (Figs. 1, 5). Runner plank: 2 in thick, 10 in wide, 12 ft 6 in long, tapered to 8 in at the ends. Set the backbone on the plank at right angles, 6 ft from the bow, and clamp them with two strap bolts, washers and nuts (Figs. 2, 3).

Materiały do tego kroku:

Tarcica sosnowaTarcica sosnowa2 sztuk
Pierścień metalowyPierścień metalowy1 sztuka
Strzemię w kształcie litery UStrzemię w kształcie litery U2 sztuk
Podkładka płaskaPodkładka płaska4 sztuk
Nakrętka sześciokątnaNakrętka sześciokątna4 sztuk

Potrzebne narzędzia:

Piła ręcznaPiła ręczna
Strug ręcznyStrug ręczny
OśnikOśnik
Świder korbowy z wiertłemŚwider korbowy z wiertłem
Klucz nastawnyKlucz nastawny
Miara zwijanaMiara zwijana
OłówekOłówek
4

Fit the guides and forward runners

Bolt guides of straight-grained oak, 1-1/2 by 3 by 14 in, to the plank ends with 5/16 in carriage bolts, and bolt oak chocks at each tapered edge (Fig. 4). Make the forward runners of oak, 1-1/2 by 5 by 36 in, shaped at the ends as drawn, and shoe them with half-round strap iron held by screws with carefully countersunk heads. Pivot them on 5/8 in bolts (5 in long in Fig. 1), nuts to the inner side, with washers and jam nuts, or rivet the bolt ends slightly so the nuts cannot work loose.

Materiały do tego kroku:

Deska z dębu białegoDeska z dębu białego3 sztuk
Śruba zamkowaŚruba zamkowa8 sztuk
Pręt żelazny półokrągłyPręt żelazny półokrągły2 sztuk
Wkręty do drewnaWkręty do drewna1 sztuka
Podkładka płaskaPodkładka płaska4 sztuk
Nakrętka sześciokątnaNakrętka sześciokątna4 sztuk

Potrzebne narzędzia:

Piła ręcznaPiła ręczna
Strug ręcznyStrug ręczny
Świder korbowy z wiertłemŚwider korbowy z wiertłem
Wiertarka ręcznaWiertarka ręczna
Zestaw pogłębiaczy stożkowychZestaw pogłębiaczy stożkowych
Piła do metaluPiła do metalu
Klucz nastawnyKlucz nastawny
5

Make the stern runner and steering

Make the stern runner of oak, 1-1/2 by 5 by 30 in, shod like the others. Pivot it on a 3/8 in bolt in a hanger of heavy iron strip bent into a U and riveted to a vertical shaft. Put a heavy rubber washer, protected by a metal one, on the shaft; thread its upper end for a washer and nut, slip a section of pipe over the shaft, and clamp the steering handle (2 ft 10 in in Fig. 1) on a squared part of the shaft. The hanger may be forged, or made by a blacksmith.

Materiały do tego kroku:

Deska z dębu białegoDeska z dębu białego1 sztuka
Pręt żelazny półokrągłyPręt żelazny półokrągły1 sztuka
Płaskownik ze stali miękkiejPłaskownik ze stali miękkiej1 sztuka
Pręt okrągły ze stali niskowęglowejPręt okrągły ze stali niskowęglowej1 sztuka

Nity żelazneNity żelazne2 sztuk
Śruba zamkowaŚruba zamkowa1 sztuka
Podkładka gumowaPodkładka gumowa1 sztuka
Podkładka płaskaPodkładka płaska2 sztuk
Nakrętka sześciokątnaNakrętka sześciokątna2 sztuk
Rura stalowa ocynkowanaRura stalowa ocynkowana1 sztuka

Potrzebne narzędzia:
Palenisko kowalskiePalenisko kowalskie
KowadłoKowadło
MłotekMłotek
Imadło warsztatoweImadło warsztatowe
Piła do metaluPiła do metalu
Wiertarka ręcznaWiertarka ręczna
Pilniki (pilnik ręczny)Pilniki (pilnik ręczny)
Klucz nastawnyKlucz nastawny
6

Build the cockpit

Fix a cockpit 5 ft long and 3 ft wide, with 4 in coaming, to the lower side of the backbone toward the stern; fasten its floor to the backbone with lag screws and fasten the coaming securely. Square corners are easiest; rounded ends with steamed, bent coaming are better. Larger craft may carry it on ribs.

Materiały do tego kroku:

Deska sosnowaDeska sosnowa4 sztuk
Wkręt do drewna pod klucz (coach screw)Wkręt do drewna pod klucz (coach screw)6 sztuk
Wkręty do drewnaWkręty do drewna1 sztuka

Potrzebne narzędzia:

Piła ręcznaPiła ręczna
Świder korbowy z wiertłemŚwider korbowy z wiertłem
Klucz nastawnyKlucz nastawny
Miara zwijanaMiara zwijana
7

Square up and stay the frame

Line up runners, plank and backbone at right angles so the craft tracks true. Hold them with four 1/4 in wire-rope stays with turnbuckles, from eyes on the bow band and on the bands at the plank ends to an eyebolt below the cockpit (Fig. 2). Loop each rope end and clamp the eye with steel clamps made for the purpose (wire-rope clips); metal thimbles in the loops make a better finish.

Materiały do tego kroku:

Lina stalowaLina stalowa1 sztuka
Ściągacz śrubowy (napinacz)Ściągacz śrubowy (napinacz)4 sztuk
NaparstekNaparstek8 sztuk
Zacisk do lin stalowychZacisk do lin stalowych8 sztuk
Śruba oczkowaŚruba oczkowa1 sztuka

Potrzebne narzędzia:

Piła do metaluPiła do metalu
Klucz nastawnyKlucz nastawny
Miara zwijanaMiara zwijana
8

Make the wishbone mast

Shape two poles of hickory or ash, 3-1/2 in thick at the base and 2 in at the top (12 ft in Fig. 6). Join them carefully at the masthead, bolt them together into an oak breast hook, and reinforce the joint with an iron strap with an eye at its upper end for the forward stay. Step the lower ends in sockets in the runner plank, about 8 ft apart, reinforced with oak mast blocks, and fit their projecting ends with 3 in two-eyed bands for the stays (Figs. 4, 6).

Materiały do tego kroku:

Drewniany drągDrewniany drąg2 sztuk
Deska z dębu białegoDeska z dębu białego1 sztuka
Płaskownik ze stali miękkiejPłaskownik ze stali miękkiej1 sztuka
Śruba zamkowaŚruba zamkowa2 sztuk
Nakrętka sześciokątnaNakrętka sześciokątna2 sztuk

Potrzebne narzędzia:

OśnikOśnik
Strug ręcznyStrug ręczny
Piła ręcznaPiła ręczna
Świder korbowy z wiertłemŚwider korbowy z wiertłem
DłutaDłuta
Palenisko kowalskiePalenisko kowalskie
KowadłoKowadło
MłotekMłotek
9

Make the yard and booms

Make the yard and two booms of hickory or ash, each 16 ft long, 2-3/4 in at the middle tapering to 1-1/2 in at the ends, with metal rings on the ends against splitting. Bolt loops to their forward ends to engage an eyebolt and ring on the backbone at the bow; set the eyebolt in a slotted plate of 3/16 in sheet iron, fastened by a lever nut (Fig. 5).

Materiały do tego kroku:

Drewniany drągDrewniany drąg3 sztuk
Pierścień metalowyPierścień metalowy6 sztuk
Śruba oczkowaŚruba oczkowa1 sztuka
Blacha ze stali miękkiejBlacha ze stali miękkiej1 sztuka
Płaskownik ze stali miękkiejPłaskownik ze stali miękkiej1 sztuka
Śruba zamkowaŚruba zamkowa3 sztuk
Nakrętka sześciokątnaNakrętka sześciokątna3 sztuk

Potrzebne narzędzia:

OśnikOśnik
Strug ręcznyStrug ręczny
Piła do metaluPiła do metalu
Wiertarka ręcznaWiertarka ręczna
Pilniki (pilnik ręczny)Pilniki (pilnik ręczny)
Imadło warsztatoweImadło warsztatowe
10

Sew the sails

Make two lateen sails of 8-oz unbleached cotton duck: lap the breadths about 1 in and stitch along the edge (or fold 1 in and double-stitch), the seams parallel to the leech. Reinforce each corner with a triangular patch of duck and bind the edges with 1/4 in tarred rope, using a sailor's palm, a diamond-pointed needle and sail twine, well waxed (the wax is ours: beeswax). Along the yard and boom edges punch holes, set two 3/4 in brass grommet rings in each, one each side, and overcast them with buttonhole stitch. Sew in reef points of 1/8 in cotton rope, whipped at the ends.

Materiały do tego kroku:

Płótno bawełnianePłótno bawełniane1 sztuka
Nici żaglomistrzowskieNici żaglomistrzowskie1 sztuka
Wosk pszczeliWosk pszczeli1 sztuka
Lina smołowanaLina smołowana1 sztuka
Mosiężne oczko (kausza do płótna)Mosiężne oczko (kausza do płótna)40 sztuk
Lina bawełnianaLina bawełniana1 sztuka

Potrzebne narzędzia:
Rękawica żaglomistrza (dłoniak)Rękawica żaglomistrza (dłoniak)
Igła żaglomistrzowskaIgła żaglomistrzowska
DziurkaczDziurkacz
NożyczkiNożyczki
Miara zwijanaMiara zwijana
11

Set up and rig

Fit the forward ring and strap bolts, the runners and steering, then step the mast, clamp the masthead and fit the bands; set the bottom stays and the masthead stay with the turnbuckles. Lace the sails to yard and booms and fix the forward ends at the bow. Run a 3/8 in halyard from the yard through a pulley at the masthead and a second on the runner plank to cleats by the cockpit, and haul up so the sails set. Lash the main sheets to the boom ends, through pulleys at the stern of the backbone and on the booms about 1 ft and 5 ft from their ends, then to cleats at the cockpit; the second boom needs a duplicate set. Taking down is the reverse.

Materiały do tego kroku:

LinaLina1 sztuka
KrążekKrążek6 sztuk
KnagaKnaga4 sztuk
Wkręty do drewnaWkręty do drewna1 sztuka

Potrzebne narzędzia:

Klucz nastawnyKlucz nastawny
Wiertarka ręcznaWiertarka ręczna
12

Finish

Smooth the masts, yard and booms, sandpaper them lightly and give them several coats of spar varnish; paint the other woodwork. He gives the metal fittings two coats of red lead "or other good paint for use on metals exposed to the weather": red lead is a lead poison, so use the other paint.

Materiały do tego kroku:

Papier ściernyPapier ścierny1 sztuka
Lakier jachtowyLakier jachtowy1 sztuka
Farba olejnaFarba olejna1 sztuka

Potrzebne narzędzia:

Pędzel szerokiPędzel szeroki
13

Sailing and troubleshooting

Ice yacht sailing.

Flow

Loading...
14

History and honest limits

From "A Wishbone-Mast Ice Yacht" by John F. Pjerrou, in **The Boy Mechanic, Book 3**, Popular Mechanics, 1919 (Project Gutenberg 71856; checked on the archive.org scan boymechanic0003unse, pp. 17-20). He gives no sail outline sizes. The tools, the metric figures and the choice of the non-lead paint he allows are ours.

Materiały

35

Wymagane narzędzia

21

Według tego planu powstaje

Powiązane blueprinty

Te blueprinty dzielą się wiedzą — technikami, materiałami lub zasadami
CC0 Domena publiczna

Ten plan jest udostępniany na licencji CC0. Możesz go swobodnie kopiować, modyfikować, rozpowszechniać i wykorzystywać do dowolnych celów, bez konieczności uzyskiwania zgody.

Wesprzyj Makera kupując produkty przez jego plan, za co zarabia Prowizja Makera ustalony przez sprzedawców, lub stwórz nową iterację tego planu i dołącz go jako połączenie w swoim własnym planie, aby dzielić się przychodami.

Dyskusja

(0)

Zaloguj się aby dołączyć do dyskusji

Ładowanie komentarzy...