SZTUKA
Piękno i dobre samopoczucie
RZEMIOSŁO
KULTURA I HISTORIA
ROZRYWKA
ŚRODOWISKO
JEDZENIE I NAPOJE
INŻYNIERIA ODWROTNA
NAUKI
LEKKOATLETYKA
TECHNOLOGIA
URZĄDZENIA DO NOSZENIA
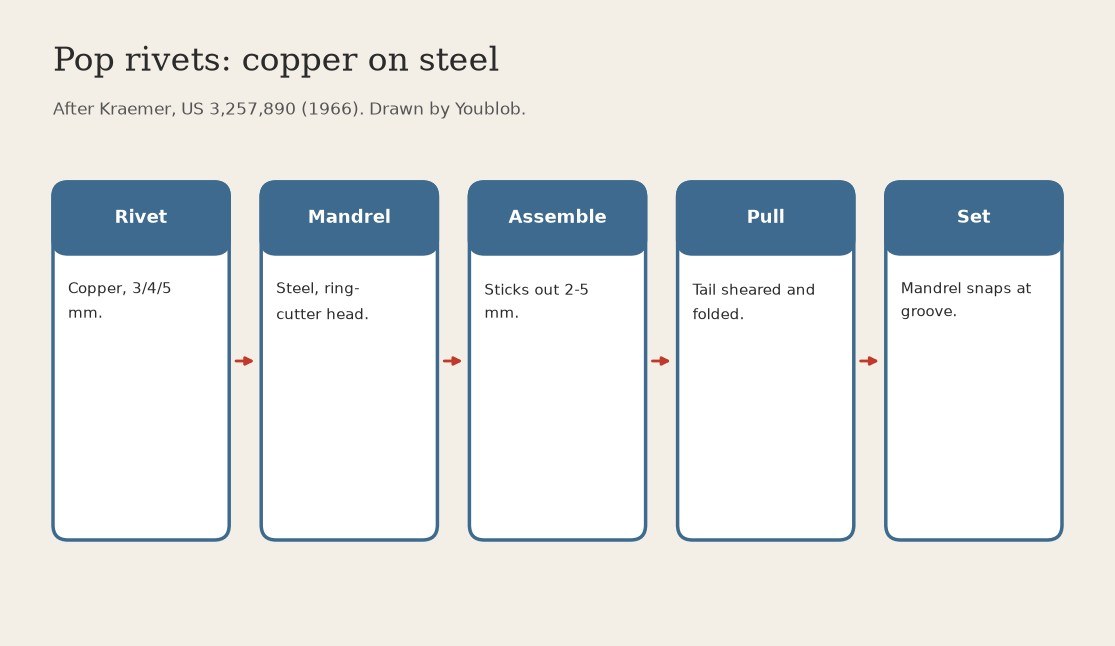


Pop Rivets: Copper Hollow Rivet on a Steel Break Mandrel with a Ring-Cutter Head (Kraemer, US 3,257,890)
A blind rivet set from one side. Kraemer's mandrel head has a sharp ring edge that shears the inner part of the rivet's tail and pushes it into the bore, while the outer part folds round the head. The pull needed is about half, and the set rivet is about as strong in shear as a solid one.
Result: copper pop rivets, 3, 4 or 5 mm, each on its steel mandrel.
Source: Kraemer, US 3,257,890 (1966). His other rivet metals, aluminium-magnesium and 80/20 copper-nickel, are separate compositions. Not given: die design. Picture drawn by Youblob.
Zaawansowany
Factory process
Instrukcje
1
1
Stamp the copper rivet
Stamp the copper rivet
Form a hollow rivet with a flange (set head) at one end and a straight bore. Kraemer says the parts can be made e.g. by stamping. Sizes (mm), outside / bore: 5 / 3, 4 / 2.6, 3 / 1.8. Ours: from copper sheet.
Materiały do tego kroku:
 Blacha miedziana1 as required
Potrzebne narzędzia:
 Prasa do tłoczenia
2
2
Form the steel mandrel
Form the steel mandrel
Shape a steel mandrel: draw shaft, a groove as the breaking point, a cone tapering up to the bore size, and a near-hemispherical button head. Head edge diameter (mm): 4.3, 3.6, 2.6 for the 5, 4, 3 mm rivets, so it covers 55-70 % of the rivet's end face. Ours: from steel wire.
Materiały do tego kroku:
 Drut stalowy1 as required
Potrzebne narzędzia:
Prasa do tłoczenia3
3
Assemble and size for the work
Assemble and size for the work
Push the mandrel fully into the rivet; it is supplied this way. Pick a length that sticks out past the sheets by 3-5 mm (5 mm rivet), 2.5-3.5 mm (4 mm) or 2-4 mm (3 mm).
Potrzebne narzędzia:
 Zestaw nitownicy jednostronnej
4
4
Set it from one side
Set it from one side
Put the rivet in the hole, grip the draw shaft and press the tool's head on the flange while pulling. The ring edge shears the tail, the rest bulges and folds round the button head, and the mandrel breaks at its groove.
Potrzebne narzędzia:
Zestaw nitownicy jednostronnejMateriały
2- 1 as requiredZastępnik
- 1 as requiredZastępnik
Wymagane narzędzia
2- Zastępnik
- Zastępnik
Według tego planu powstaje

Powiązane blueprinty
Te blueprinty dzielą się wiedzą — technikami, materiałami lub zasadami

CC0 Domena publiczna
Ten plan jest udostępniany na licencji CC0. Możesz go swobodnie kopiować, modyfikować, rozpowszechniać i wykorzystywać do dowolnych celów, bez konieczności uzyskiwania zgody.
Wesprzyj Makera kupując produkty przez jego plan, za co zarabia Prowizja Makera ustalony przez sprzedawców, lub stwórz nową iterację tego planu i dołącz go jako połączenie w swoim własnym planie, aby dzielić się przychodami.