Producing Salt by Solar Evaporation of Seawater — Humanity's Oldest Chemical Process
Instrukcje
Understand seawater composition
Understand seawater composition
Seawater contains approximately 35 grams of dissolved salts per liter (3.5% salinity). The dissolved salts are roughly: 78% sodium chloride (NaCl), 11% magnesium chloride (MgCl2), 5% magnesium sulfate (MgSO4), 4% calcium sulfate (CaSO4), and 2% other salts including potassium chloride. To produce 1 kg of salt, you need approximately 28-30 liters of seawater. Solar evaporation works best in warm, dry climates with consistent sunshine and low rainfall. Traditional salt-making regions include the Mediterranean, India (Gujarat), Southeast Asia, and West Africa.
Select a site for evaporation pans
Select a site for evaporation pans
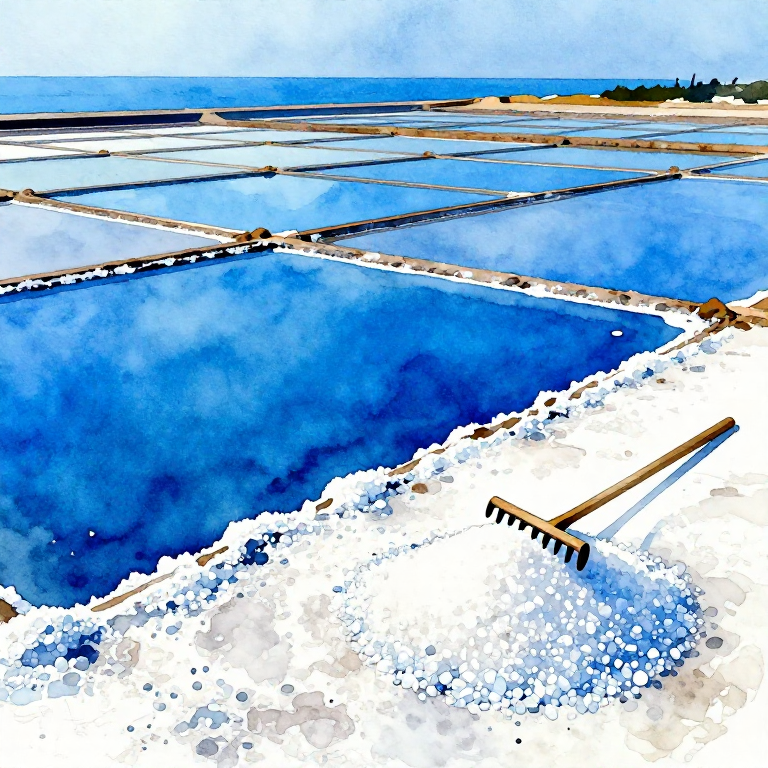
Choose a flat, sun-exposed area near the coast. The site should be above the high-tide line to avoid flooding. Ideal characteristics: maximum sun exposure (south-facing in the Northern Hemisphere), minimal shade from trees or structures, and protection from rain (or a plan to cover pans during rain). Clay or compacted earth makes the best natural pan floor — sandy soil lets brine drain away. Wind is beneficial as it accelerates evaporation. Avoid sites near river mouths where freshwater dilutes salinity.
Construct the first pan (concentrating pan)
Construct the first pan (concentrating pan)
Dig a shallow rectangular basin approximately 2 m x 3 m and 15-20 cm deep. Line the bottom with compacted clay or, if available, a pond liner to prevent seepage. Build low earthen dikes around the edges. The floor must be as level as possible — uneven floors lead to uneven evaporation and premature crystallization in shallow spots. This first pan is the concentrating pan where seawater begins its evaporation journey.
Materiały do tego kroku:
 Compacted Clay (for pan lining)100 kilogram
 Earthen Material (for dikes)200 kilogram
Tools needed:
 Shovel
 Rake
Rake Spirit Level
Construct the second and third pans
Construct the second and third pans
Build two additional pans of similar dimensions but progressively shallower: the second pan 10-15 cm deep, and the third (crystallizing) pan only 5-10 cm deep. Connect the pans with small gated channels or sluices so brine can flow from one to the next by gravity. Position the pans in sequence — each slightly lower than the previous. The multi-pan system allows progressive concentration: calcium sulfate (gypsum) precipitates first at 3-4x concentration in pan two, while NaCl crystallizes in the final pan at 9-10x concentration.
Materiały do tego kroku:
Compacted Clay (for pan lining)150 kilogramTools needed:
ShovelRakeCollect seawater
Collect seawater
Collect clean seawater at high tide or from offshore, avoiding river-diluted or harbor-contaminated water. Use buckets, jugs, or a siphon/pump system to fill the first concentrating pan to a depth of 10-15 cm. For a 6 m2 pan at 15 cm depth, you need approximately 900 liters. Collect on calm, clear days when the water is not stirred up with sediment. Let the water settle in the first pan for 24 hours — suspended silt and organic matter will settle to the bottom.
Materiały do tego kroku:
 Clean Seawater900 litrów
Tools needed:
 Buckets (20 liter)
 Water Transport Containers
Begin solar evaporation in the first pan
Begin solar evaporation in the first pan
Leave the seawater to evaporate in the first pan under the sun. Evaporation rate depends on temperature, humidity, wind speed, and pan surface area. In warm, dry climates (Mediterranean, tropical dry season), expect 5-10 mm of evaporation per day. A 15 cm deep pan will reduce by half in about 10-15 days. The brine gradually turns from clear to slightly pink or amber as concentration increases. Skim off any floating debris or algae that develops.
Tools needed:
 Fine-Mesh Skimmer
Transfer concentrated brine to the second pan
Transfer concentrated brine to the second pan
When the brine in the first pan has reduced to about one-third of its original volume (salinity approximately 10-12%), transfer it to the second pan through the connecting channel. At this concentration, calcium sulfate (CaSO4, gypsum) begins to precipitate as fine white crystals on the pan floor. This is desirable — removing gypsum before the NaCl crystallization stage produces cleaner table salt. Refill the first pan with fresh seawater to continue the cycle.
Monitor for NaCl saturation point
Monitor for NaCl saturation point
Continue evaporation in the second pan. When salinity reaches approximately 25-26% (about 9-10 times the original seawater concentration), sodium chloride begins to crystallize. You can test for this point using a hydrometer (read 1.20-1.21 specific gravity) or by observing the first small cubic crystals forming on the surface and edges. The brine at this stage is called bittern. Transfer this near-saturated brine to the third (crystallizing) pan, leaving the gypsum deposits behind in pan two.
Tools needed:
Crystallize salt in the final pan
Crystallize salt in the final pan
In the shallow crystallizing pan (5-10 cm deep), NaCl crystals form as the brine continues to evaporate. Crystals appear first as a thin floating crust on the surface, then grow as hollow pyramidal hoppers (inverted stepped pyramids characteristic of NaCl). As they grow heavier, they sink and accumulate on the pan floor as a thick salt bed 2-5 cm deep. The process takes 5-10 days in warm, dry conditions. Do NOT let the pan evaporate completely — stop when about 2 cm of liquid (bittern) remains above the salt.
Harvest the salt crystals
Harvest the salt crystals
Drain or scoop off the remaining bittern (bitter liquid rich in magnesium chloride and potassium salts — this is the traditional source of nigari/magnesium chloride used in tofu making). Use a wooden rake or flat shovel to scrape the salt crystals from the pan floor. Pile the wet salt on a raised platform or in baskets to drain. The harvested raw salt is a mixture of NaCl crystals, some trapped bittern, and minor impurities. Total yield from 900 liters of seawater: approximately 25-30 kg of raw salt.
Tools needed:
 Wooden Rake
 Flat Shovel
 Draining Baskets
Wash the salt with saturated brine
Wash the salt with saturated brine
To remove bitter magnesium and potassium salts trapped between crystals, wash the harvested salt with a small amount of saturated sodium chloride solution (brine). Make the wash brine by dissolving salt in water until no more dissolves (approximately 360 g NaCl per liter at 20 degrees C). Pour this saturated brine over the salt pile — it dissolves the more soluble MgCl2 and KCl impurities without dissolving significant NaCl (because the brine is already saturated with NaCl). Drain and repeat once more if the salt tastes bitter.
Materiały do tego kroku:
 Existing Salt (for making saturated wash brine)2 kilogram
Tools needed:
 Mixing Container
Dry the washed salt
Dry the washed salt
Spread the washed salt in a thin layer (2-3 cm) on a clean, raised surface — a wooden table, clean tarp, or woven mat works well. Cover with a fine mesh or cheesecloth to keep insects and debris out while allowing air circulation. In direct sun with good airflow, the salt dries in 1-2 days. Turn it occasionally with a wooden paddle to expose all surfaces. Properly dried salt should feel completely dry and free-flowing, with no clumping.
Tools needed:
 Clean Drying Surface
 Cheesecloth
 Wooden Paddle
Grade and store the finished salt
Grade and store the finished salt
Sieve the dried salt to separate crystal sizes: coarse crystals (above 2 mm) for cooking and curing, fine crystals for table use. Well-made solar salt is white to slightly gray, tastes clean and salty with no bitterness (bitterness indicates remaining magnesium salts — wash again). Store in dry, airtight containers — ceramic jars, glass jars, or food-grade plastic. Salt is hygroscopic (absorbs moisture from air), so keep containers sealed. Properly stored, salt keeps indefinitely — it is itself a preservative. Label with production date and source.
Tools needed:
 Sieves (2 mm and 1 mm mesh)
 Airtight Storage Containers
Maintain the evaporation pans for next cycle
Maintain the evaporation pans for next cycle
After harvesting, clean the crystallizing pan by scraping off any remaining salt crust and gypsum deposits. Repair any cracks in the clay lining. Re-level the pan floor if it has become uneven. In commercial salt pans (salinas), the cycle is continuous — fresh seawater enters the first pan while salt is harvested from the third. A well-maintained three-pan system can produce multiple harvests per season. In tropical climates with year-round sunshine, production can be nearly continuous during dry months.
Tools needed:
ShovelRakeMateriały
5- 100 kilogramPlaceholder
- 200 kilogramPlaceholder
- 900 litrówPlaceholder
- Placeholder
Wymagane narzędzia
16- Placeholder
- Placeholder
- Placeholder
- Placeholder
- Placeholder
- Placeholder
- Placeholder
- Placeholder
- Placeholder
- Placeholder
- Placeholder
- Placeholder
- Placeholder
- Placeholder
Materiały z połączonych planów
Required Equipment
Equipment this kind of build typically needs — buy from any maker below.
- CriticalNitrile Lab Gloves·
 Boxing Gloves (Training)
 Leather Gauntlet Gloves
 Cotton Gloves
 Welding Gloves
 Heavy-Duty Gloves
 Leather Work Gloves
 - CriticalChemical Splash Goggles·
 Splash-Proof Safety Goggles
 Chemical Splash Goggles
 Safety Goggles
 Welding Goggles
 Laser Safety Goggles Set
 Anti-Fog Safety Goggles
 - RecommendedBeaker·
 Borosilicate Beaker
 Heat-Resistant Glass Beaker (1 liter)
 Glass Beaker (Borosilicate, 500ml)
 Beaker Set
 Volumetric Beaker
 Borosilicate Glass Beaker
 - RecommendedDust Mask / Respirator·
 Full-Face Gas Mask (ABEK multi-gas cartridge)
 Dust Mask
 Venetian Mask Blank (Papier-Mache)
 Full-Face Respirator
 Respirator Fit Test Kit
 Respirator with Acid Gas Cartridge
 - RecommendedGraduated Cylinder·
 Graduated Cylinder (100 ml)
 Cast Iron Cylinder
 Graduated Mixing Cups (50-Pack)
 Measuring Cylinder
 Hydraulic Cylinder
 Graduated Cylinder (10ml)
 - RecommendedSafety Glasses·
 Safety Sign (Caution/Warning)Splash-Proof Safety Goggles
 Reflective Safety Vest Kit (DIY)Chemical Splash Goggles
 Safety Netting for Rockfall
 Steel-Toed Safety Boots
 - RecommendedPrecision Scale·
 Iron Scale
 Livestock Scale
 Architectural Model Kit (Scale 1:100)
 Weighing Scale
 Precision Scale
 Platform Weighing Scale
 - RecommendedWork Gloves·Boxing Gloves (Training)Leather Gauntlet GlovesCotton GlovesWelding GlovesHeavy-Duty GlovesLeather Work Gloves
- OptionalFire Extinguisher·
 ABC Fire Extinguisher
 Fire Extinguisher
 - OptionalFirst Aid Kit·
 First Aid Kit
 Mountain First Aid Kit (Altitude)
 Workshop First Aid Kit
 Bow Release Aid
You can swap these in
Can't get one of the materials? Swap it for an equivalent — these work just as well.
- Instead of Compacted Clay (for pan lining), try:
 Refractory Clay
 Wild Clay
 Porcelain Clay
 - Instead of Distilled Water, try:
 Distilled Water (1 Liter)
 - Instead of Mixing Container, try:
 Container
 Tin Container (Round)
 - Instead of Hydrometer, try:
 Brewing Hydrometer
 - Instead of Existing Salt (for making saturated wash brine), try:
 Pickling Salt
 Nylon Salt
 - Instead of Fine-Mesh Skimmer, try:
 Perforated Skimmer (झारा)
 - Instead of Clean Drying Surface, try:
 Video Editing Control Surface (USB)
 - Instead of Earthen Material (for dikes), try:
 Temper Material
Recommended for this build
Products makers often use with builds like this one.
 Fire PokerUsed together and in similar buildsHeat-Resistant Glass Beaker (1 liter)Frequently used with this build's materials
 Stirring Rod (wooden)Frequently used with this build's materials
 Lime (Calcium Hydroxide)Used together and in similar builds
 CharcoalUsed together and in similar buildsChemical Splash GogglesUsed together and in similar builds
 Glass MullerFrequently used with this build's materials
 FirewoodUsed together and in similar builds
Related blueprints
Other builds that share materials, tools, or techniques with this one.


CC0 Domena publiczna
Ten plan jest udostępniany na licencji CC0. Możesz go swobodnie kopiować, modyfikować, rozpowszechniać i wykorzystywać do dowolnych celów, bez konieczności uzyskiwania zgody.
Wesprzyj Makera kupując produkty przez jego plan, za co zarabia Prowizja Makera ustalony przez sprzedawców, lub stwórz nową iterację tego planu i dołącz go jako połączenie w swoim własnym planie, aby dzielić się przychodami.