Współpraca
SZTUKA
Piękno i dobre samopoczucie
RZEMIOSŁO
KULTURA I HISTORIA
ROZRYWKA
ŚRODOWISKO
JEDZENIE I NAPOJE
INŻYNIERIA ODWROTNA
NAUKI
LEKKOATLETYKA
TECHNOLOGIA
URZĄDZENIA DO NOSZENIA
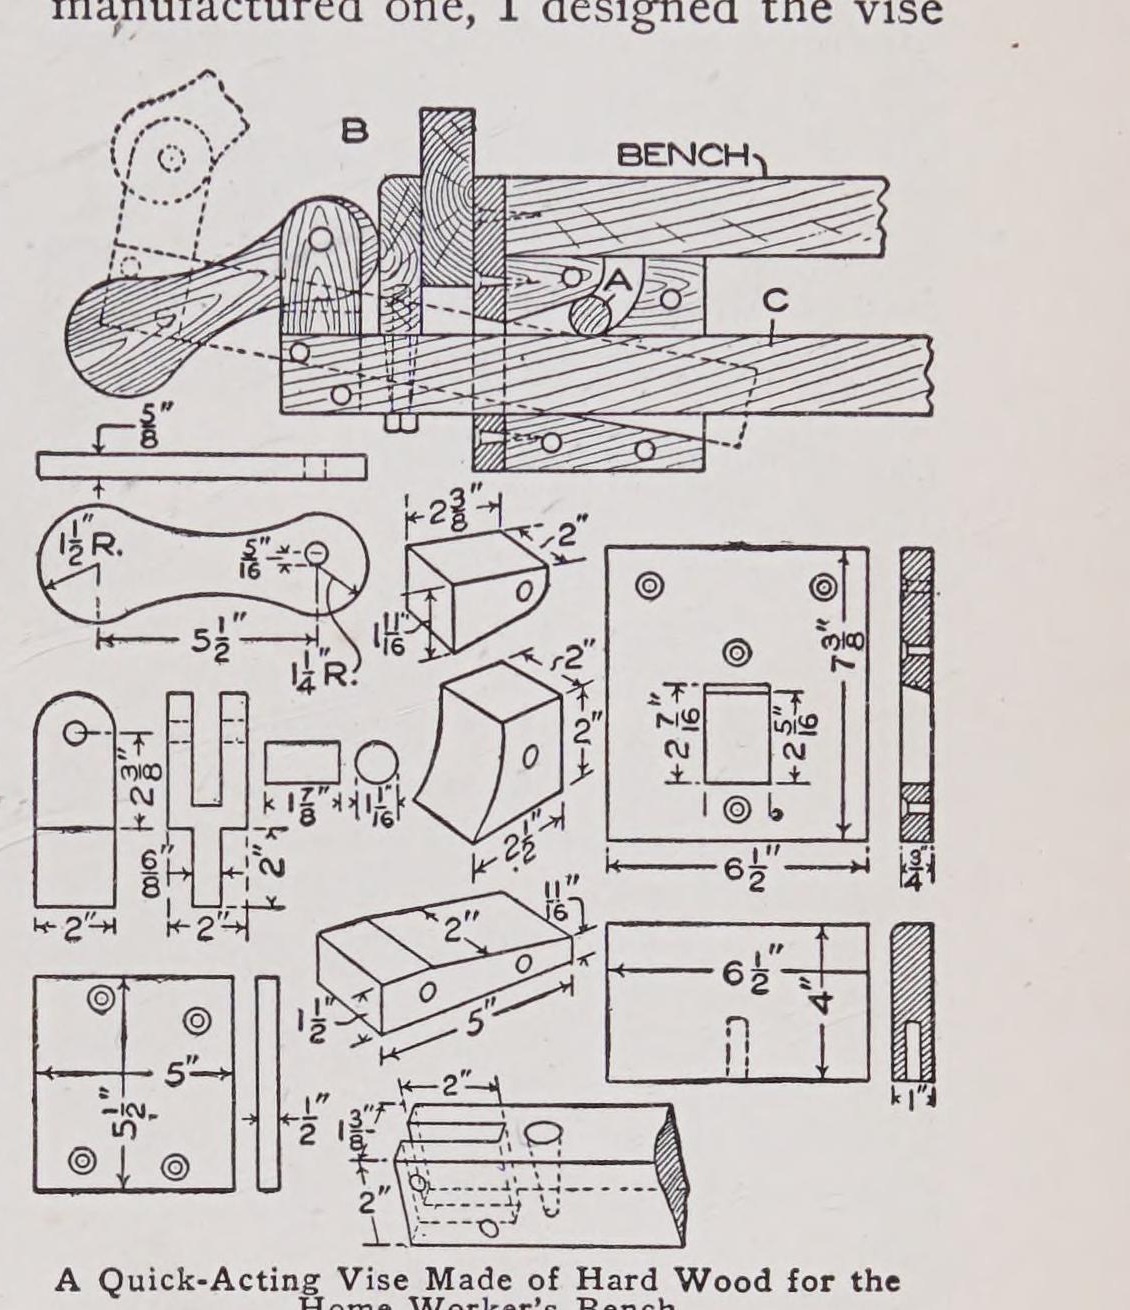


Quick-Acting Hardwood Bench Vise with Cam and Drop Roll (Boy Mechanic, 1919)
A home-made bench vise entirely of hard wood: the front jaw slides in and out on arm C, a loose roll A drops into place to lock it, a cam lever in front gives the final squeeze, and the pivoted jaw B tilts to grip work whose sides are not parallel.
Średniozaawansowany
A day
Instrukcje
1
1
Sizes in mm
Sizes in mm
Wczytywanie notatnika Jupyter…
2
2
Read the Boy Mechanic
Read the Boy Mechanic
"A detail is given of each part, with dimensions, so that it is not difficult to make it from hard wood."
3
3
Cut the parts to the drawing
Cut the parts to the drawing
Cut every part from hard wood to the sizes in the drawing: the 6-1/2 x 7-3/8 x 3/4 in plate with its 2-5/16 x 2-7/16 in opening, the 6-1/2 x 4 x 1 in slotted plate, the 5 x 5-1/2 x 1/2 in plate, the blocks, the forked piece, the long bar drawn at the bottom (2 x 1-3/8 in; we take it to be arm C) and the cam lever (5-1/2 in between centres, 5/16 in pin hole; its edge view is drawn 5/8 in).
Materiały do tego kroku:
 Deska z drewna liściastego1 sztuka
Potrzebne narzędzia:
 Piła ręczna
 Piłka włosowa
 Dłuta
 Świder korbowy z wiertłem
4
4
Turn roll A
Turn roll A
Make roll A, a round hardwood roll 1-1/16 in across and 1-7/8 in long.
Materiały do tego kroku:
 Kołki z twardego drewna1 sztuka
Potrzebne narzędzia:
Piła ręczna5
5
Assemble under the bench
Assemble under the bench
Fit the parts under the bench top as the section view shows: arm C slides through the fixed part, roll A sits in its curved seat behind the jaw so it can drop and wedge the arm, jaw B is pivoted so it swings loose, and the cam lever is pinned at the front. Screw and bolt the fixed parts to the bench.
Materiały do tego kroku:
 Wkręty do drewna1 sztuka
 Śruba zamkowa1 sztuka
Potrzebne narzędzia:
Świder korbowy z wiertłem Młotek
6
6
Use it
Use it
To open: turn the cam, then lift the front of the vise to free roll A, and slide the front jaw out to the size of the work. Put the work in: roll A drops into place and clamps arm C. Turn the cam to tighten.
7
7
Troubleshooting
Troubleshooting
Wooden vise troubleshooting.
Flow
Loading...
8
8
History and honest limits
History and honest limits
From **The Boy Mechanic, Book 3** (Popular Mechanics, 1919), p. 85, by J. C. Hansen (checked on the archive.org scan boymechanic0003unse). The text names only roll A, jaw B, arm C and the cam; build the other pieces as drawn. Metric figures are ours.
Materiały
4- 1 sztukaZastępnik
- 1 sztukaZastępnik
- 1 sztukaZastępnik
- 1 sztukaZastępnik
Według tego planu powstaje

Powiązane blueprinty
Te blueprinty dzielą się wiedzą — technikami, materiałami lub zasadami
CC0 Domena publiczna
Ten plan jest udostępniany na licencji CC0. Możesz go swobodnie kopiować, modyfikować, rozpowszechniać i wykorzystywać do dowolnych celów, bez konieczności uzyskiwania zgody.
Wesprzyj Makera kupując produkty przez jego plan, za co zarabia Prowizja Makera ustalony przez sprzedawców, lub stwórz nową iterację tego planu i dołącz go jako połączenie w swoim własnym planie, aby dzielić się przychodami.