SZTUKA
Piękno i dobre samopoczucie
RZEMIOSŁO
KULTURA I HISTORIA
ROZRYWKA
ŚRODOWISKO
JEDZENIE I NAPOJE
INŻYNIERIA ODWROTNA
NAUKI
LEKKOATLETYKA
TECHNOLOGIA
URZĄDZENIA DO NOSZENIA
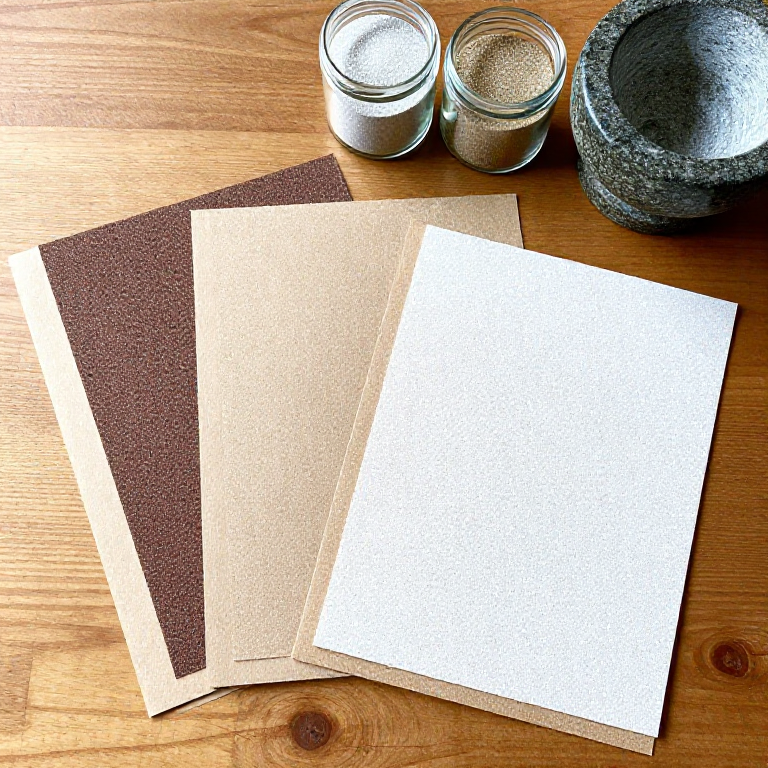


Sandpaper from Sand, Hide Glue and Paper
A coated abrasive is grit glued to a backing. The first recorded one, in 13th-century China, bonded crushed shells, seeds and sand to parchment with natural gum. Here clean quartz sand is crushed, sieved into grades and scattered on paper brushed with warm hide glue.
Sieve mesh only roughly matches a shop grit number: real P grades are set by ISO 6344. Quartz grit on hide glue wears faster than garnet or aluminium oxide paper, and water softens the glue, so use it dry.
Początkujący
1 hour, plus a day drying
Instrukcje
1
1
Crush the sand
Crush the sand
With a dust mask on, crush clean quartz sand in the mortar, a few spoonfuls at a time.
Materiały do tego kroku:
 Piasek kwarcowy300 g
Potrzebne narzędzia:
 Moździerz z tłuczkiem
 Maska przeciwpyłowa
2
2
Sieve into grades
Sieve into grades
Sieve through the 60, 80 and 120 mesh sieves stacked coarse on top. Keep what each sieve holds in its own labelled jar: coarse, medium and fine.
Potrzebne narzędzia:
 Sito 60 mesh
 Sito o oczkach 80
 Sito 120 oczek
 Słoiki szklane z pokrywkamiMaska przeciwpyłowa
3
3
Warm the glue
Warm the glue
Soak hide glue granules in water, then warm them in a double boiler to about 60 °C until runny. Do not let it boil.
Materiały do tego kroku:
 Klej skórny50 g
 Woda0.1 litr
Potrzebne narzędzia:
 Garnek do kąpieli wodnej
 Płyta grzejna
 Termometr z sondą pozostawianą w potrawie
4
4
Glue the paper
Glue the paper
Brush a thin, even coat of glue over one face of a sheet of strong paper, edge to edge.
Materiały do tego kroku:
 Papier3 arkuszy
Potrzebne narzędzia:
 Pędzel do kleju
5
5
Scatter the grit
Scatter the grit
While the glue is wet, sprinkle one grade of grit thickly over it, press it in with a rolling pin over a clean sheet, and let it set for a minute.
Potrzebne narzędzia:
 Wałek do ciasta
6
6
Shake off and dry
Shake off and dry
Tip the sheet on edge and tap off the loose grit back into its jar. Dry it flat for a day, then label the back with its grade.
Potrzebne narzędzia:
Słoiki szklane z pokrywkami7
7
Test it
Test it
Sand a scrap of softwood ten strokes and look at the scratches. Cut sheets to size.
Potrzebne narzędzia:
 Nożyczki
8
8
Troubleshooting
Troubleshooting
Home-made sandpaper troubleshooting.
Flow
Loading...
Materiały
4- 300 gZastępnik
- 50 gZastępnik
- 0.1 litrZastępnik
- 3 arkuszyZastępnik
Wymagane narzędzia
12- Zastępnik
- Zastępnik
- Zastępnik
- Zastępnik
- Zastępnik
- Zastępnik
- Zastępnik
- Zastępnik
- Zastępnik
- Zastępnik
- Zastępnik
Według tego planu powstaje


Powiązane blueprinty
Te blueprinty dzielą się wiedzą — technikami, materiałami lub zasadami

CC0 Domena publiczna
Ten plan jest udostępniany na licencji CC0. Możesz go swobodnie kopiować, modyfikować, rozpowszechniać i wykorzystywać do dowolnych celów, bez konieczności uzyskiwania zgody.
Wesprzyj Makera kupując produkty przez jego plan, za co zarabia Prowizja Makera ustalony przez sprzedawców, lub stwórz nową iterację tego planu i dołącz go jako połączenie w swoim własnym planie, aby dzielić się przychodami.