SZTUKA
Piękno i dobre samopoczucie
RZEMIOSŁO
KULTURA I HISTORIA
ROZRYWKA
ŚRODOWISKO
JEDZENIE I NAPOJE
INŻYNIERIA ODWROTNA
NAUKI
LEKKOATLETYKA
TECHNOLOGIA
URZĄDZENIA DO NOSZENIA

The Tapered Pipe Thread: A Screw That Seals
Every valve in this batch has two ends, and both of them have to be joined to something without leaking. The oldest general answer is a screw thread that is not parallel.
A parallel thread cannot seal: it needs clearance to assemble, and clearance is a helical path straight out of the joint. Cut the same thread on a **taper of one in sixteen** and screwing it in drives the flanks into interference — the metal wedges, and the joint holds because it is jammed rather than because it is tight.
That change is credited to Robert Briggs in 1862 and it is why a plumbing fitting is a different object from a nut and bolt. This rung cuts a thread, measures the taper, finds out exactly how much of a turn seals it, and then over-tightens one on purpose to see how the wedge splits the fitting.
Początkujący
About 3 hours
Instrukcje
1
1
Measure the taper, and prove it is there
Measure the taper, and prove it is there
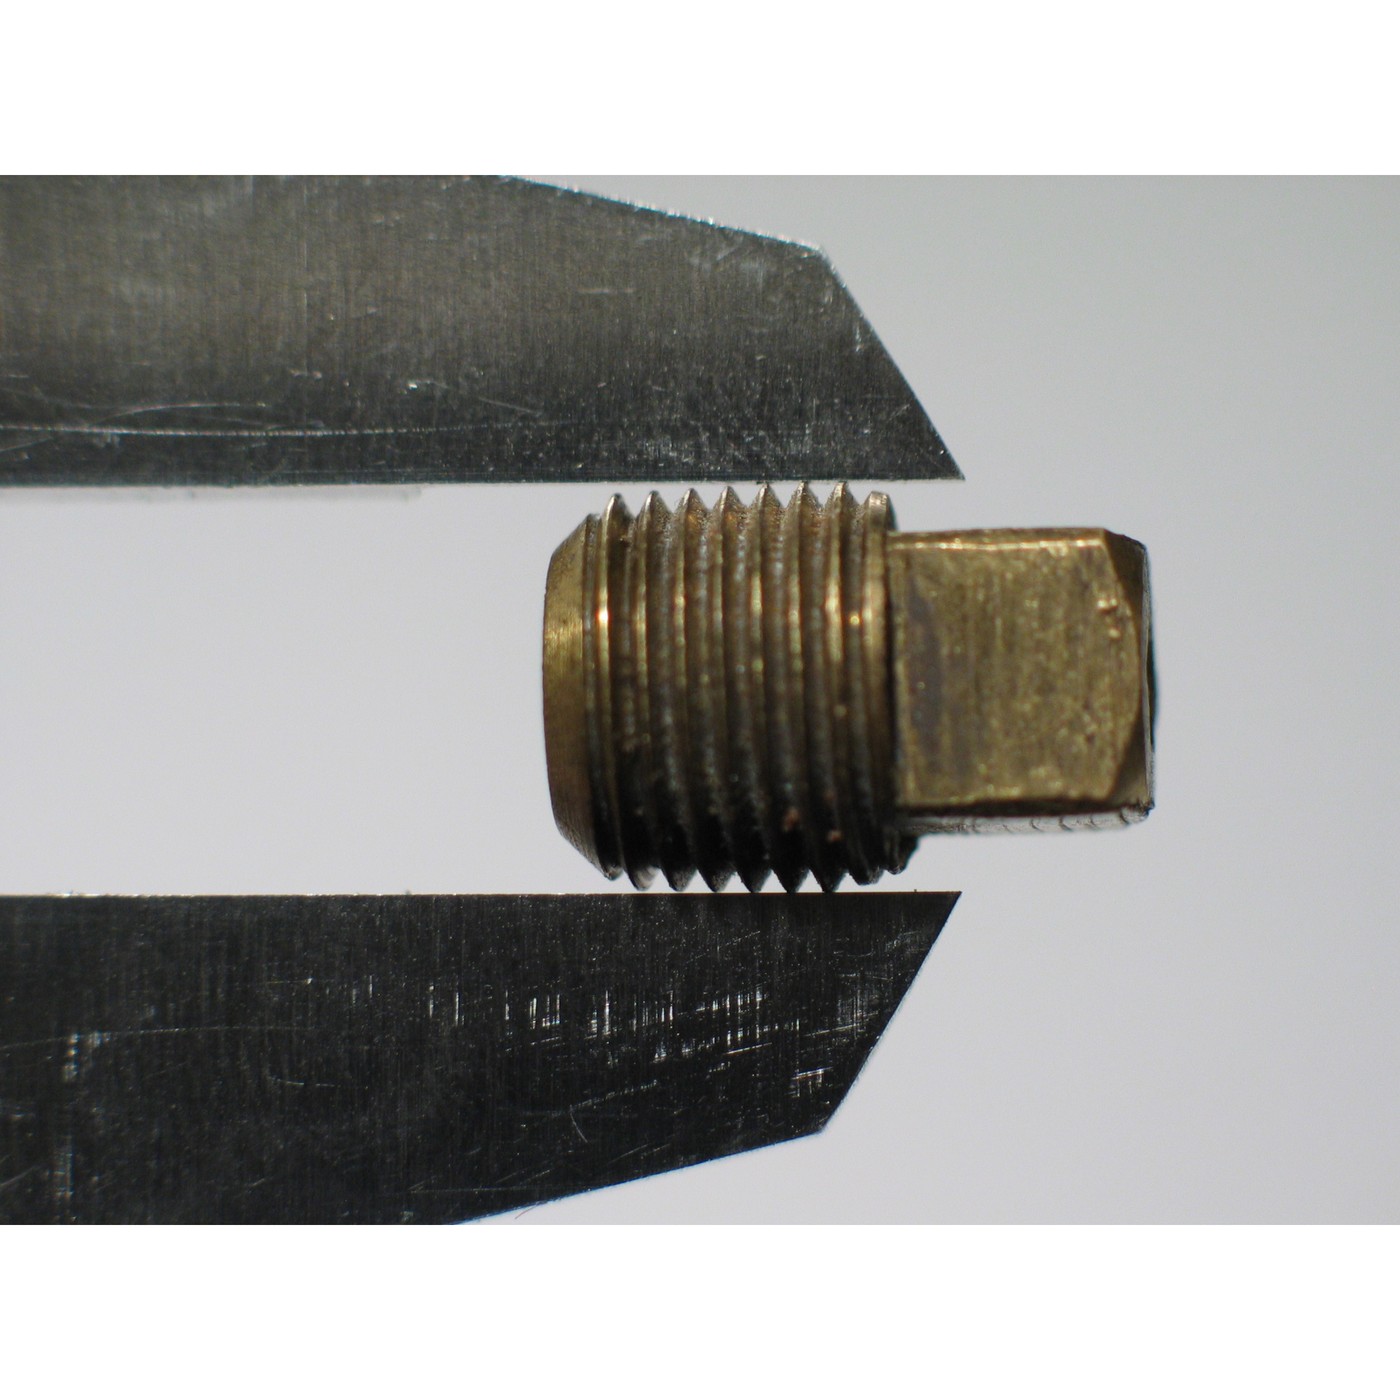
The photograph on this page is a brass NPT plug held in a caliper, and that is the measurement to make first because the taper is small enough to be easy to disbelieve.
Take a tapered male fitting and measure the **major diameter at the first full thread** and again **four or five threads along**, with the caliper jaws square to the axis. Divide the difference by the distance between the two measurements.
You should get close to **1 in 16** — 0.0625, or 3/4 inch per foot, which is the figure every tapered pipe thread in the English-speaking world uses.
Now do the same with an ordinary bolt of similar size. The diameter does not change at all. That single difference is the whole subject of this rung.
Count threads per inch with a thread pitch gauge and note something that surprises everybody: **the pitch has almost nothing to do with the nominal size**. An eighth-inch and a quarter-inch NPT are both 27 threads per inch; a three-eighths and a half are both 14. The 'size' of a pipe thread refers to the pipe's approximate **bore**, not to any dimension you can measure on the outside, which is why a 1/2 inch fitting measures about 21 mm across the threads.
Potrzebne narzędzia:
 Złączka gwintowana do rur
 Rura stalowa ocynkowana
 Suwmiarka cyfrowa 6 cali
 Mikrometr
 Wzornik gwintów
 Imadło warsztatowe
 Mikroskop cyfrowy
2
2
Cut a thread, and find hand-tight
Cut a thread, and find hand-tight
Cut a tapered thread yourself with a pipe die. It behaves quite differently from cutting a machine thread, and the difference teaches the mechanism.
Clamp a short length of steel or brass pipe in the vise, square. Start the die and turn. Unlike a normal die, **the effort rises continuously** as you go, because the die is cutting progressively deeper into a taper it is creating. You do not run the die to a stop; you stop when the pipe end is flush with the far face of the die, which is what sets the thread length.
Clean the swarf out, deburr the bore — a burr inside a pipe is a permanent restriction — and screw the fitting together **dry, by hand**.
Mark the position where it stops turning by hand. That is **hand-tight**, and it is the reference every instruction uses. Now take a spanner and count. Somewhere between two and three turns past hand-tight the joint will be solid.
Step 4 shows what those turns are actually doing: at fourteen threads per inch, one turn closes the joint by about 0.11 mm on the diameter. The seal is made in hundredths of a millimetre, by wedging, and that is why the instruction is in turns rather than torque.
Materiały do tego kroku:
Rura stalowa ocynkowana1 sztuka Olej do prowadnic obrabiarki (1 kwarta)1 sztuka
Potrzebne narzędzia:
 Zestaw do gwintowania
 Klucz hydrauliczny
 Klucz nastawnyImadło warsztatowe
 Piła do metalu
 Gradownik
 Pilniki (pilnik ręczny)Suwmiarka cyfrowa 6 cali
 Okulary ochronne bezbarwne
 Skórzane rękawice robocze
3
3
Seal it three ways, and split one on purpose
Seal it three ways, and split one on purpose
A tapered thread wedges, but the helix itself is still a spiral leak path, so in practice it is always assembled with something in it. Test three and compare.
Make up the same joint three times with a gauge on the end and pressurise it:
1. **Dry.** It will usually weep, and it may take a lot of force before it stops. This surprises people who believe the taper alone does the job.
2. **PTFE tape.** Wrap in the direction the fitting turns — clockwise looking at the male end — so tightening does not unwind it. Three or four turns, pressed into the threads, and keep it off the first thread so it cannot shed into the bore.
3. **Pipe thread sealant.** A paste, brushed on. It fills better than tape on a rough or damaged thread, stays put in vibration, and is what you want on anything that will be taken apart.
Now the destructive one. Take a scrap **brass** female fitting and keep turning past the point where it is solid — another turn, then another. Watch the outside of the socket under the microscope as you go.
You are driving a wedge into a ring. It will either split with a crack along the axis, or — worse — it will not split today and will crack in a week. Step 4 estimates the hoop stress and it is far past brass's yield.
That is why a tapered joint has no torque figure. It is tightened until it stops and then a little, by feel, and a fitting that has been over-tightened once is scrap.
Pressurise with water rather than air — a fitting that lets go under air is dangerous, under water it is merely wet. Eye protection throughout.
Materiały do tego kroku:
 Taśma uszczelniająca PTFE do gwintów1 sztuka
 Pasta uszczelniająca do gwintów rurowych1 sztukaRura stalowa ocynkowana2 sztuk
Potrzebne narzędzia:
Złączka gwintowana do rurKlucz hydraulicznyKlucz nastawnyImadło warsztatowe Manometr
 Ręczna pompa próbna ciśnieniowa
 WiadroMikroskop cyfrowyOkulary ochronne bezbarwne
 Rękawice nitrylowe
4
4
The taper, the turns and the wedge
The taper, the turns and the wedge
Wczytywanie notatnika Jupyter…
5
5
History and context
History and context
**Attribution, stated honestly.** The tapered pipe thread is credited to **Robert Briggs**, who set out the standard in **1862** while chief engineer of the Pascal Iron Works in Philadelphia. **No patent number is asserted here**, and none should be: Briggs's contribution was published as a *standard* — a table of diameters, pitches and lengths — rather than filed as an invention. It was adopted by the trade, later refined into the American National Pipe Thread we call NPT, and Britain settled on the parallel-and-tapered pair now called BSPP and BSPT.
**A standard is a kind of invention.** This is the second time in the recent batches that the decisive contribution has been an agreement rather than a mechanism — the 18650 cell's fixed dimensions were the other. A thread form that everyone cuts the same way means a valve from one foundry screws into a pipe from another, and that interchangeability is worth more than any individual fitting.
**Why the sizes are so strange.** A '1/2 inch' fitting measures about 21 mm over the threads and has no half-inch dimension anywhere on it. The name refers to the approximate **bore** of the wrought-iron pipe the thread was designed for in the 1860s, and as pipe walls got thinner the bore drifted while the name did not. It is a fossil, it confuses everyone once, and it is far too deeply embedded to change.
**Honest limits.** A tapered thread is a **single-use interference fit** in practice: it beds in, and remaking the same joint repeatedly cuts the flanks and eventually stops sealing. It gives no way to control the final orientation of the fitting — if the valve ends up facing the wrong way, your choices are to over-tighten it or to back it off and leak, which is precisely why unions and flanges exist. And it needs a sealant, so the joint depends on a consumable that has to be compatible with whatever is inside; PTFE tape in an oxygen line or a fuel line is a specification question, not a shelf question.
Materiały
4- 2 sztukZastępnik
- Olej do prowadnic obrabiarki (1 kwarta)10% prowizji1 sztukaZastępnik
- Zastępnik
- Zastępnik
Wymagane narzędzia
19- Zastępnik
- Zastępnik
- Zastępnik
- Zastępnik
- Zastępnik
- Zastępnik
- Zastępnik
- Zastępnik
- Zastępnik
- Zastępnik
- Zastępnik
- Zastępnik
- Zastępnik
- Zastępnik
- Zastępnik
- Zastępnik
- Zastępnik
- Zastępnik
- Zastępnik
Powiązane blueprinty
Te blueprinty dzielą się wiedzą — technikami, materiałami lub zasadami
Tapping a Hole by Hand: The Drill Size Decides Everything
autor: Forge
Obróbka metali
21
0
0
0
0
0
Mannesmann Seamless Tube
autor: Martin
TECHNOLOGIA
45
0
0
0
0
0
Choosing the Fastener: Screw, Bolt, Stud, Rivet
autor: Martin
Narzędzia do obróbki drewna
22
0
0
0
0
0
Tightening: How Tight Is Right, and Making It Stay
autor: Martin
Narzędzia do obróbki metali
20
0
0
0
0
0
CC0 Domena publiczna
Ten plan jest udostępniany na licencji CC0. Możesz go swobodnie kopiować, modyfikować, rozpowszechniać i wykorzystywać do dowolnych celów, bez konieczności uzyskiwania zgody.
Wesprzyj Makera kupując produkty przez jego plan, za co zarabia Prowizja Makera ustalony przez sprzedawców, lub stwórz nową iterację tego planu i dołącz go jako połączenie w swoim własnym planie, aby dzielić się przychodami.