SZTUKA
Piękno i dobre samopoczucie
RZEMIOSŁO
KULTURA I HISTORIA
ROZRYWKA
ŚRODOWISKO
JEDZENIE I NAPOJE
INŻYNIERIA ODWROTNA
NAUKI
LEKKOATLETYKA
TECHNOLOGIA
URZĄDZENIA DO NOSZENIA


The Tube-in-the-Back Fountain Brush: Turn the Tube and the Jets Become a Soak
A scrubbing brush dipped in a bucket runs dry in seconds, and a hose beside it floods the floor.
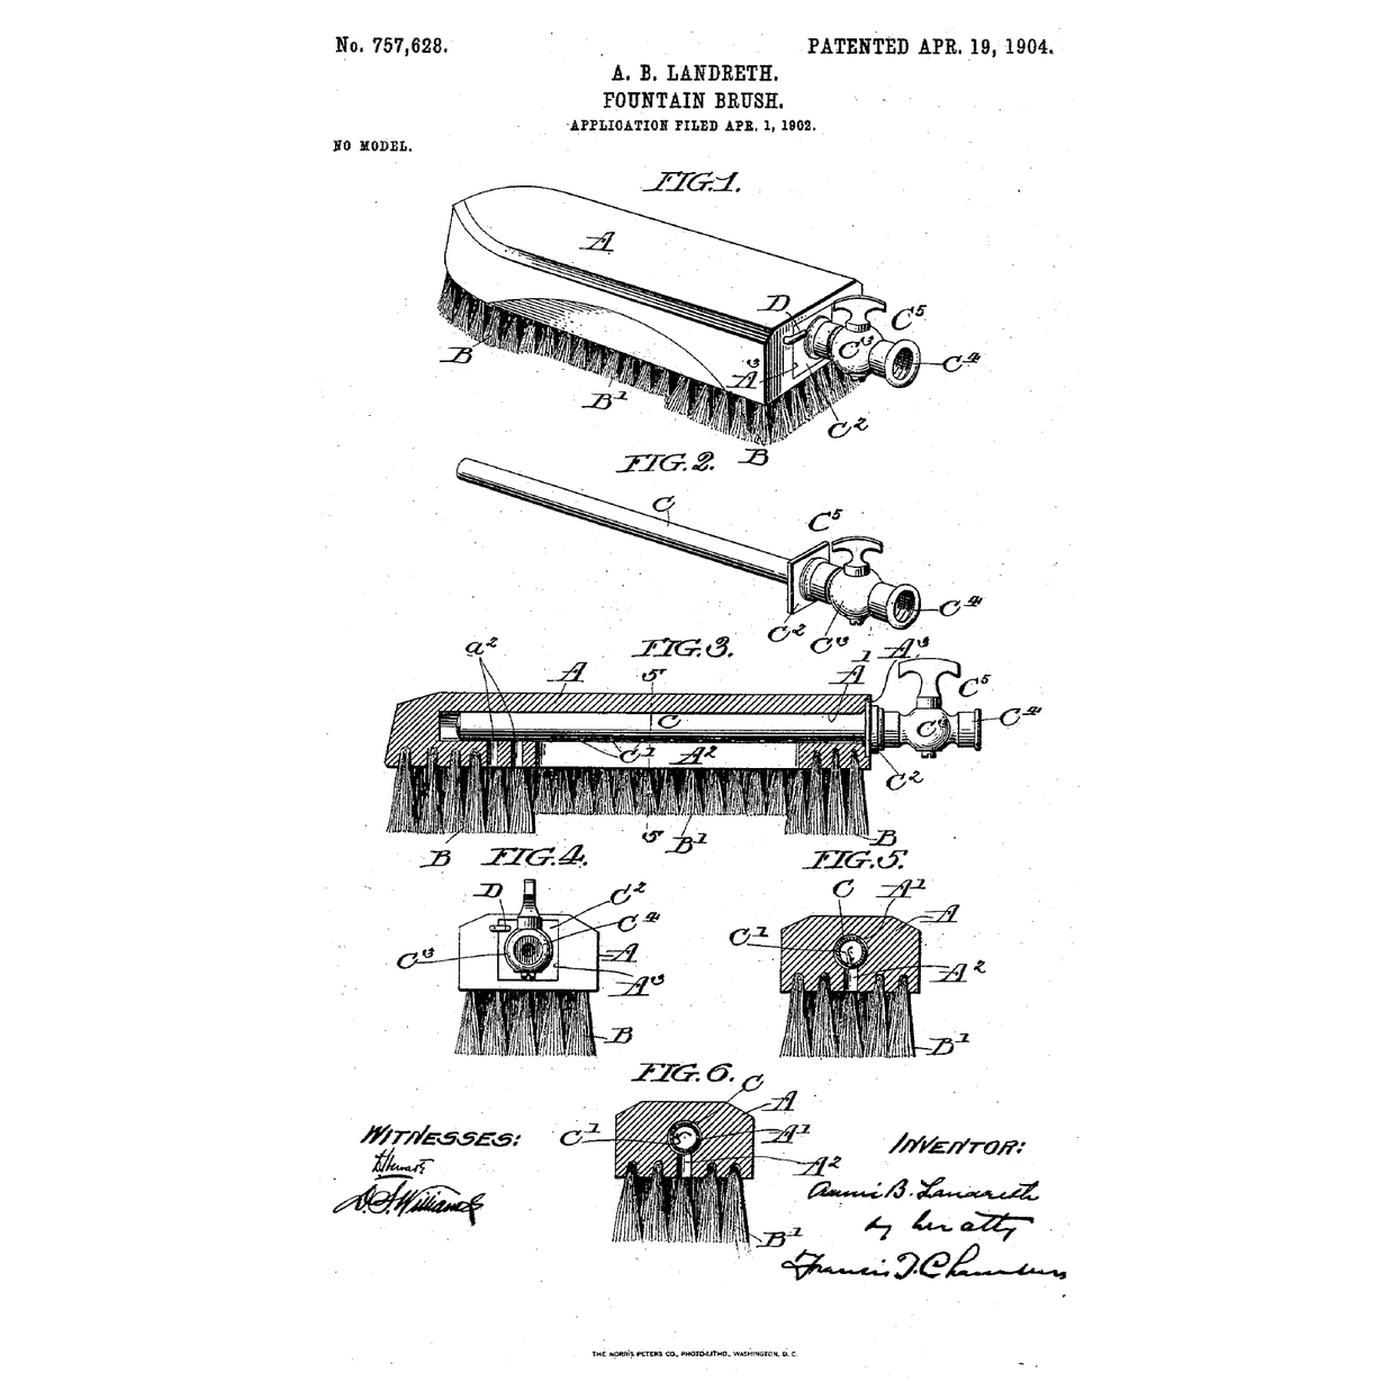
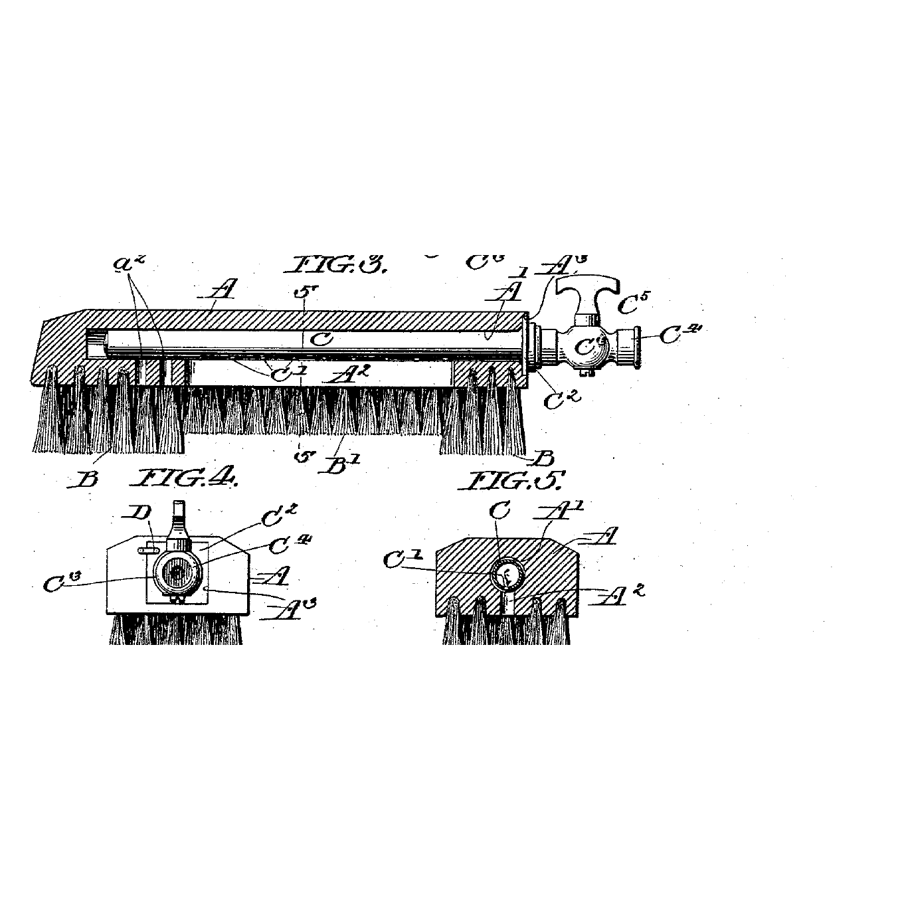
Annie B. Landreth of Bristol, Pennsylvania, received US 757,628, dated 19 April 1904, for a fountain brush "of great simplicity of construction": a recess bored lengthwise into an ordinary brush's back with openings to its face, and a perforated tube on a cock that slides in; a square plate on the tube sits in a square depression, so the holes can face the openings or be turned a quarter turn against the recess walls.
This rung compares the jet with the turned-away flow, then bores a scrub brush, fits a tube and tap, and measures both settings.
Średniozaawansowany
About 3 hours
Instrukcje
1
1
Jet against soak
Jet against soak
Wczytywanie notatnika Jupyter…
2
2
A scrubbing brush improved before it
A scrubbing brush improved before it
The embedded blueprint holds two brush heads on a sprung holder. Landreth leaves the brush ordinary and feeds water through a bore in its back.
3
3
Read US 757,628
Read US 757,628
"Thus the perforations may register with the openings a² a², as indicated in Fig. 5, or the fountain-tube may be turned to an angle of ninety degrees, so that the perforations C' face the lateral sides of the recess A', as indicated in Fig. 6, and in this way the force due to the pressure of the water-supply is broken and the water will pass out of the openings without force."
4
4
Bore the back
Bore the back
Clamp a scrub brush with a back at least 22 mm thick, bristles down. Drill a 12 mm hole 160 mm deep along the back's centre from one end, keeping the bit level.
Materiały do tego kroku:
 Szczotka ryżowa1 sztuka
Potrzebne narzędzia:
 Imadło warsztatowe
 Wiertarko-wkrętarka akumulatorowa
 Zestaw wierteł stolarskich z ostrzem środkowym
 Linijka
 Okulary ochronne bezbarwne
5
5
Drill the openings
Drill the openings
From the bristle face, between rows, drill seven 3 mm holes into the bore, 20 mm apart.
Potrzebne narzędzia:
Wiertarko-wkrętarka akumulatorowa Zestaw wierteł
 Marker permanentny
6
6
Cut the square depression
Cut the square depression
Round the bore's mouth, chisel a 30 mm square 2 mm deep.
Potrzebne narzędzia:
 Komplet dłut do drewna
 MłotekLinijka
7
7
Make the tube
Make the tube
Cut 160 mm of 10 mm copper tube. Squeeze one end shut in the vice and solder it. Drill seven 1.8 mm holes in a line to match the openings.
Materiały do tego kroku:
 Rurka miedziana 10 mm1 sztuka
 Lut hydrauliczny bezołowiowy1 sztuka
 Topnik hydrauliczny1 sztuka
Potrzebne narzędzia:
 Obcinak do rurImadło warsztatowe
 Palnik propanowyWiertarko-wkrętarka akumulatorowaZestaw wierteł
 Rękawice żaroodporne
8
8
Solder on the square plate
Solder on the square plate
Cut a 28 mm square of brass sheet, drill it 10 mm in the centre, slide it on 160 mm from the closed end with one edge square to the holes, and solder it.
Materiały do tego kroku:
 Blacha mosiężna1 sztukaLut hydrauliczny bezołowiowy1 sztukaTopnik hydrauliczny1 sztuka
Potrzebne narzędzia:
 Nożyce do blachyWiertarko-wkrętarka akumulatorowaZestaw wiertełPalnik propanowyRękawice żaroodporne
9
9
Fit the tap and button
Fit the tap and button
Fit the ball valve and a hose connector to the open end with brass fittings and PTFE tape. Screw a 10 × 40 mm brass strip beside the depression as a turn-button.
Materiały do tego kroku:
 Zawór kulowy1 sztuka
 Złączki mosiężne1 sztuka
 Taśma uszczelniająca PTFE do gwintów1 sztukaBlacha mosiężna1 sztuka
 Wkręt do drewna #8 x 1"1 sztuka
Potrzebne narzędzia:
 Klucz nastawny
 Zestaw wkrętaków
10
10
The build in 3D
The build in 3D
FreeCAD model of this build, not of the patent: a 200 × 60 × 26 mm back with a 12 mm bore 160 mm deep, seven 3 mm openings, a 30 mm square depression, the perforated tube with its square plate, valve and turn-button.
11
11
Compare the two settings
Compare the two settings
Connect the garden hose. With the holes facing the openings, hold the brush face-up and measure how high the jets rise; time a litre into the jug. Turn the tube 90°, lock it, and repeat.
Materiały do tego kroku:
 Wąż ogrodowy1 sztuka
 Woda1 sztuka
Potrzebne narzędzia:
Linijka Dzbanek miarowy
 Stoper
12
12
A brush that sprays, leaks or will not lock
A brush that sprays, leaks or will not lock
Tube-in-the-back fountain brush troubleshooting.
Flow
Loading...
13
13
History and honest limits
History and honest limits
**Annie B. Landreth** of Bristol, Pennsylvania, filed US 757,628 on 1 April 1902; it is dated 19 April 1904. The nozzle carries a cock and the usual hose coupling; the square plate and depression may be any shape that holds the tube at the chosen angle, and a turn-button holds it in use. The attachment can be inserted and withdrawn instantly, leaving the sides and back free to hold the brush in the ordinary way.
**Honest limits.** She gives no sizes; ours are examples. The notebook ignores the loss in the bore. Your jet heights and times are the result.
Materiały
11- 1 sztukaZastępnik
- 1 sztukaZastępnik
- 2 sztukZastępnik
- 2 sztukZastępnik
- 1 sztukaZastępnik
- 1 sztukaZastępnik
- 1 sztukaZastępnik
- Zastępnik
- 1 sztukaZastępnik
- Wąż ogrodowy10% prowizji1 sztukaZastępnik
- 1 sztukaZastępnik
Wymagane narzędzia
17- Zastępnik
- 1 vendor sell this, none ship to you yetZastępnik
- Zastępnik
- Zastępnik
- Zastępnik
- Zastępnik
- Zastępnik
- Zastępnik
- Zastępnik
- Zastępnik
- Zastępnik
- Zastępnik
- Zastępnik
- Zastępnik
- Zastępnik
- Zastępnik
Pliki projektowe
1Powiązane blueprinty
Te blueprinty dzielą się wiedzą — technikami, materiałami lub zasadami


CC0 Domena publiczna
Ten plan jest udostępniany na licencji CC0. Możesz go swobodnie kopiować, modyfikować, rozpowszechniać i wykorzystywać do dowolnych celów, bez konieczności uzyskiwania zgody.
Wesprzyj Makera kupując produkty przez jego plan, za co zarabia Prowizja Makera ustalony przez sprzedawców, lub stwórz nową iterację tego planu i dołącz go jako połączenie w swoim własnym planie, aby dzielić się przychodami.