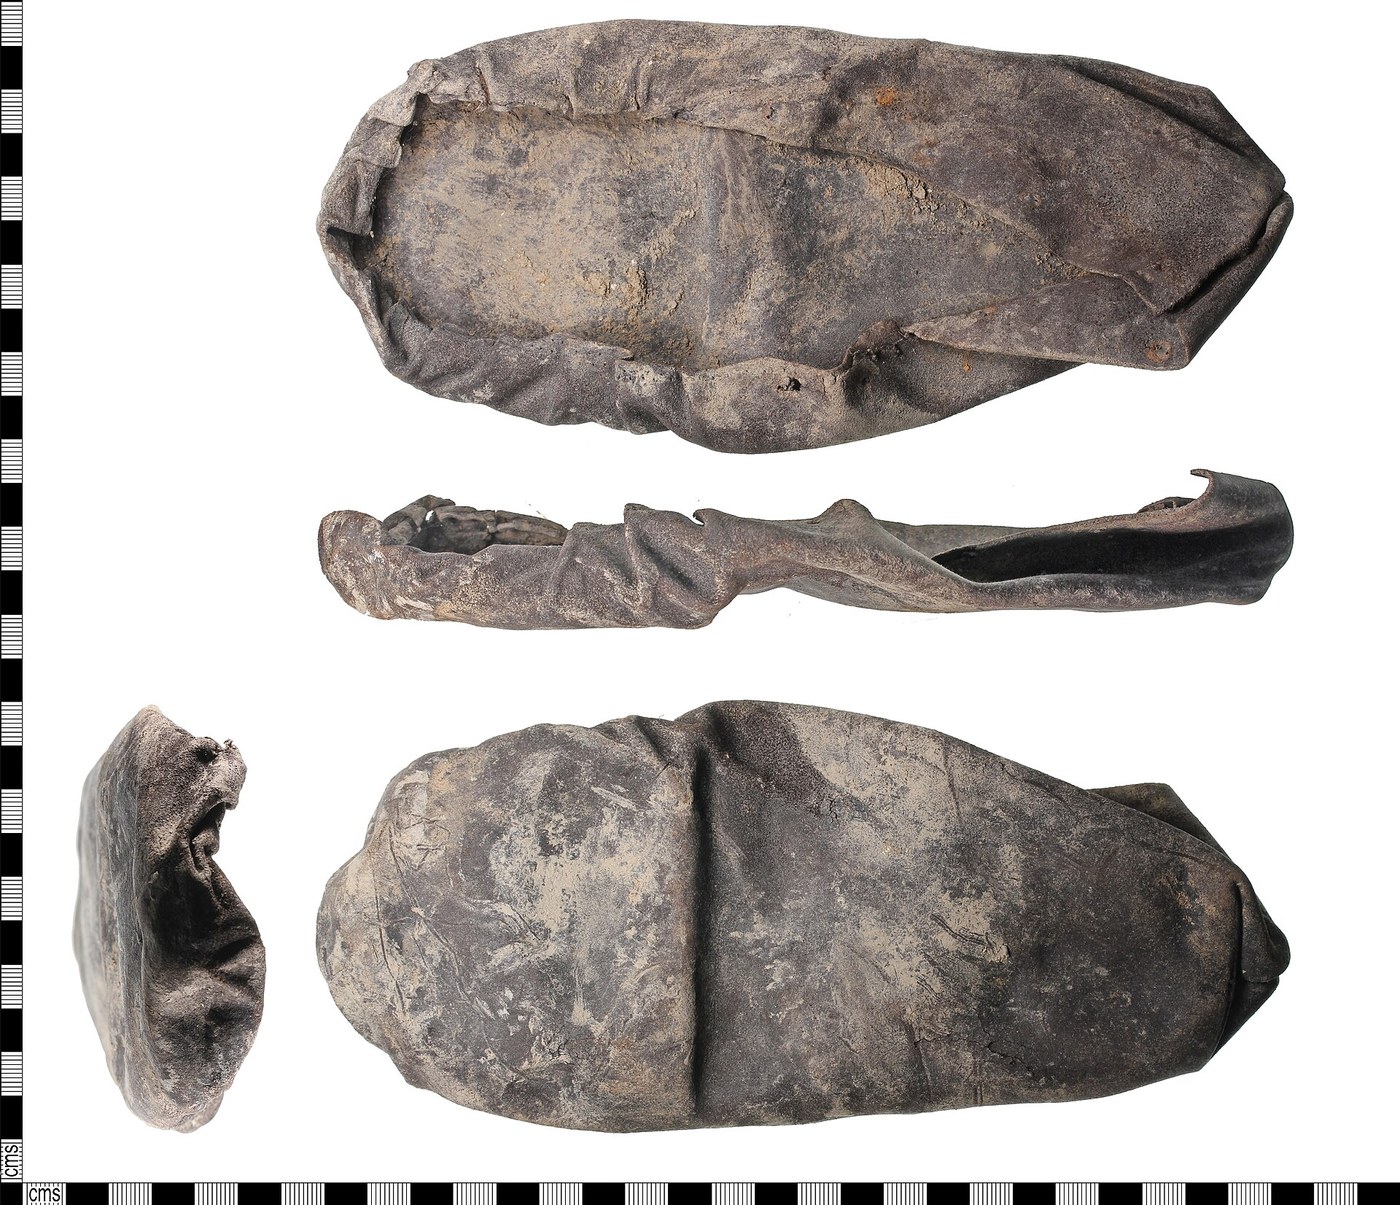


Turnshoe
For most of the medieval period, every shoe in Europe was made the same way: sewn together inside out, soaked, and then turned right-side out so the seam ended up hidden inside the shoe. That single move is the whole technique, and it produces a shoe with no stitching exposed to the ground — nothing for the road to abrade, and a sole that flexes with the foot because there is no rigid welt.
A turnshoe has two pieces and one seam. No nails, no glue, no shank, no heel. Thousands survive from waterlogged town excavations in London, Dublin, Bergen and Novgorod, which is why the construction is known in such detail — leather keeps well in wet anaerobic mud.
The result is close to a modern minimal shoe, five hundred years early.
Instrukcje
Draw round the foot for the sole pattern
Draw round the foot for the sole pattern
Stand on paper, weight on the foot, and trace round it. Add 5 mm all round for the seam. Trace both feet — they differ, and a turnshoe is made to a specific foot.
Take the girth measurements
Take the girth measurements
Measure round the ball of the foot, round the instep, and round the heel diagonally over the ankle. The upper is drafted from these three numbers.
Potrzebne narzędzia:
 Linijka
Draft the upper as one piece
Draft the upper as one piece
Draw a single wrap-around upper with the seam at the heel or slightly to one side. Make a paper mock-up and tape it to the sole pattern before touching leather.
Test the mock-up on the foot
Test the mock-up on the foot
Tape the paper upper to the paper sole and put your foot in it. Adjust until it closes without gaping at the instep. Paper is free; leather is not.
Cut the sole from thick vegetable-tanned leather
Cut the sole from thick vegetable-tanned leather
Cut soles from 4-5 mm vegetable-tanned leather. Vegetable tanning matters — chrome-tanned leather will not take the wet-forming that this construction depends on.
Materiały do tego kroku:
 Skóra garbowana roślinnie1 arkusz
Cut the upper from thinner leather
Cut the upper from thinner leather
Cut the upper from 1.5-2 mm leather. It has to bend round the toe when turned, and thick leather simply will not go.
Cut an edge-flesh channel round the sole
Cut an edge-flesh channel round the sole
With a sharp knife, cut a shallow angled groove into the sole edge, about 3 mm in, running all the way round. The stitches will sit in this groove and pass out through the sole edge — never through the walking surface, which is what stops the thread wearing through.
Potrzebne narzędzia:
 Nóż introligatorski
Damp both pieces until pliable
Damp both pieces until pliable
Wet the leather and leave it wrapped for an hour until it is uniformly damp and flexible but not soggy. Dry leather will not turn and will crack at the toe.
Assemble it inside out
Assemble it inside out
Put the upper against the sole with the grain sides facing each other — the finished outer surfaces on the inside. This feels wrong and is correct.
Saddle-stitch the sole to the upper
Saddle-stitch the sole to the upper
Stitch all round with two needles on one waxed linen thread, passing through the edge-flesh channel in the sole and through the upper's edge. Keep the stitch spacing even at about 4-5 mm.
Materiały do tego kroku:
 Woskowana nić lniana5 metrów
Potrzebne narzędzia:
 Igła z dużym uchem
Close the heel seam
Close the heel seam
Butt the two edges of the upper at the heel and stitch them, optionally backing the seam with a strip of leather inside. Do not overlap — an overlapped heel seam makes a ridge that will blister the wearer.
Turn the shoe
Turn the shoe
Wet it again thoroughly, then work it right-side out, starting at the heel and easing the toe through last. It will look ruined halfway through. Take your time and keep the leather wet.
Form it on a last or on the foot
Form it on a last or on the foot
While still damp, force a wooden last in — or wear it with a thick sock — and shape the toe and instep by hand. It dries to the shape you leave it in.
Let it dry slowly, away from heat
Let it dry slowly, away from heat
Dry at room temperature over a day or two. Heat makes vegetable-tanned leather shrink hard and brittle, and a radiator will ruin the shoe you just made.
Dress the leather with fat or wax
Dress the leather with fat or wax
Work in tallow, neatsfoot oil or a beeswax dressing once dry. This is waterproofing and conditioning in one, and it needs redoing every few weeks in wear.
Materiały do tego kroku:
 Wosk pszczeli w granulkach30 g
History & Context — the shoe that mud preserved
History & Context — the shoe that mud preserved
Why we know so much about medieval shoes. Leather survives in waterlogged, oxygen-free deposits, and medieval towns produced exactly those conditions along their waterfronts. Excavations in London, Dublin, Bergen, York and Novgorod have produced turnshoes by the thousand, complete with stitch holes, repairs and wear patterns. This is an unusual case where an everyday object of the poor is better documented archaeologically than many objects of the rich — most textiles from the same period are simply gone.
What the construction gets right. Turning the shoe puts the seam inside, so the thread is protected from abrasion by the ground. The edge-flesh stitch is subtler: the awl enters the sole's edge and exits into the channel without ever piercing the walking surface, so the thread is invisible and unworn from below. And because there is no welt, no shank and no heel, the sole flexes with the foot. The trade-off is real and was accepted at the time — a single thin sole wears through fast, so surviving shoes very often carry clump soles, extra layers stitched on as repairs.
When and why it ended. Turnshoes work while soles stay thin, because a thick sole cannot be turned. As heavier, more protective soles came into demand in the sixteenth century, the turnshoe gave way to welted construction, where a strip of leather is stitched to the upper and the sole is then stitched to that strip — right-side out throughout, and capable of taking a thick sole and a heel. Welting is still how good traditional shoes are made today.
A note on left and right. Medieval turnshoes were commonly made to distinct left and right shapes, which is worth stating because of a persistent myth that shoes were made identical until the nineteenth century. That is true of some mass-produced later footwear — "straights" genuinely existed and were sold in quantity — but it is not a fair description of medieval bespoke shoemaking, which fitted the individual foot.
Materiały
3- 1 arkuszZastępnik
- 5 metrówZastępnik
- Zastępnik
Wymagane narzędzia
3- Zastępnik
- Zastępnik
- Zastępnik
Powiązane blueprinty
Te blueprinty dzielą się wiedzą — technikami, materiałami lub zasadami
CC0 Domena publiczna
Ten plan jest udostępniany na licencji CC0. Możesz go swobodnie kopiować, modyfikować, rozpowszechniać i wykorzystywać do dowolnych celów, bez konieczności uzyskiwania zgody.
Wesprzyj Makera kupując produkty przez jego plan, za co zarabia Prowizja Makera ustalony przez sprzedawców, lub stwórz nową iterację tego planu i dołącz go jako połączenie w swoim własnym planie, aby dzielić się przychodami.