Współpraca
SZTUKA
Piękno i dobre samopoczucie
RZEMIOSŁO
KULTURA I HISTORIA
ROZRYWKA
ŚRODOWISKO
JEDZENIE I NAPOJE
INŻYNIERIA ODWROTNA
NAUKI
LEKKOATLETYKA
TECHNOLOGIA
URZĄDZENIA DO NOSZENIA
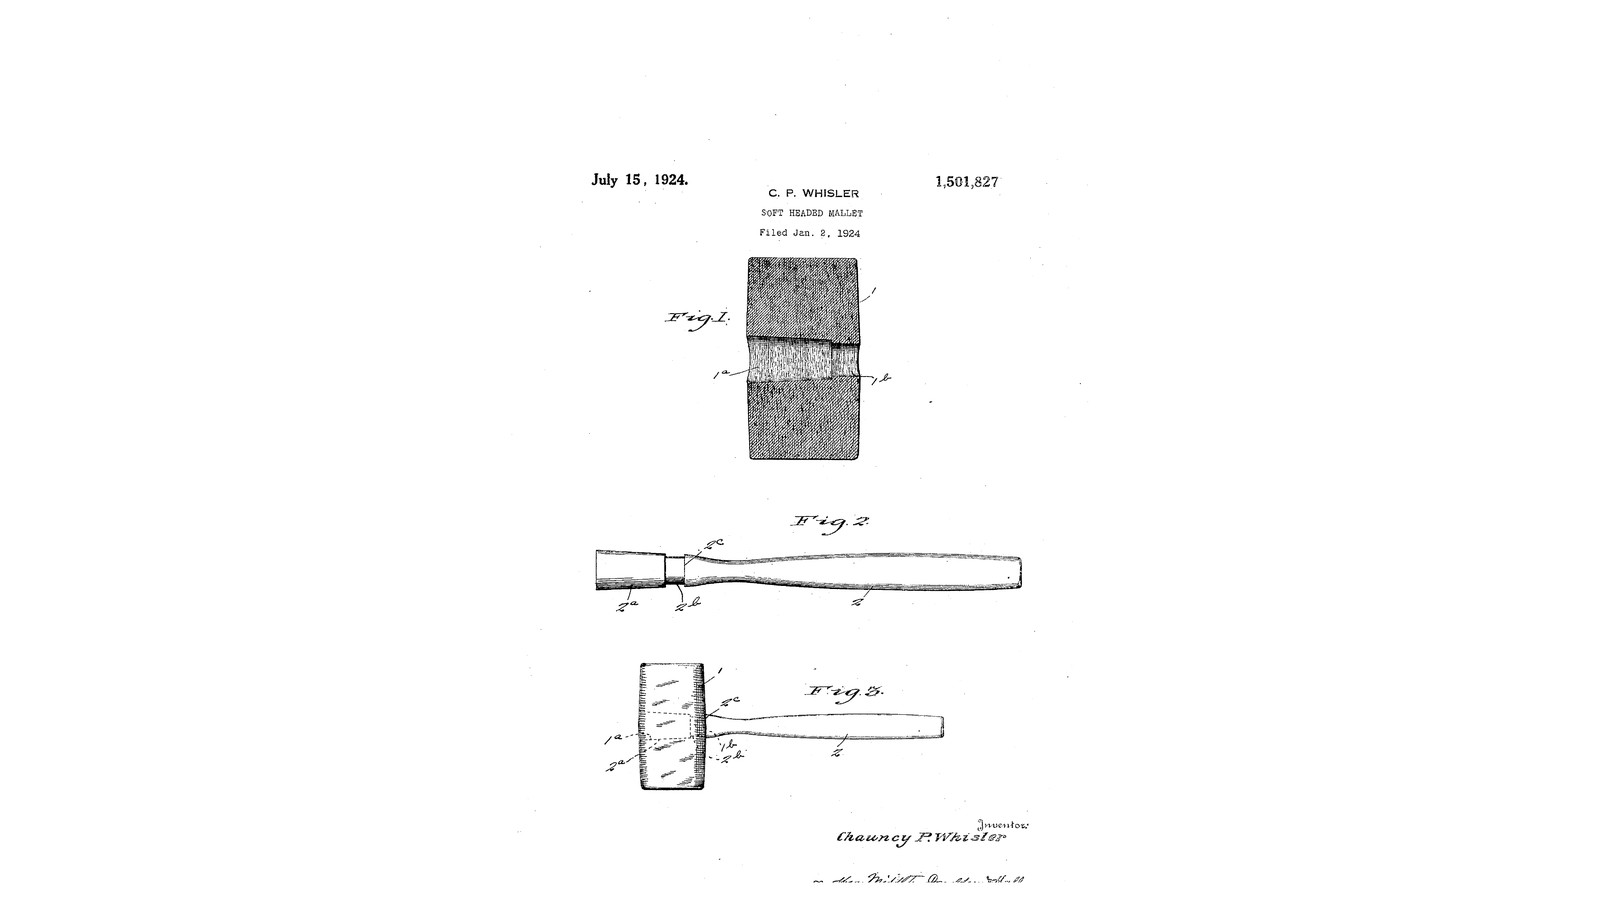


Laminated Rubber Mallet: A Rubber-and-Canvas Head Locked on a Flared Handle by an Internal Rib (Whisler, 1924)
Chauncy P. Whisler of Kenmore, Ohio, received US 1,501,827, dated 15 July 1924, for The Miller Rubber Company of Akron. It solves how to fix a handle in a head that is itself elastic. The rubber-and-fabric head has an eye that flares outwards, with a narrow rib at the handle side. The handle has a matching flared end, a groove for the rib and a shoulder. It is pushed right through the warm head from the outer face until the rib snaps into the groove. The flare stops the head flying off and the rib stops it sliding up the handle.
We build the head from rubber sheet and canvas, ply by ply, as his "stepped conical eye". The sizes are ours.
Początkujący
About 2 days
Instrukcje
1
1
The stepped eye and the stretch at the rib
The stepped eye and the stretch at the rib
Wczytywanie notatnika Jupyter…
2
2
Read US 1,501,827
Read US 1,501,827
"When in position, the flared end 1a of the handle absolutely precludes the head from flying off when delivering blows and the rib and groove engagement prevents any inward displacement of the head."
3
3
Print the ply template
Print the ply template
Full-size A4 template: the 110 x 60 mm ply and the hole circle for each of the 17 plies, largest at the outer face. Print at 100 %; its 50 mm bar must measure 50 mm.
4
4
Cut the plies
Cut the plies
Cut 17 plies of 3 mm natural rubber sheet 110 x 60 mm and 14 of cotton canvas the same size. Glue each paper circle from the template in the middle of its ply, numbered 1 to 17, and cut the hole round it with a sharp craft knife, holding the blade upright. Cut the same hole in a canvas ply for each of plies 1 to 14.
Materiały do tego kroku:
 Płyta z kauczuku naturalnego2 sztuk
 Płótno brezentowe bawełniane1 sztuka
Potrzebne narzędzia:
 Drukarka atramentowa
 Klej
 Nóż introligatorski
 Kątownik nastawny
5
5
Laminate the head
Laminate the head
Brush contact cement on both faces to be joined, let it go touch-dry, and lay up the stack in order, ply 1 at the bottom: rubber, canvas, rubber, ... with the holes lined up over a 24 mm dowel through the middle, and plies 15, 16 and 17 rubber to rubber with no canvas. Press it between boards in clamps overnight. Trim the sides square with the knife and round the edges of the two striking faces slightly.
Materiały do tego kroku:
 Klej kontaktowy1 sztuka
Potrzebne narzędzia:
 Kołki z twardego drewna
 Ścisk stolarski listwowyNóż introligatorskiKątownik nastawny
6
6
Turn the handle
Turn the handle
Turn a hardwood handle 330 mm long. At its head end turn the flared part 2a as long as plies 1 to 15 are thick, 32 mm at the end tapering to 24; then the groove 2b, 20 mm across and as long as plies 16 and 17; then the shoulder 2c, 28 mm, to bear on the head's inner face; then the grip, 28 mm tapering to 26 at its end, so it can pass the eye. Check each diameter with the caliper against the plies.
Materiały do tego kroku:
 Deska z drewna liściastego1 sztuka
Potrzebne narzędzia:
 Tokarka do drewna
 Zestaw dłut tokarskich (HSS)
 Suwmiarka cyfrowa 6 cali
 Okulary ochronne
7
7
Fit the head
Fit the head
Warm the head for ten minutes in hot water and dry it. Push the grip end of the handle into the eye from the outer face (ply 1) and force it right through, the rib stretching over the grip and the shoulder, until the flared part seats in the eye and the rib snaps into the groove. Let it cool. Strike a board: the head must not move.
Potrzebne narzędzia:
 Woda
8
8
Troubleshooting
Troubleshooting
Rubber mallet troubleshooting.
Flow
Loading...
9
9
History and honest limits
History and honest limits
**Chauncy P. Whisler** of Kenmore, Ohio, assignor to The Miller Rubber Company, US 1,501,827, dated 15 July 1924, filed 2 January 1924. He claimed "a mallet having a head of elastic material provided with an outwardly flaring handle-receiving eye provided with an annular internal rib adjacent the inner face of the head, and a handle having an outwardly flared end engaging said flared eye, and an annular groove engaged by said annular rib", and "a stepped conical eye". His head was moulded of rubber and fibrous material, as in Maranville and Dabney's application; ours is laminated from rubber sheet and canvas with contact cement. He gives no sizes; every size here is ours.
Materiały
4- 2 sztukZastępnik
- 1 sztukaZastępnik
- 1 sztukaZastępnik
- 1 sztukaZastępnik
Wymagane narzędzia
11- Zastępnik
- Zastępnik
- Zastępnik
- Zastępnik
- Zastępnik
- Zastępnik
- Zastępnik
- Zastępnik
- Zastępnik
- Zastępnik
- Zastępnik
Pliki projektowe
1Według tego planu powstaje

Powiązane blueprinty
Te blueprinty dzielą się wiedzą — technikami, materiałami lub zasadami
CC0 Domena publiczna
Ten plan jest udostępniany na licencji CC0. Możesz go swobodnie kopiować, modyfikować, rozpowszechniać i wykorzystywać do dowolnych celów, bez konieczności uzyskiwania zgody.
Wesprzyj Makera kupując produkty przez jego plan, za co zarabia Prowizja Makera ustalony przez sprzedawców, lub stwórz nową iterację tego planu i dołącz go jako połączenie w swoim własnym planie, aby dzielić się przychodami.