Współpraca
SZTUKA
Piękno i dobre samopoczucie
RZEMIOSŁO
KULTURA I HISTORIA
ROZRYWKA
ŚRODOWISKO
JEDZENIE I NAPOJE
INŻYNIERIA ODWROTNA
NAUKI
LEKKOATLETYKA
TECHNOLOGIA
URZĄDZENIA DO NOSZENIA
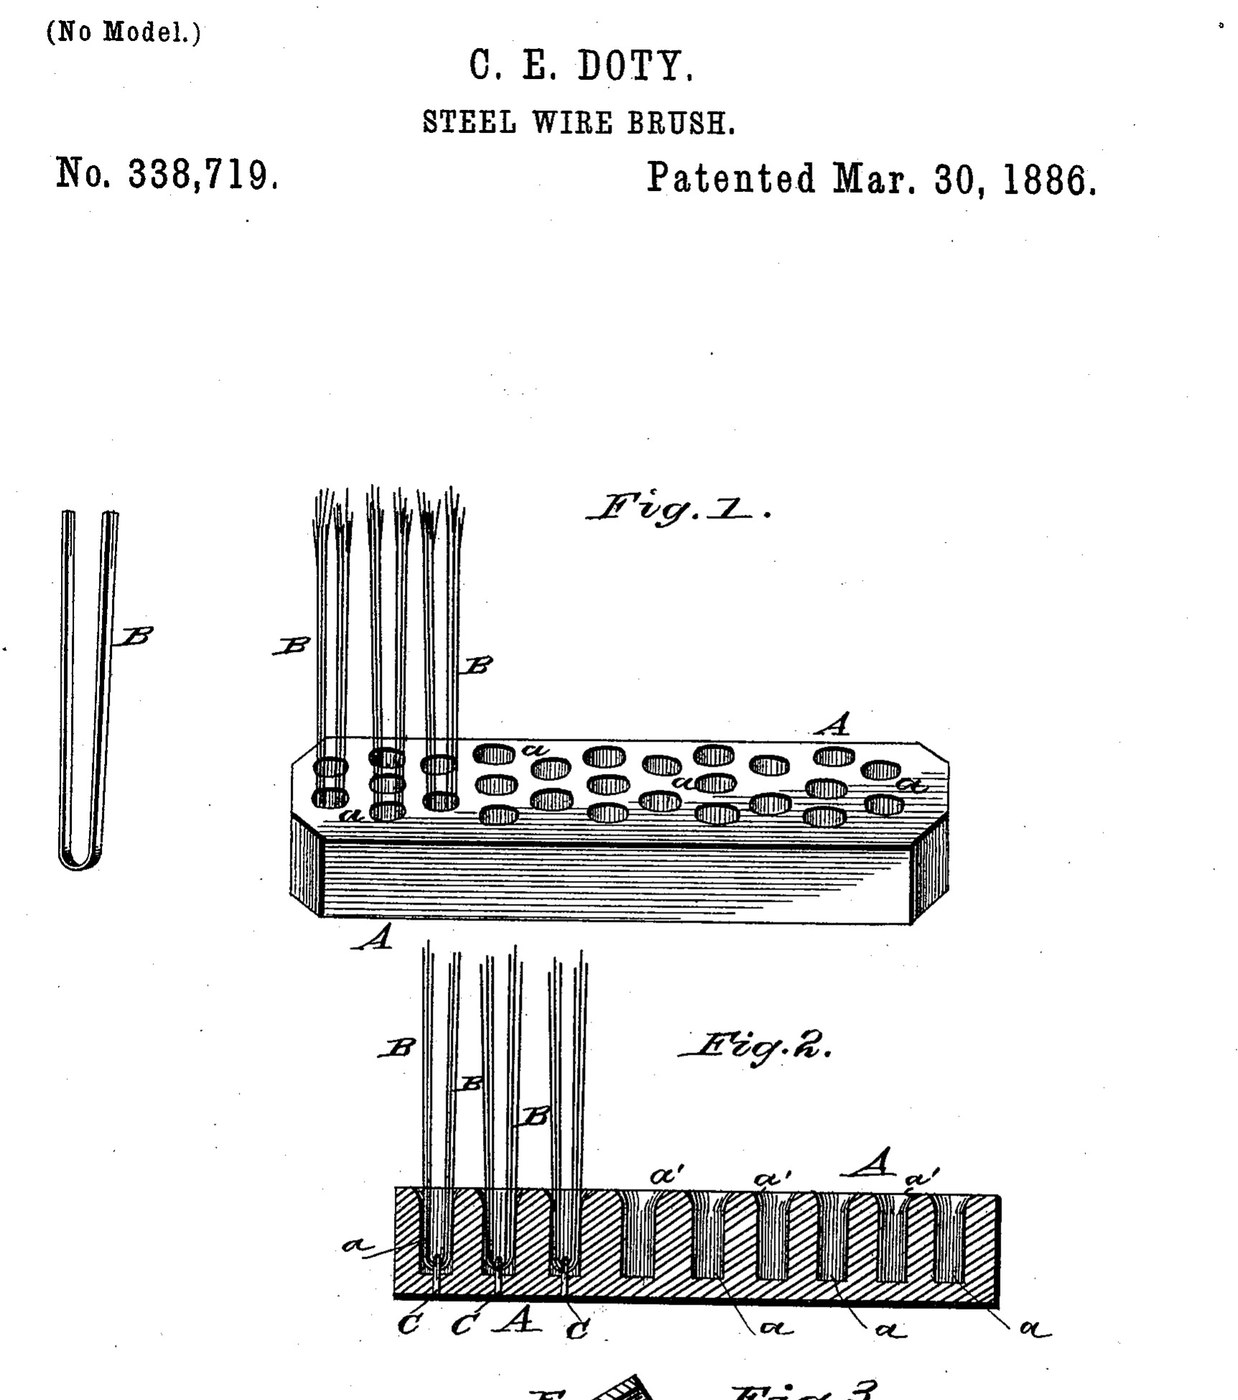


Wire Brush: Flat Steel Wire Tufts Stapled into a One-Piece Back (Doty, US 338,719, 1886)
A heavy steel wire brush whose back stays in one piece: flat steel wires are folded in bunches into blind holes and held by small staples driven right through the back and clinched on the other side. The holes flare at the mouth so the wires bend in a curve rather than snapping at the edge. All the wires lie the same way, so they flex alike and share the work.
Result: a steel wire brush for heavy scrubbing that holds its wires, with a smooth back.
Source: C. E. Doty, US 338,719 (1886). Unknown: the back material, sizes and wire gauge. Picture: the patent drawing.
Początkujący
Unknown
Instrukcje
1
1
Bore the back
Bore the back
Make the back in one piece and bore rows of holes into its face that do not go right through. Shape the mouth of each hole with a rounded, flaring wall so the wires bend in a curve there. Ours: a hardwood block. Not given: the back material, sizes.
Materiały do tego kroku:
 Klocek z drewna twardego1 brush back
Potrzebne narzędzia:
 Wiertarka stołowa
 Nieznane wymiary
2
2
Flatten the wires
Flatten the wires
Use flat steel wires, so they flex most across their thin side. Cut them to twice the bristle length so each bunch folds in the middle. Ours: spring steel wire flattened on the anvil. Not given: the wire gauge.
Materiały do tego kroku:
 Drut sprężynowy1 bristle wires
Potrzebne narzędzia:
 Kowadło
 Młotek
3
3
Staple in the tufts
Staple in the tufts
Lay the back, holes up, on a hard, smooth metal surface. Lay a bunch of wires across a hole, flat sides horizontal and lying the way the brush will be used. Set a short staple astride the middle of the bunch with its points in the hole. Bring a plunger down into the hole: it drives the folded bunch to the bottom and the staple's points right through the back. The points hit the metal surface and are bent over and clinched smoothly on the back. Tilt the back a little for the outer rows so their wires spread slightly outward.
Materiały do tego kroku:
 Nieznany metal1 staples
Potrzebne narzędzia:
 Prasa dźwigniowaKowadło
Materiały
3- 1 brush backZastępnik
- 1 bristle wiresZastępnik
- 1 staplesZastępnik
Materiały z połączonych planów
Według tego planu powstaje

CC0 Domena publiczna
Ten plan jest udostępniany na licencji CC0. Możesz go swobodnie kopiować, modyfikować, rozpowszechniać i wykorzystywać do dowolnych celów, bez konieczności uzyskiwania zgody.
Wesprzyj Makera kupując produkty przez jego plan, za co zarabia Prowizja Makera ustalony przez sprzedawców, lub stwórz nową iterację tego planu i dołącz go jako połączenie w swoim własnym planie, aby dzielić się przychodami.