Сотрудничество
ИСКУССТВО
КРАСОТА И ЗДОРОВЬЕ
РЕМЕСЛО
КУЛЬТУРА И ИСТОРИЯ
РАЗВЛЕЧЕНИЯ
ЭКОЛОГИЯ
ЕДА И НАПИТКИ
ОБРАТНАЯ ИНЖЕНЕРИЯ
НАУКИ
СПОРТ
ТЕХНОЛОГИИ
НОСИМЫЕ УСТРОЙСТВА
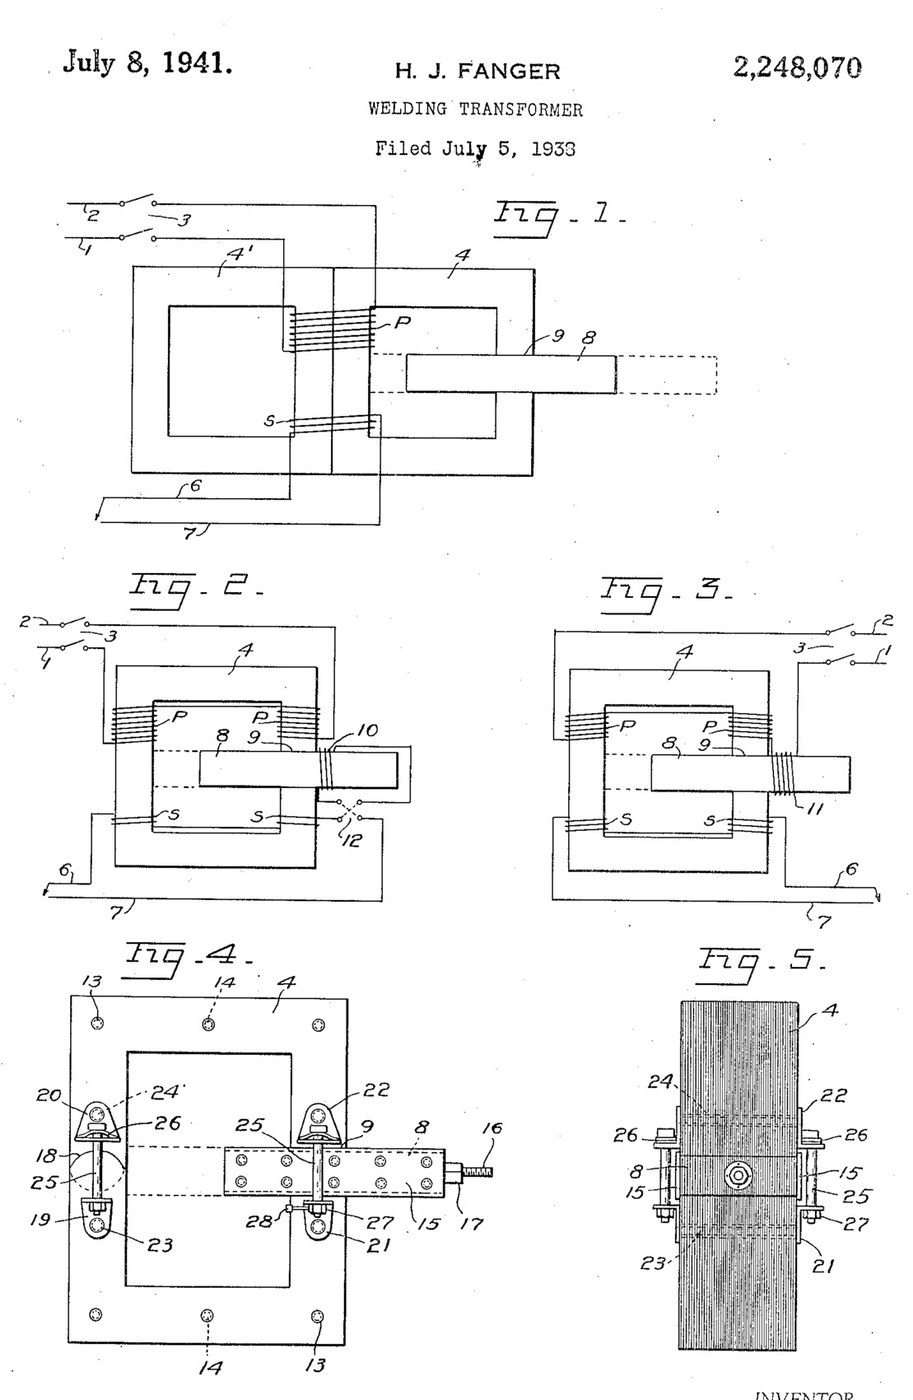


Arc Welder: AC Transformer with a Sliding Shunt Core (Fanger, US 2,248,070)
An AC arc welder is a step-down transformer whose current can be turned up and down. H. J. Fanger (US 2,248,070, 1941) cuts a gap through one leg of a laminated ring core and slides a laminated iron shunt bar through it: pushed in, it carries flux past the secondary and lowers the welding current; pulled out, the current rises.
For arc welding he gives about 60 to 68 volts open circuit, 15 to 200 amps, dropping to 38 or 40 volts at the working arc, with a small coil on the shunt bar in series with the secondary.
Source: H. J. Fanger, "Welding Transformer", US Patent 2,248,070 (filed 1938, granted 1941). Picture: its Figs. 1-5.
Продвинутый
Unknown
Инструкции
1
1
Read Fanger
Read Fanger
"With arc welding, infinite control of the volume of the secondary current, between maximum and minimum is obtained by adjustment of the slidable shunt core without altering the welding characteristics of the current, also better ignition of the arc is had at a given voltage, and greater stability of the arc".
2
2
Stack the core
Stack the core
Build a single rectangular ring core of insulated iron laminations, held together with brass (or insulated) bolts or rivets in insulating tubes (Fig. 4). Cut a gap straight through one leg, accurately machined and finished, and make a circular joint through the opposite leg with the segments staggered to overlap in successive laminations. Core size, lamination iron and thickness are not given (ours: the tools).
Материалы для этого шага:
 Неизвестный металл1 iron laminations
 Набор шестигранных болтов1 brass bolts
 Неизвестный изоляционный материал1 insulating tubes
Необходимые инструменты:
 Ножницы по металлу
 Сверлильный станок
 Набор свёрл
 Напильники (ручной напильник)
 Неизвестные размеры
3
3
Make the shunt bar
Make the shunt bar
Make the sliding shunt section of the same laminated iron, a snug fit in the gap with its laminations edge-to-edge with the core's, and long enough to fill the gap at every position. Sheath both sides with a slightly wider plate of Bakelite that overlaps the edges of the gap to guide it. Fit a threaded rod on its outer end, working in a nut fixed to the section (or move it by hand, with calibration marks along one edge).
Материалы для этого шага:
Неизвестный металл1 shunt laminations Бакелит2 side platesНабор шестигранных болтов1 brass bolts
 Шпилька резьбовая1 штука
 Шестигранная гайка1 штука
Необходимые инструменты:
Сверлильный станокНабор свёрлНапильники (ручной напильник)4
4
Wind the coils
Wind the coils
Wind the primary and secondary windings on both legs of the core (Fig. 2), in series or in parallel to suit the line voltage and the current wanted. Wind a small auxiliary coil round the shunt bar's path, fixed so the bar slides through it, and connect it in series with the secondary through a reversing switch (some jobs weld better with the current through it one way). Turns and wire sizes are not given.
Материалы для этого шага:
 Медная проволока1 insulation and size not given
Необходимые инструменты:
Неизвестные размеры5
5
Spring the joints
Spring the joints
On both sides of the gap and of the circular joint fit pairs of confronting angle plates, held by brass bolts in insulating sleeves and drawn together by spring bolts whose heads rest on slightly arched spring plates, so the joints close snugly on the sliding bar. A small lever on the gap-joint nut gives a half turn to release the bar for moving. The angle-plate material is not given.
Материалы для этого шага:
 Неизвестный материал4 angle platesНабор шестигранных болтов1 brass and spring boltsНеизвестный изоляционный материал1 sleeves
 Полоса пружинной стали1 arched spring platesШестигранная гайка4 штук
Необходимые инструменты:
Сверлильный станокНабор свёрл Разводной ключ
6
6
Connect and set
Connect and set
Connect the primary to the line through a line switch, and the secondary leads to the electrode holder and the work. Pull the shunt bar out for more current, push it in for less: Fanger gives about 60-68 volts open circuit and 15-200 amps, dropping to 38-40 volts at the arc.
Материалы для этого шага:
 Выключатель питания1 line switch
Необходимые инструменты:
Разводной ключМатериалы
10- 1 shunt laminationsЗаполнитель
- 1 brass and spring boltsЗаполнитель
- 1 sleevesЗаполнитель
- 2 side platesЗаполнитель
- 1 штукаЗаполнитель
- 5 штукЗаполнитель
- 1 insulation and size not givenЗаполнитель
- 4 angle platesЗаполнитель
- 1 arched spring platesЗаполнитель
- 1 line switchЗаполнитель
По этому чертежу делают

CC0 Общественное достояние
Этот чертёж выпущен под лицензией CC0. Вы можете свободно копировать, изменять, распространять и использовать эту работу в любых целях без запроса разрешения.
Поддержите мейкера, покупая товары через его чертёж, где он получает Комиссию мейкера установленную продавцами, или создайте новую итерацию этого чертежа и включите его как связь в свой чертёж для распределения дохода.