
Сотрудничество
ИСКУССТВО
КРАСОТА И ЗДОРОВЬЕ
РЕМЕСЛО
КУЛЬТУРА И ИСТОРИЯ
РАЗВЛЕЧЕНИЯ
ЭКОЛОГИЯ
ЕДА И НАПИТКИ
ОБРАТНАЯ ИНЖЕНЕРИЯ
НАУКИ
СПОРТ
ТЕХНОЛОГИИ
НОСИМЫЕ УСТРОЙСТВА
Five-Foot Bait-Casting Rod: Hand-Tapered Dagame Stick, Cork Grasps and Agate Guides (Boy Mechanic, 1915)
Woody

Создано

Woody

13. ноябрь 2026NO
2
0
0
0
0

Five-Foot Bait-Casting Rod: Hand-Tapered Dagame Stick, Cork Grasps and Agate Guides (Boy Mechanic, 1915)

Stillman Taylor's first rod for a beginner, from The Boy Mechanic, Book 2 (1915): a one-piece 5 ft bait-casting rod planed by hand from a 5/8 in square stick of dagame to his calipered taper (1/2 in at the grasp to 1/8 in at the tip), with a double cork grasp around the reel seat, two agate guides and an agate tip, whipped in silk and varnished. He made it with "a saw, plane, jackknife, file, and sandpaper".
Средний
About 2 weeks (glue and varnish drying)

Инструкции

1

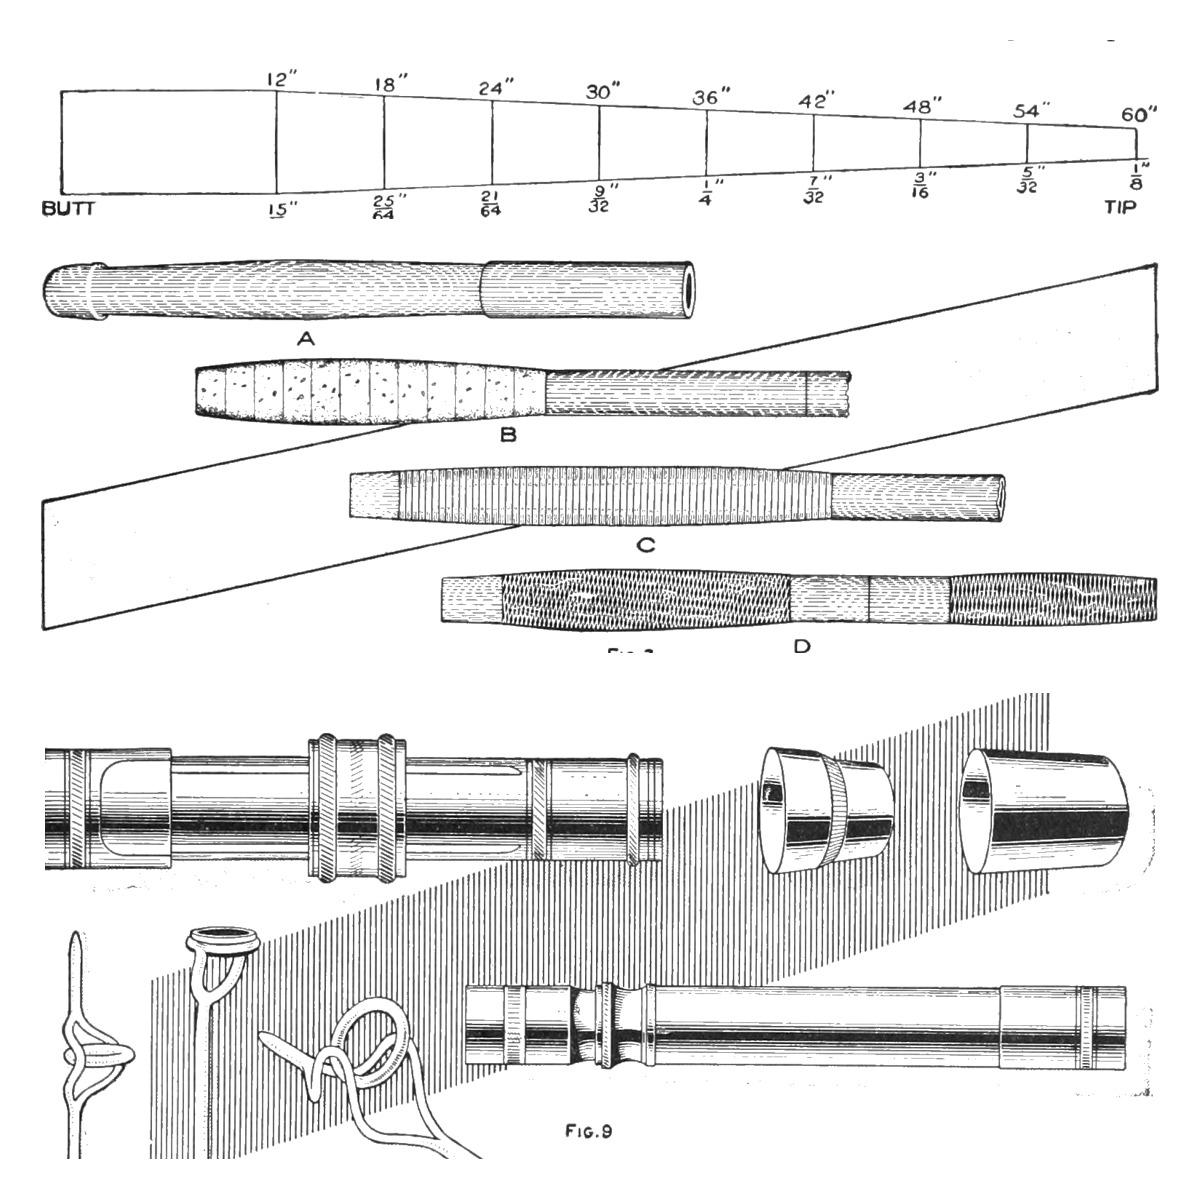
Fig. 5: the taper, station by station

Загрузка блокнота Jupyter…
2

Read The Boy Mechanic, Book 2

"The short one-piece bait-casting rod with but one ferrule is the easiest rod to make." His materials: 1 dagame or greenheart stick, 5 ft long and 5/8 in square; 1 reel seat with straight hood, 3/4 in; 1 butt cap, 1 in; 1 taper, small end 15/32 in; 1 offset agate top, 3/32 in, and 2 narrow agate guides, 1/2 in, all in German silver; 2 doz. corks, 1-1/4 by 1-1/8 in; two 50 yd spools of silk, red and green, 00 size.
3

Make the gauge and grooved board

On a strip of paper draw the rod full length: a 1/2 in line for the butt, a centre line 60 in long, a 1/8 in line at the tip, and join the ends. From 12 in, mark a crossline every 6 in and write his diameters on them (see the notebook). File nine slots in a thin strip of brass to these diameters as a gauge. Plane a groove, gradually shallower toward one end, in a 5 ft tongue-and-groove pine board about 1 in thick, and nail it to the bench edge, groove up.

Материалы для этого шага:

Латунный листЛатунный лист1 штука
Сосновая доскаСосновая доска1 штука
ГвоздиГвозди1 штука

Необходимые инструменты:

Обёрточная крафт-бумагаОбёрточная крафт-бумага
КарандашКарандаш
Напильники (ручной напильник)Напильники (ручной напильник)
Слесарные тискиСлесарные тиски
ШтангенциркульШтангенциркуль
Ручной рубанокРучной рубанок
МолотокМолоток
РулеткаРулетка
4

Plane the stick square and tapered

Plane along each side and from both ends of a 5/8 in square dagame strip to find the grain. Drill two holes about 1/4 in from the butt end and hook them over a brad in the bench corner, so you plane with the grain. Plane it straight and true to 1/2 in square, evenly from all sides, ignoring kinks. Knife-mark the hand grasp 12 in from the butt (11 in for a single grasp). Then plane an even taper from butt to tip, checking with caliper and gauge at every 6 in mark and planing the thick spots lightly. Bend the tip on the floor: if it stays bent, the wood needs a few weeks' seasoning in a warm place.

Материалы для этого шага:

Древесина дагамеДревесина дагаме1 штука
ГвоздиГвозди1 штука

Необходимые инструменты:

Ручной рубанокРучной рубанок

Обдирочный рубанокОбдирочный рубанок
Точильный каменьТочильный камень
Ручная дрельРучная дрель
ШтангенциркульШтангенциркуль
Макетный ножМакетный нож
МолотокМолоток
5

Round the rod

Lay the rod in the grooved board, a corner up, and take each corner off with a finely set small plane to make it eight-sided, calipering every 6 in mark and keeping the eight sides even, until it is almost round and tapers evenly from the grasp mark to the tip. File grooves across the edge of a cabinetmaker's steel scraper with a round file, sharpen them, and scrape the rod perfectly round; sandpaper it smooth. Tie on the tip and guides and string the reel on to try a few casts, then smooth it with No. 0 sandpaper.

Материалы для этого шага:

Наждачная бумагаНаждачная бумага1 штука

Необходимые инструменты:

Обдирочный рубанокОбдирочный рубанок

Стальной скребокСтальной скребок
Напильники (ручной напильник)Напильники (ручной напильник)
ШтангенциркульШтангенциркуль
6

Build the lower grasp and reel-seat sleeve

Cut a hole in the corks with a sharpened tube turned like a wad cutter. Cut the butt off square about 1 in from the end, to remove the holes. Glue on a cork with hot glue, then cork after cork, about 10, for a grasp a trifle over 5 in long. For the reel-seat sleeve, bore a 15/32 in hole through white pine about 3/4 in thick and 5 in long, plane the outside to slip inside the reel seat, taper one end to match it, and make it about 1/4 in shorter than the reel seat. Glue it down on top of the last cork and leave the glue a day or two.

Материалы для этого шага:

Пробковые кольцаПробковые кольца10 штук
Животный клейЖивотный клей1 штука
Сосновая доскаСосновая доска1 штука

Необходимые инструменты:
Латунная трубкаЛатунная трубка
Напильники (ручной напильник)Напильники (ручной напильник)
Ножовка по деревуНожовка по дереву
Ручная дрельРучная дрель
Обдирочный рубанокОбдирочный рубанок
7

Fit the butt cap and reel seat

Trim the grasp to about 1-1/16 in diameter (1-1/4 in corks need little trimming), leaving the top cork as a shoulder, and fit the lower corks to the butt cap's taper. Heat the cap moderately, rub melted ferrule cement inside and force it on; when hard, drive a small brass pin or brad through and file it flush. Cut the 4-1/2 in reel seat down to 3-7/8 in and fit it with the hood at the lower end, worked into the cork for a tight joint. Cement the sleeve, push the reel seat home and drive a small pin through the hood into the wood a short way only, not through the rod.

Материалы для этого шага:

Затыльник удилищаЗатыльник удилища1 штука
КатушкодержательКатушкодержатель1 штука
Клей для втулокКлей для втулок1 штука

Необходимые инструменты:

Макетный ножМакетный нож
Напильники (ручной напильник)Напильники (ручной напильник)
Пропановая горелкаПропановая горелка
МолотокМолоток
8

Build the upper grasp and finish the wood

Cement corks above the reel seat, the first pressed against the seat and turned so the metal enters it, then shape them into a smooth swelled grasp and cement on the winding check. Sand the rod, wet it to raise the grain, and sand again with old paper; for a finer polish rub with pumice and oil and an oiled rag. File the tip to fit the agate top, smear on melted ferrule cement and push the top home. Rub the wood over with a cloth wet with varnish to fill the pores, and wipe off the surplus.

Материалы для этого шага:

Пробковые кольцаПробковые кольца6 штук
Животный клейЖивотный клей1 штука
Окончание рукояти (виндинг-чек)Окончание рукояти (виндинг-чек)1 штука
Тюльпан удилищаТюльпан удилища1 штука
Клей для втулокКлей для втулок1 штука
Наждачная бумагаНаждачная бумага1 штука
Каретный лакКаретный лак1 штука

Необходимые инструменты:

Макетный ножМакетный нож
Напильники (ручной напильник)Напильники (ручной напильник)
Пропановая горелкаПропановая горелка
9

Whip on the guides

Place the first guide 19-1/2 in from the metal taper above the upper grasp and the second 15-1/2 in further on; round the sharp edges of their bases with a fine file and hold them with a few turns of common thread. Whip with 00 silk using the invisible knot: tuck the end under the first coil, wind tightly by turning the rod, lay a waxed loop of silk about 4 in long under the last turns, wind about 1/8 in beyond the pointed flange, cut the silk and pull its end back under with the loop. About a dozen turns make a winding; edgings of three or four turns go on after, in red with green or yellow.

Материалы для этого шага:

Пропускное кольцо удилищаПропускное кольцо удилища2 штук
Шёлк для обмотки удилищШёлк для обмотки удилищ1 штука
Льняная нитьЛьняная нить1 штука
Пчелиный воскПчелиный воск1 штука

Необходимые инструменты:

Напильники (ручной напильник)Напильники (ручной напильник)
Макетный ножМакетный нож
10

Shellac and varnish

Clip any fuzzy ends and give the silk two light coats of white shellac dissolved in grain alcohol, warmed and laid on with a small camel's-hair brush; let it dry a couple of days. Warm the coach varnish in a pot of hot water for five minutes and brush it on evenly with a brush about 1/2 in wide, in a warm place (about 75 deg F). Hang the rod by the tip in a dust-free room; allow three days between coats; two coats protect it, three give complete protection.

Материалы для этого шага:

Шеллачный лакШеллачный лак1 штука
Каретный лакКаретный лак3 штук

Необходимые инструменты:
Широкая малярная кистьШирокая малярная кисть
11

Troubleshooting

Casting rod troubleshooting.

Flow

Loading...
12

History and honest limits

From "Fishing-Rod Making and Angling, Part I -- A One-Piece Casting Rod" by Stillman Taylor, in **The Boy Mechanic, Book 2**, Popular Mechanics, 1915 (Project Gutenberg 44585; checked on the archive.org scan boymechanicbook200chic2, pp. 59-66). His text says about 10 corks for the lower grasp; his list allows 2 dozen for both grasps. The block plane, vernier caliper and other modern tool names, and the metric figures, are ours; his tools were "a saw, plane, jackknife, file, and sandpaper" plus those in his tools section.

Материалы

18

Требуемые инструменты

17

По этому чертежу делают

Связанные чертежи

Эти чертежи делятся знаниями — техники, материалы или принципы
CC0 Общественное достояние

Этот чертёж выпущен под лицензией CC0. Вы можете свободно копировать, изменять, распространять и использовать эту работу в любых целях без запроса разрешения.

Поддержите мейкера, покупая товары через его чертёж, где он получает Комиссию мейкера установленную продавцами, или создайте новую итерацию этого чертежа и включите его как связь в свой чертёж для распределения дохода.

Обсуждение

(0)

Войти чтобы присоединиться к обсуждению

Загрузка комментариев...