Сотрудничество
ИСКУССТВО
КРАСОТА И ЗДОРОВЬЕ
РЕМЕСЛО
КУЛЬТУРА И ИСТОРИЯ
РАЗВЛЕЧЕНИЯ
ЭКОЛОГИЯ
ЕДА И НАПИТКИ
ОБРАТНАЯ ИНЖЕНЕРИЯ
НАУКИ
СПОРТ
ТЕХНОЛОГИИ
НОСИМЫЕ УСТРОЙСТВА
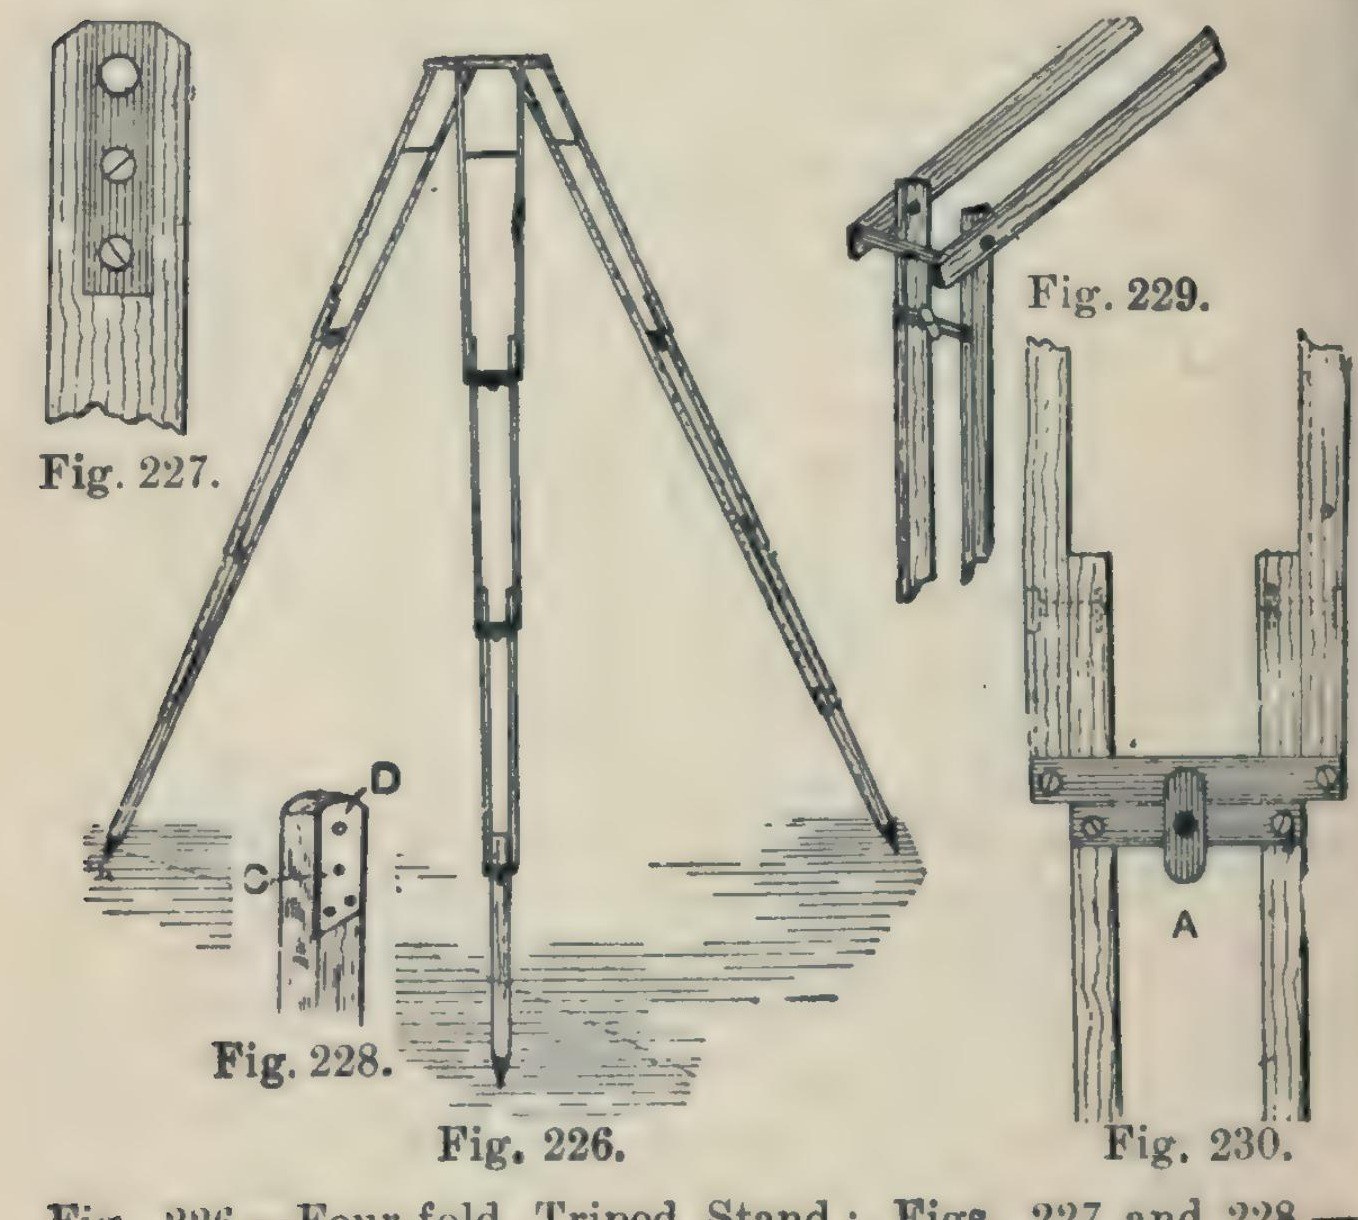


Camera Tripod: a Four-Fold Ash Tripod Stand (Hasluck, 1902)
A light, compact folding camera stand: three legs, each of seven ash laths riveted so it folds in four, locked open by brass buttons, on a triangular ash top with brass pins and a hole for the camera screw.
Hasluck says the same method makes stands that fold in three or two.
Source: Paul N. Hasluck, Photographic Cameras and Accessories (1902), pp. 153-157. Picture: Figs. 226-230 of the book.
Средний
Unknown
Инструкции
1
1
Cut the ash laths
Cut the ash laths
Cut laths of good ash, true and square or the stand won't be rigid, and round the edges slightly: six 17 1/4 x 5/8 x 3/8 in, six 16 x 5/8 x 3/8 in, six 15 1/2 x 5/8 x 3/8 in, and three 14 x 5/8 x 5/8 in.
Материалы для этого шага:
 Ясеневая доска1 21 laths
Необходимые инструменты:
 Обушковая пила
 Обдирочный рубанок
2
2
Fit the top ends and stretcher
Fit the top ends and stretcher
On each 17 1/4 in lath let in flush a 1/16 in brass plate, 1 1/4 in long, with a 3/16 in hole 1/4 in from the top, held by two countersunk brass screws; bore the wood to match and take off the top corners. On one lath of each pair cut a groove inside, about 3/16 in deep and 3 1/2 in long, starting 2 in from the top, and hinge a 1/8 in brass rod stretcher in it on a pin. On the other lath cut a curved groove 1 1/2 in long, 3/16 in wide, with a small hole at the bottom where the rod catches.
Материалы для этого шага:
 Латунный лист1 1/16 in plates
 Шурупы по дереву1 small brass screws
 Латунный пруток1 1/8 in stretcher
Необходимые инструменты:
 Рамка ножовки с полотнами
 Напильник по металлу
 Ручная дрель
 Стамески
 Отвёртка плоская
3
3
Bore and rivet the legs
Bore and rivet the legs
Bore the rivet holes: in the long laths 1 3/4 in from the lower end, counterbored so the copper rivet head sits flush, then 1/8 in through; in the 16 in and 15 1/2 in laths 1/2 in and 1 3/4 in from the ends; in each 14 in piece 1/2 in from one end, and taper its other end for a pointed iron shoe or a steel point and ferrule. Rivet the 21 laths into three legs with 1/8 in copper rivets and washers: a 16 in lath inside each 17 1/4 in one, a 15 1/2 in lath inside that, the 14 in foot between the last pair. Rivets flush, just tight enough to fold but not loose.
Материалы для этого шага:
 Медные заклёпки1 1/8 in, with washers
 Неизвестный металл3 iron shoes or steel points
Необходимые инструменты:
 Коловорот с перкойРучная дрель
 Клепальный молоток
4
4
Add cross strips and lock buttons
Add cross strips and lock buttons
Screw 1/16 in brass strips across the bottom ends of each pair of laths (Fig. 229). Under them screw strips carrying a small brass button riveted at the centre; turned, the button hooks over the strip above and locks the joint open (Fig. 230).
Материалы для этого шага:
Латунный лист1 cross strips, buttonsШурупы по дереву1 штукаНеобходимые инструменты:
Рамка ножовки с полотнамиНапильник по металлуОтвёртка плоскаяКлепальный молоток5
5
Make the top
Make the top
Plane ash to 1/2 in and draw an equilateral triangle with 8 1/2 in sides. Bisect the angles; 2 in from each corner draw a line at right angles, go 1/2 in in along the sides, and mark three rectangles 2 7/8 x 3/4 in; cut the outline (Fig. 231). Fix a 3/16 in brass rod, one end tapered, across each rectangle, bored 3/8 in from the outer edge and projecting about 1/2 in, for the legs to hang on. Bore a 1/4 in hole in the centre for the camera screw and glue felt on top.
Материалы для этого шага:
Ясеневая доска1 topЛатунный пруток3 3/16 in pins Шерстяной войлок1 штука
 Животный клей1 штука
Необходимые инструменты:
Обдирочный рубанокОбушковая пилаКоловорот с перкойРучная дрель6
6
Finish
Finish
Glasspaper and varnish the wood, and lacquer the brass.
Материалы для этого шага:
 Шеллачный лак1 varnish
 Неизвестный материал1 brass lacquer
Необходимые инструменты:
 Наждачная бумага
Материалы
10- 1 topЗаполнитель
- 1 cross strips, buttonsЗаполнитель
- 1 штукаЗаполнитель
- 3 3/16 in pinsЗаполнитель
- 1 1/8 in, with washersЗаполнитель
- 3 iron shoes or steel pointsЗаполнитель
- 1 штукаЗаполнитель
- 1 штукаЗаполнитель
- 1 varnishЗаполнитель
- 1 brass lacquerЗаполнитель
Требуемые инструменты
10- Заполнитель
- Заполнитель
- Заполнитель
- Заполнитель
- Заполнитель
- Заполнитель
- Заполнитель
- Заполнитель
- Заполнитель
- Заполнитель
По этому чертежу делают

CC0 Общественное достояние
Этот чертёж выпущен под лицензией CC0. Вы можете свободно копировать, изменять, распространять и использовать эту работу в любых целях без запроса разрешения.
Поддержите мейкера, покупая товары через его чертёж, где он получает Комиссию мейкера установленную продавцами, или создайте новую итерацию этого чертежа и включите его как связь в свой чертёж для распределения дохода.