ИСКУССТВО
КРАСОТА И ЗДОРОВЬЕ
РЕМЕСЛО
КУЛЬТУРА И ИСТОРИЯ
РАЗВЛЕЧЕНИЯ
ЭКОЛОГИЯ
ЕДА И НАПИТКИ
ОБРАТНАЯ ИНЖЕНЕРИЯ
НАУКИ
СПОРТ
ТЕХНОЛОГИИ
НОСИМЫЕ УСТРОЙСТВА


Face Side and Face Edge: Everything Is Measured From the Same Two Surfaces
Choose one face and one edge of every board, make them true, mark them, and measure everything from those two surfaces for the rest of the job. That is the whole idea, and it is the foundation the entire hand-tool series quietly assumes.
The reason is that errors do not add up if they all share an origin. Measure the second face from the first and it is parallel to it; measure it from the opposite face and it inherits whatever that face's error was. Work from one reference and mistakes stay put instead of compounding.
Zero published blueprints on Youblob covered this. It is the first thing a joiner is taught and the reason their work fits together.
Начинающий
2 hours
Инструкции
1
1
Pick the best face, and make it true
Pick the best face, and make it true
Look at all four surfaces and choose the one that is flattest, has the best grain and is most likely to show. That becomes the FACE SIDE.
Make it flat — no twist, no cup, no bow. It does not have to be pretty, it has to be TRUE, because everything else in the job is going to be referenced from it. The next rung is how to test that honestly with winding sticks and a straightedge.
Choosing matters more than it sounds. A board with a knot where a joint will go, or with the best figure buried on the underside, is a decision you make once and live with. Spend the minute.
Материалы для этого шага:
 Доска из твёрдой древесины1 штука
Необходимые инструменты:
 Поверочная линейка
 Ручной рубанок
 Ювелирная лупа
2
2
Then one edge, square to that face
Then one edge, square to that face
Choose an edge adjacent to the face side and plane it straight and SQUARE to that face — not square to anything else, and not merely straight.
Test with a try square held against the face side, sliding along the edge, sighted against the light. Any gap under the blade is out of square, and the eye can see a gap of a few hundredths this way. That becomes the FACE EDGE.
Now you have a reference corner: two true surfaces at a known right angle. Width is measured from the face edge, thickness from the face side, and every square line is struck with the square's stock against one of them.
Материалы для этого шага:
Доска из твёрдой древесины1 штукаНеобходимые инструменты:
 Столярный угольникРучной рубанок
 Тяжёлые слесарные тиски
3
3
Mark them, and use the traditional marks
Mark them, and use the traditional marks
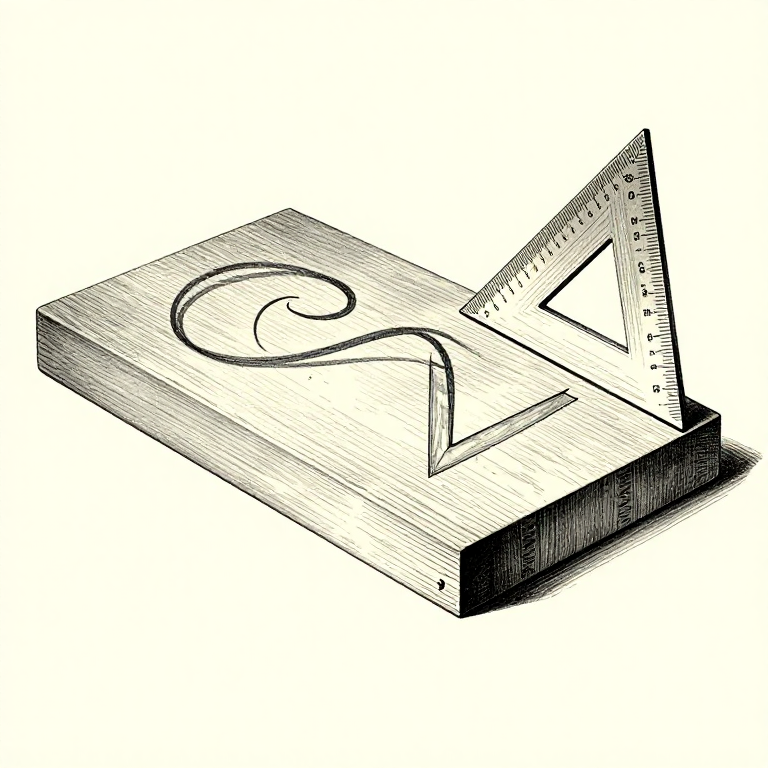
Draw a loose looping mark on the face side and an inverted V on the face edge, with the point of the V touching the face side's mark at the shared corner.
The marks do real work. They survive handling, they are unmistakable across a bench of similar boards, and because they meet at the corner they tell you which face goes with which edge — which matters once you have four boards that all look alike.
Put them where they will not be planed away, and where you can see them while working. Any consistent convention works; the traditional one has survived because it is quick to draw and impossible to confuse with a measuring mark.
Материалы для этого шага:
Доска из твёрдой древесины2 штукНеобходимые инструменты:
Столярный угольник4
4
Always reference from the marks — never from the other side
Always reference from the marks — never from the other side
Every gauge, every square and every measurement registers against the face side or the face edge. The gauge's stock goes against the marked face, every time, on every board.
Do that and a small error in the board's thickness simply does not matter: the joint is cut at a fixed distance from a true surface, and the other surface can be whatever it likes. Reference from the wrong side once and that error lands directly in the joint.
This is also why a set of parts should be marked out together, from the same reference, in one session. Boards marked from different references fit their own measurements perfectly and each other not at all — which is the usual reason a carefully made assembly will not go together.
Материалы для этого шага:
Доска из твёрдой древесины4 штукНеобходимые инструменты:
 Разметочный рейсмусСтолярный угольник
Требуемые инструменты
6- Заполнитель
- Заполнитель
- Заполнитель
- Заполнитель
- Заполнитель
- Заполнитель
Связанные чертежи
Эти чертежи делятся знаниями — техники, материалы или принципы


CC0 Общественное достояние
Этот чертёж выпущен под лицензией CC0. Вы можете свободно копировать, изменять, распространять и использовать эту работу в любых целях без запроса разрешения.
Поддержите мейкера, покупая товары через его чертёж, где он получает Комиссию мейкера установленную продавцами, или создайте новую итерацию этого чертежа и включите его как связь в свой чертёж для распределения дохода.