
Сотрудничество
ИСКУССТВО
КРАСОТА И ЗДОРОВЬЕ
РЕМЕСЛО
КУЛЬТУРА И ИСТОРИЯ
РАЗВЛЕЧЕНИЯ
ЭКОЛОГИЯ
ЕДА И НАПИТКИ
ОБРАТНАЯ ИНЖЕНЕРИЯ
НАУКИ
СПОРТ
ТЕХНОЛОГИИ
НОСИМЫЕ УСТРОЙСТВА
Twin-Saw Table: A Rip Saw and a Crosscut Saw at Opposite Corners, One Motor, Each Depth Set by Tilting the Top (Gottschalk, 1926)
Forge

Создано

Forge

13. ноябрь 2026NO
0
0
0
0
0

Twin-Saw Table: A Rip Saw and a Crosscut Saw at Opposite Corners, One Motor, Each Depth Set by Tilting the Top (Gottschalk, 1926)

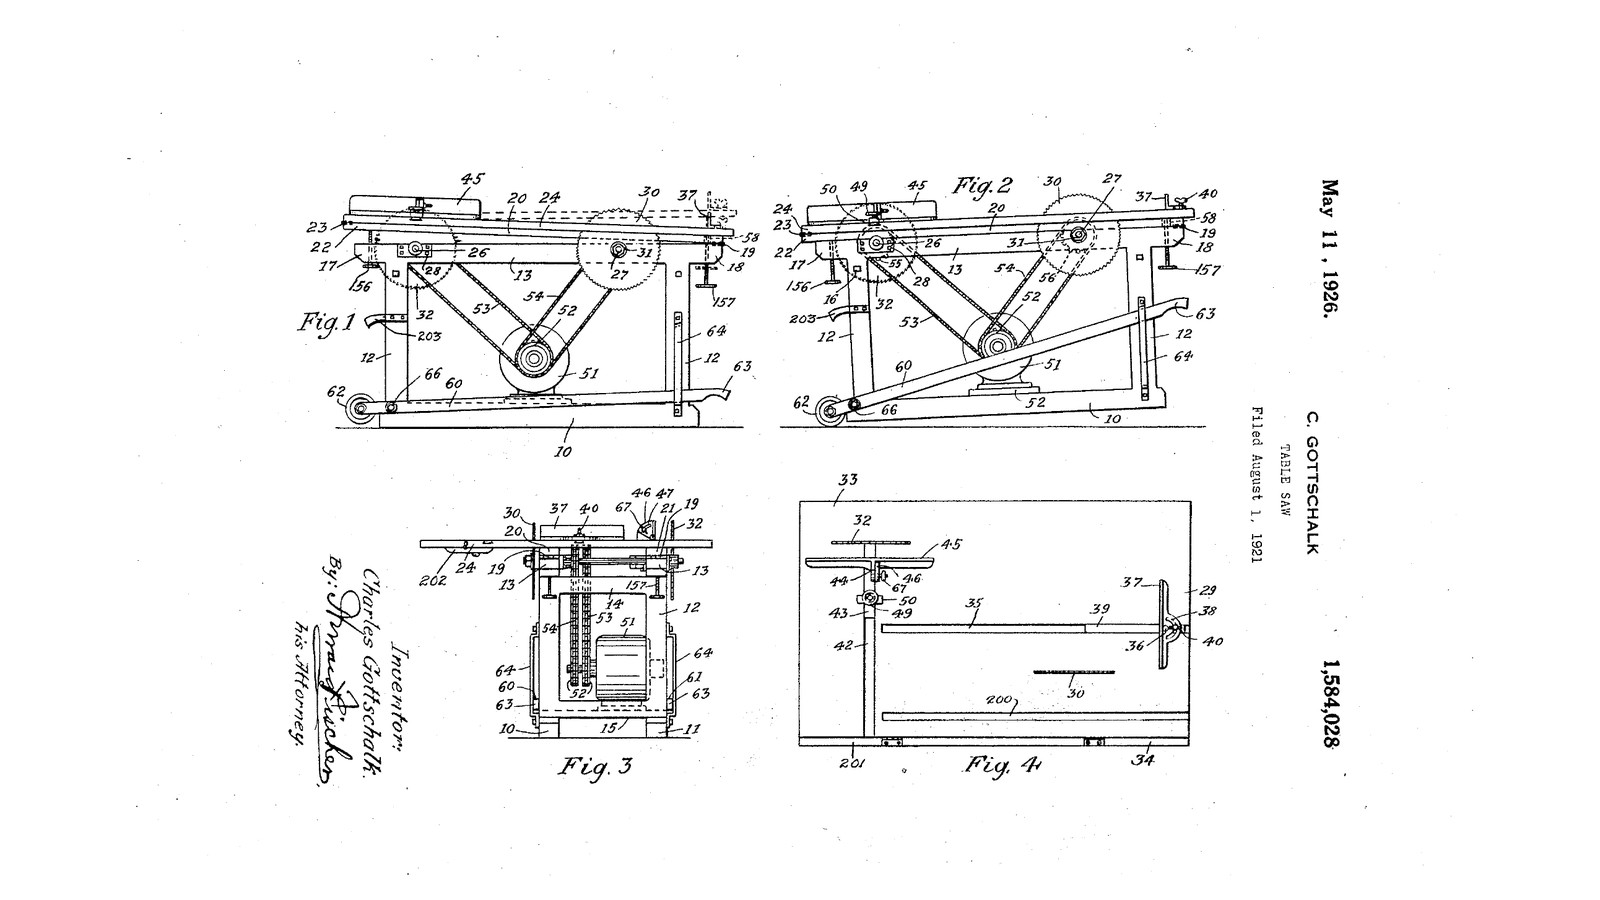
Charles Gottschalk of St. Paul, Minnesota, received US 1,584,028, dated 11 May 1926, for a table saw with two saws. A crosscut saw and a rip saw stand at opposite corners of one table, so either or both can be used without changing blades. An electric motor inside the frame drives both through two chains. The top is hinged twice and lifted by a hand screw at either end, which sets each saw's depth of cut on its own. A lever with wheels lets two people truck the whole machine about. The patent gives no sizes; every size here is ours.
Продвинутый
About 1 week

Инструкции

1

Setting each saw's depth

Загрузка блокнота Jupyter…
2

Read US 1,584,028

"Inasmuch as the saws are positioned fairly close to the hinges 19 and 23 the movement of the table for one of the saws does not appreciably affect the positioning of the same in regard to the other saw so that the depth of cut of either of the two saws may be adjusted independently or simultaneously if desired."
3

Frame on skids

From 45 x 95 mm pine: two skids 10, 11 1200 mm long; four uprights 12 775 mm long; two top rails 13 1300 mm long, their ends 50 mm past the uprights (17 at the rear, 18 at the front); cross rails 14, 15 between the uprights; a motor bed 52 across the skids. Glue and bolt the joints with carriage bolts, square and level, so the rails' tops stand 820 mm above the floor and 600 mm apart.

Материалы для этого шага:

Сосновый пиломатериалСосновый пиломатериал10 штук
Болт с полукруглой головкойБолт с полукруглой головкой24 штук
Плоская шайбаПлоская шайба24 штук
Шестигранная гайкаШестигранная гайка24 штук
Столярный клейСтолярный клей1 штука

Необходимые инструменты:

ЭлектролобзикЭлектролобзик
Аккумуляторная дрельАккумуляторная дрель
Набор свёрлНабор свёрл
Набор перовых свёрлНабор перовых свёрл
Разводной ключРазводной ключ
Струбцина с направляющейСтрубцина с направляющей
Комбинированный угольникКомбинированный угольник
РулеткаРулетка
4

Turn the two arbors

From 30 mm steel bar turn two arbors 26, 27, each 400 mm long. On one end of each turn a collar 40 mm across and 6 mm thick 30 mm from the end, and screw-cut the last 25 mm M20 on the lathe; turn a loose flange 60 mm across with a 20 mm bore for each. Drill and tap the sprockets' hubs for set screws if they have none.

Материалы для этого шага:

Круглый пруток из малоуглеродистой сталиКруглый пруток из малоуглеродистой стали2 штук
Шестигранная гайкаШестигранная гайка4 штук

Необходимые инструменты:

Токарный станок по металлуТокарный станок по металлу
Трёхкулачковый токарный патронТрёхкулачковый токарный патрон
Токарный резецТокарный резец
Цифровой штангенциркуль 6 дюймовЦифровой штангенциркуль 6 дюймов
Ножовка по металлуНожовка по металлу
Сверлильный станокСверлильный станок
Набор свёрлНабор свёрл
Набор метчиков и плашекНабор метчиков и плашек
Вороток для метчиковВороток для метчиков
Защитные очкиЗащитные очки
5

Mount the arbors and the saws

Bolt two 30 mm flange bearings 28 to the outsides of the rails for each arbor, its centre 30 mm below the rails' tops: the crosscut saw's arbor 27 250 mm from the front ends, the rip saw's arbor 26 250 mm from the rear ends. Push the arbors through so the crosscut saw's threaded end stands out past the left rail and the rip saw's past the right one, seen from the front. Fix a 17-tooth #40 sprocket on each arbor between the rails. Put each 250 mm blade on its collar, the teeth at the top pointing to the front, then the loose flange, a nut and a second nut locked against it.

Материалы для этого шага:

Фланцевый подшипникФланцевый подшипник4 штук
ЗвёздочкаЗвёздочка2 штук
Circular Saw Blade SetCircular Saw Blade Set1 штука
Набор шестигранных болтовНабор шестигранных болтов16 штук
Установочный винт с чашеобразным концомУстановочный винт с чашеобразным концом4 штук

Необходимые инструменты:

Разводной ключРазводной ключ

Набор шестигранных ключейНабор шестигранных ключей
Аккумуляторная дрельАккумуляторная дрель
Набор свёрлНабор свёрл
6

Motor and chains

Bolt the motor 51 to its bed between the skids under the arbors, its shaft parallel to them, and fit two 17-tooth sprockets 52 on its shaft, each in line with one arbor's sprocket. Fit a #40 chain 53, 54 from each to its arbor, tensioned by sliding the motor in slotted bolt holes. Have the motor wired to a switch within reach at the front. Oil the chains.

Материалы для этого шага:

ЭлектродвигательЭлектродвигатель1 штука
ЗвёздочкаЗвёздочка2 штук
Роликовая цепьРоликовая цепь2 штук
Выключатель питанияВыключатель питания1 штука
Машинное маслоМашинное масло1 штука

Необходимые инструменты:

Разводной ключРазводной ключ
Набор шестигранных ключейНабор шестигранных ключей
7

The hinged members and the top

Cut two hardwood members 20, 21 20 x 70 mm, 1340 mm long, to lie flat on the rails; hinge their front ends to the rails' front ends 19 and let them reach 40 mm past the rear 22. Cut the 18 mm plywood top 24 1400 x 800, with a slot over each blade, and hinge its rear edge to the members' rear ends 23. Rout a square groove 35 for the crosscut guide parallel to the crosscut saw and a second groove 200 on its other side, and a groove 42 across the top for the rip guide's bar.

Материалы для этого шага:

Доска из твёрдой древесиныДоска из твёрдой древесины2 штук
Лист фанерыЛист фанеры1 штука
Карточная петляКарточная петля4 штук
Шурупы по деревуШурупы по дереву40 штук

Необходимые инструменты:

ЭлектролобзикЭлектролобзик

Ручной фрезерРучной фрезер
Набор фрезНабор фрез
Аккумуляторная дрельАккумуляторная дрель
Набор свёрлНабор свёрл
Струбцина с направляющейСтрубцина с направляющей
Комбинированный угольникКомбинированный угольник
РулеткаРулетка
8

The depth screws

Screw a 6 mm steel plate under each rail's projecting end, drilled and tapped M12. Run a 150 mm M12 threaded rod up through each, with a wing nut locked on its lower end as a handle. The rear pair 156 push up under the members' rear ends 22, lifting members and top on the front hinges 19: this sets the rip saw. The front pair 157 pass through holes 58 in the members and push the top alone up on its rear hinges 23: this sets the crosscut saw.

Материалы для этого шага:

Полоса из малоуглеродистой сталиПолоса из малоуглеродистой стали1 штука

Шпилька резьбоваяШпилька резьбовая4 штук
Гайка-барашекГайка-барашек4 штук
Шестигранная гайкаШестигранная гайка4 штук
Шурупы по деревуШурупы по дереву16 штук

Необходимые инструменты:

Ножовка по металлуНожовка по металлу
Сверлильный станокСверлильный станок
Набор свёрлНабор свёрл
Набор метчиков и плашекНабор метчиков и плашек
Вороток для метчиковВороток для метчиков
Разводной ключРазводной ключ
9

The guides

Crosscut guide: a hardwood bar 39 sliding in groove 35, with an angle fence 37 pivoted on it at 36 and clamped at any angle by a wing nut 40 through an arc slot 38. Rip guide: a bar 43 sliding in groove 42, held by a hand screw 49 through a plate 50, carrying a fence 45 hinged on a bracket 44 and tilted by a wing nut 67 in an arc slot 47.

Материалы для этого шага:

Доска из твёрдой древесиныДоска из твёрдой древесины1 штука
Болт с полукруглой головкойБолт с полукруглой головкой4 штук
Гайка-барашекГайка-барашек3 штук
Полоса из малоуглеродистой сталиПолоса из малоуглеродистой стали1 штука

Необходимые инструменты:

ЭлектролобзикЭлектролобзик
Аккумуляторная дрельАккумуляторная дрель
Набор свёрлНабор свёрл
Комбинированный угольникКомбинированный угольник
10

The truck

Pivot two hardwood arms 60, 61 to the rear ends of the skids at 66, with a wheel 62 on the end of each beyond the pivot. Their front ends 63 are handles sliding in keepers 64 on the front uprights. With the handles down, the wheels are off the floor; lift the handles and the wheels take the weight so the saw can be wheeled away.

Материалы для этого шага:

Доска из твёрдой древесиныДоска из твёрдой древесины2 штук
Набор резиновых колёсНабор резиновых колёс1 штука
Набор шестигранных болтовНабор шестигранных болтов4 штук
Шурупы по деревуШурупы по дереву8 штук

Необходимые инструменты:

ЭлектролобзикЭлектролобзик
Аккумуляторная дрельАккумуляторная дрель
Набор свёрлНабор свёрл
Разводной ключРазводной ключ
11

Try it

Wind both screw pairs down and check each blade stands square to the top and parallel to its groove. Set the rip saw's depth with the rear screws and the crosscut's with the front screws, each about 10 mm above the wood. Wearing glasses and ear defenders, rip a board along the rip guide, then cut the end off another against the crosscut guide.

Необходимые инструменты:

Комбинированный угольникКомбинированный угольник
РулеткаРулетка
Защитные очкиЗащитные очки
Защита слуха (наушники, SNR 30 дБ)Защита слуха (наушники, SNR 30 дБ)
12

Troubleshooting

Twin-saw table troubleshooting.

Flow

Loading...
13

History and honest limits

**Charles Gottschalk** of St. Paul, Minnesota, US 1,584,028, dated 11 May 1926, filed 1 August 1921. He claimed a frame with two rails, longitudinal members hinged to the rails at one end, a single top hinged to them at the other, a crosscut saw at one end and a rip saw at the other through the top, and means to oscillate the members and top together, and the top alone, "so as to vary the relative depth of cut of either of said saws". He says a gasoline engine may drive it instead of the motor. His grooves are dovetailed; ours are square. He gives no sizes, speeds or sprocket sizes; all of those are ours.

Материалы

23

Требуемые инструменты

21

По этому чертежу делают

CC0 Общественное достояние

Этот чертёж выпущен под лицензией CC0. Вы можете свободно копировать, изменять, распространять и использовать эту работу в любых целях без запроса разрешения.

Поддержите мейкера, покупая товары через его чертёж, где он получает Комиссию мейкера установленную продавцами, или создайте новую итерацию этого чертежа и включите его как связь в свой чертёж для распределения дохода.

Обсуждение

(0)

Войти чтобы присоединиться к обсуждению

Загрузка комментариев...