ИСКУССТВО
КРАСОТА И ЗДОРОВЬЕ
РЕМЕСЛО
КУЛЬТУРА И ИСТОРИЯ
РАЗВЛЕЧЕНИЯ
ЭКОЛОГИЯ
ЕДА И НАПИТКИ
ОБРАТНАЯ ИНЖЕНЕРИЯ
НАУКИ
СПОРТ
ТЕХНОЛОГИИ
НОСИМЫЕ УСТРОЙСТВА
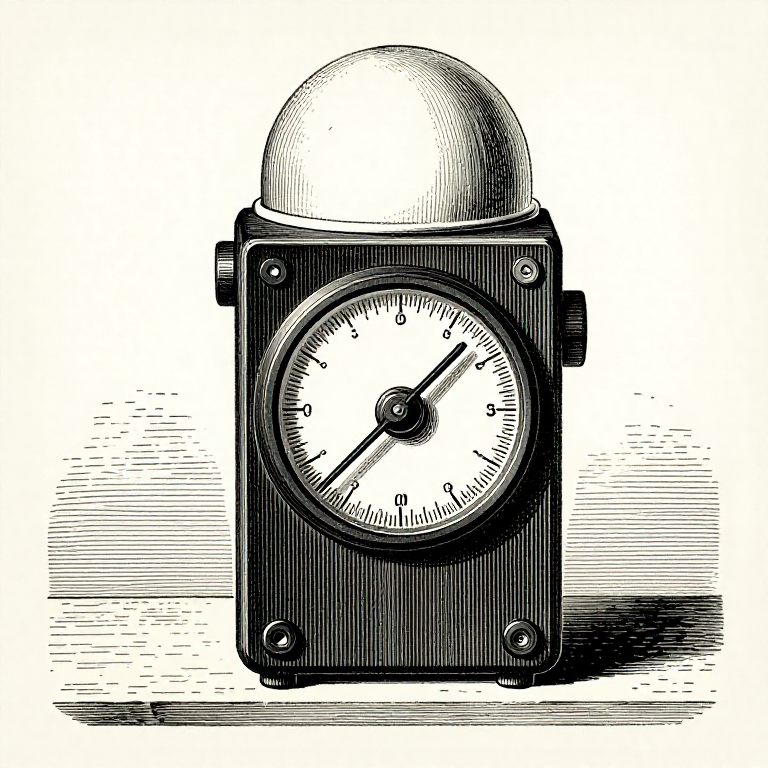


Metering: Why Snow Comes Out Grey
Point a light meter at a snowfield and it will tell you to under-expose by two stops, and the snow will come out grey. Point it at a black cat and it will tell you to over-expose, and the cat will come out grey.
This is not a fault. A reflected-light meter measures the light coming **off** the subject and has no way of knowing whether there is a lot of light on a dark thing or a little light on a bright one. So it assumes every scene averages to a mid grey, and gives the exposure that would make it so.
Every metering technique is a way of working around that one assumption.
Средний
3 hours
Инструкции
1
1
The 18% grey assumption
The 18% grey assumption
A reflected-light meter is calibrated so that whatever it is pointed at is rendered as a mid grey — conventionally quoted as **18% reflectance**, which is the reflectance of the standard grey card.
That works because an average scene really does average out to about that. It fails whenever the scene does not:
**Snow, a white wall, a beach, a pale sky.** The meter makes them grey, so the picture is under-exposed. Open up one and a half to two stops from the reading.
**A black cat, a dark doorway, dark clothing.** The meter makes them grey, so the picture is over-exposed. Close down one and a half to two stops.
**A backlit subject.** The meter sees the bright background and the subject becomes a silhouette. Meter the subject, not the frame.
The rule to carry: **the meter tells you what makes the thing you pointed it at come out grey. You decide whether it should be grey.**
This is the whole reason the grey card exists — it gives the meter the one thing it was calibrated for, so that everything else falls where it should.
Необходимые инструменты:
 Экспонометр (падающий/отражённый свет)
 Цифровая фотокамера
2
2
Reflected, incident and spot
Reflected, incident and spot
**Reflected metering** measures light coming off the subject. This is what a camera's built-in meter does, and it is subject to everything above.
**Incident metering** measures the light **falling on** the subject, with a white dome over the sensor, held at the subject and pointed back at the camera. It does not care what colour the subject is, so snow and a black cat in the same light give the same reading — the correct one for both.
This is why studio and cinema work is metered incident, and it is the single biggest improvement available to anyone struggling with exposure.
**Spot metering** is reflected metering through a very narrow angle, so one small part of the scene can be measured. That makes the 18% assumption useful rather than a nuisance: meter one chosen surface, then place it deliberately.
**Averaging and matrix metering** blend readings across the frame with rules about what is probably important. They work well most of the time and fail unpredictably, which is worse than failing predictably.
If only one meter is available, an incident reading is right more often than any reflected one.
Необходимые инструменты:
Экспонометр (падающий/отражённый свет)3
3
Placing a tone: metering for the shadows
Placing a tone: metering for the shadows
The traditional black and white rule is **expose for the shadows and develop for the highlights**, and the first half is a metering instruction.
Film records nothing at all below a threshold: an under-exposed shadow is clear film, and no amount of printing brings anything out of it. Highlights, by contrast, keep accumulating density and stay printable a long way up.
So: **spot meter the darkest part in which detail is wanted, and close down about two stops from that reading.** That places it low on the curve but above the threshold, which is exactly where a shadow should sit.
Why two stops: the meter would place that shadow as a mid grey, and a shadow with detail belongs roughly two stops below mid grey. Closing down two stops puts it there.
Then measure the brightest part in which detail is wanted, and count the stops between the two. That number is the **subject brightness range**, and it is what the development rung uses. Under about five stops the scene is flat; much over seven and something will have to be given up.
**Digital reverses this**, because clipped highlights are unrecoverable and shadows can be lifted. Meter for the highlights and expose to the right.
Материалы для этого шага:
 Фотоплёнка1 штука
Необходимые инструменты:
Экспонометр (падающий/отражённый свет)4
4
Checking a meter, and the substitutes
Checking a meter, and the substitutes
**Check a meter against a known answer.** Sunny 16 is the free calibration: on a clear day with distinct shadows, a meter should agree within about half a stop with f/16 at one over the ISO. A meter that is a stop out is worth knowing about.
**Two meters that disagree.** Take a third reading rather than averaging them; one of them is probably wrong rather than both being slightly off.
**Substitutes when there is no meter:**
*The palm of a hand*, metered close, reads about one stop brighter than mid grey for most people — so meter the palm and open up one stop.
*Grass or weathered wood* is close to mid grey and is almost always available.
*A phone* has a meter in it, and a light meter app is genuinely accurate enough for negative film's latitude.
**Record the reading and the decision.** "Metered the shadow at 1/60 f/5.6, closed down two to f/11" is a note that makes the negative interpretable. The reading alone is not, because it does not say what was pointed at.
Необходимые инструменты:
Экспонометр (падающий/отражённый свет)Цифровая фотокамераМатериалы
1- 1 штукаЗаполнитель
Связанные чертежи
Эти чертежи делятся знаниями — техники, материалы или принципы

CC0 Общественное достояние
Этот чертёж выпущен под лицензией CC0. Вы можете свободно копировать, изменять, распространять и использовать эту работу в любых целях без запроса разрешения.
Поддержите мейкера, покупая товары через его чертёж, где он получает Комиссию мейкера установленную продавцами, или создайте новую итерацию этого чертежа и включите его как связь в свой чертёж для распределения дохода.