Сотрудничество
ИСКУССТВО
КРАСОТА И ЗДОРОВЬЕ
РЕМЕСЛО
КУЛЬТУРА И ИСТОРИЯ
РАЗВЛЕЧЕНИЯ
ЭКОЛОГИЯ
ЕДА И НАПИТКИ
ОБРАТНАЯ ИНЖЕНЕРИЯ
НАУКИ
СПОРТ
ТЕХНОЛОГИИ
НОСИМЫЕ УСТРОЙСТВА
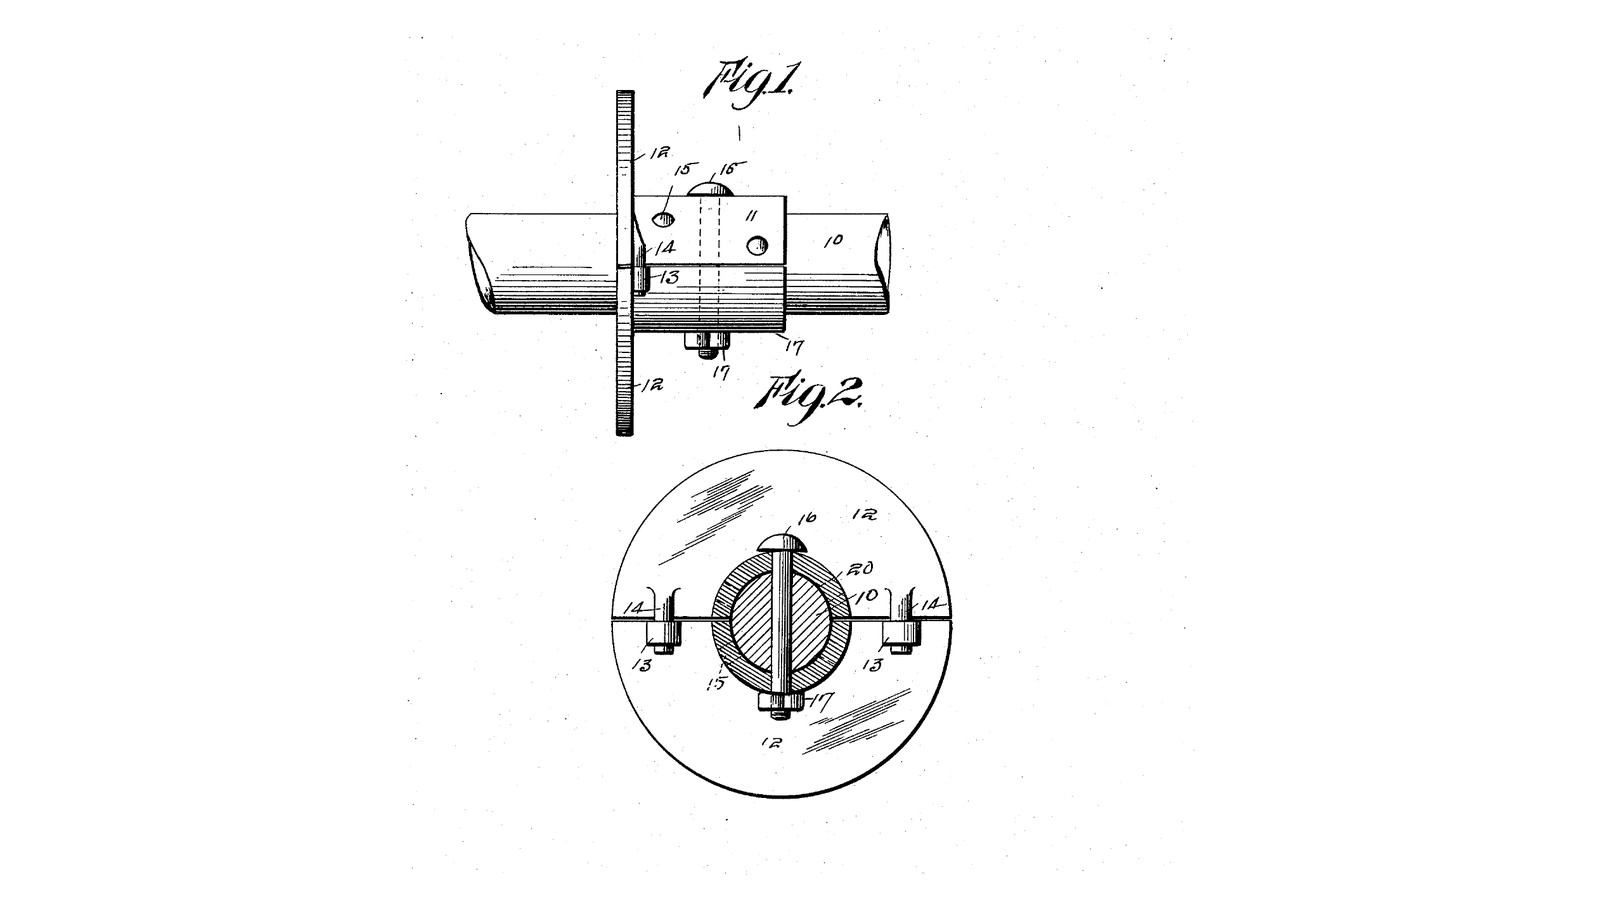


Divisible Flanged Shaft Collar: Two Halves Locked by Lugs, Bolted Through the Shaft in One of Three Hole Pairs (Obey, 1916)
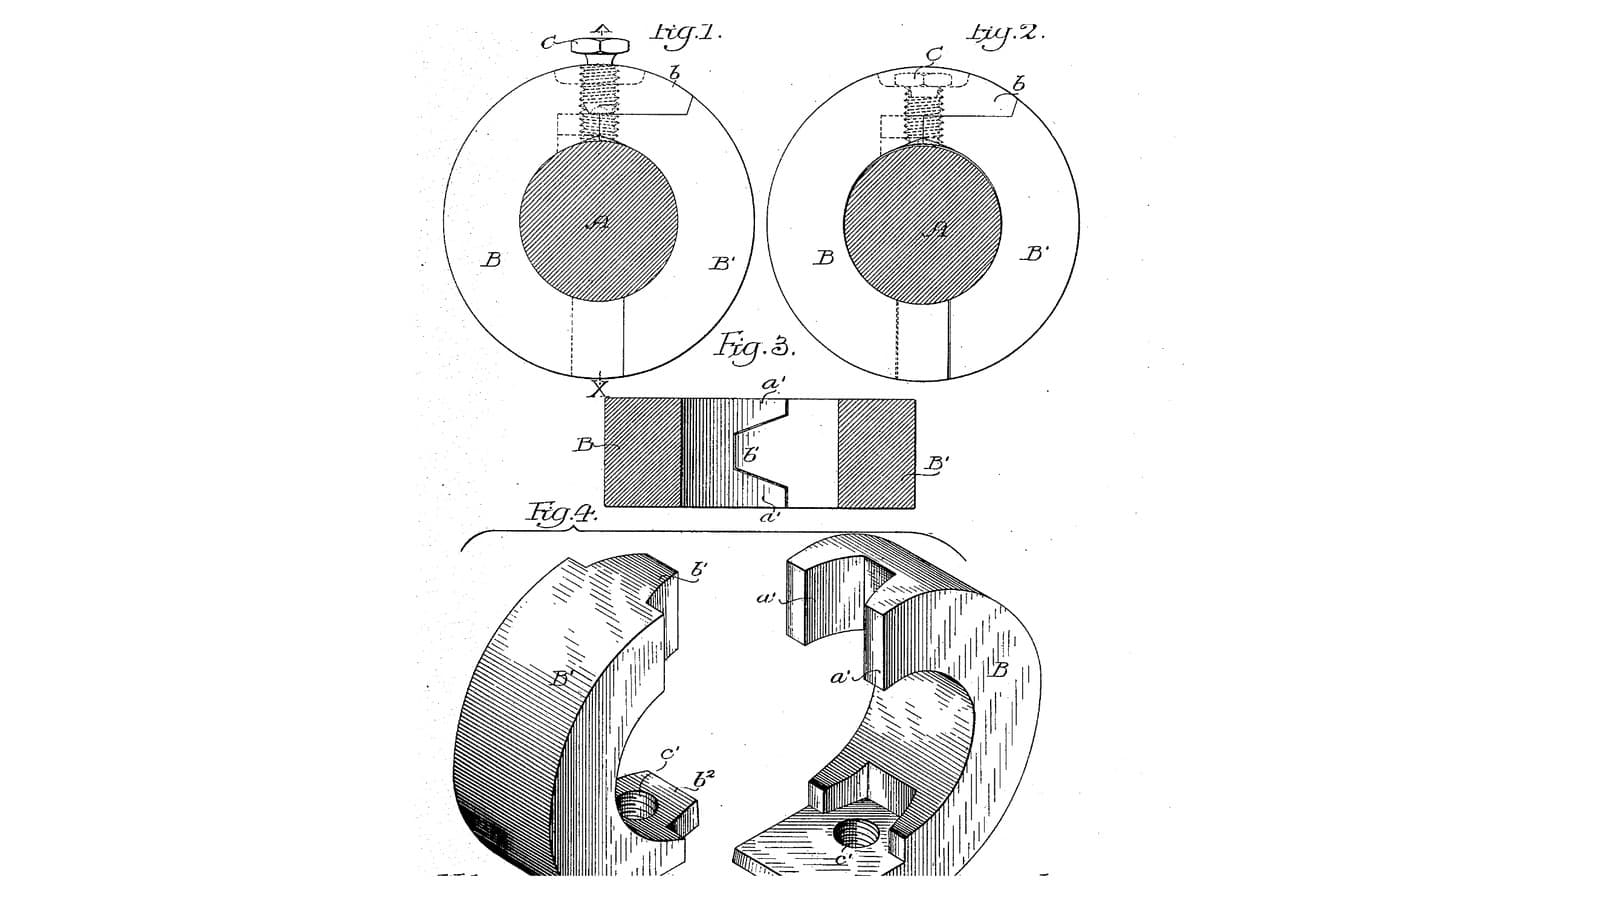
James F. Obey of Centerville, Iowa, received US 1,201,863, dated 17 October 1916, for a flanged collar that comes in two halves. It was meant for the chain rods of railway dump cars, whose collars often broke, and a whole rod then had to come out of its bearings. Lugs on one half of the flange go into slots in the other. A bolt through the rod's own hole and through a pair of openings in the collar holds it, with a nut. The collar has several pairs at different places, so it can be set in more than one position.
We turn ours in one piece and saw it in half. The patent gives no sizes; every size here is ours.
Средний
About 6 hours
Инструкции
1
1
Where each pair of openings puts the collar
Where each pair of openings puts the collar
Загрузка блокнота Jupyter…
2
2
Read US 1,201,863
Read US 1,201,863
"These shaft collars frequently become broken and it is one of the important purposes of my invention to provide a shaft-collar which can be quickly and easily installed on the shaft without the removal of the shaft from its bearings."
3
3
Turn the flanged collar
Turn the flanged collar
Grip 75 mm round bar in the 3-jaw chuck. Face it and turn the flange to 70 mm. Turn the hub to 32 mm for 40 mm, leaving the flange 10 mm thick. Centre-drill, drill through 15 mm and ream 16 mm. Part off at 50 mm and face the flange's outer face.
Материалы для этого шага:
 Круглый пруток из малоуглеродистой стали1 штука
 Смазочно-охлаждающее масло1 штука
Необходимые инструменты:
 Токарный станок по металлу
 Трёхкулачковый токарный патрон
 Токарный резец
 Отрезной резец
 Набор центровочных свёрл
 Набор свёрл
 Развёртка
 Цифровой штангенциркуль 6 дюймов
 Защитные очки
4
4
Mark out and drill the holes
Mark out and drill the holes
Blue the flange and hub. Scribe the split line across the flange through the centre and along both sides of the hub. Mark two chord holes across the split line, 28 mm each side of the centre, in the middle of the flange's thickness; drill them 5 mm right through the flange, square to the split line. Mark three pairs of openings round the hub, at 18, 30 and 42 mm from the flange's outer face and at 90, 30 and 150 degrees from the split line. Centre-punch, and with the collar in the V-block drill each pair 6.5 mm straight through the hub and the bore.
Необходимые инструменты:
 Синяя контрольная краска
 Чертилка
 Комбинированный угольник
 Транспортир
 Кернер
 Сверлильный станок
 Машинные тиски
 Призма разметочнаяНабор свёрлЦифровой штангенциркуль 6 дюймов
5
5
Saw it in half and fit the lugs
Saw it in half and fit the lugs
In soft jaws, saw down the split line through flange and hub with a fine hacksaw blade, through the middle of the chord holes. File the cut faces flat. Tap a 5 mm steel dowel pin 20 mm long into each chord hole of one half, leaving 9 mm sticking out: these are the lugs, and the other half's holes are the slots. Put the halves together: they must close with only the saw cut between them, and slide apart only straight.
Материалы для этого шага:
 Стальной штифт2 штук
Необходимые инструменты:
 Слесарные тиски
 Мягкие губки для тисков
 Ножовка по металлу
 Набор напильников
 Слесарный молоток с шаровым бойком
 Гратосниматель
6
6
The collar in 3D
The collar in 3D
FreeCAD model, our sizes: the two halves with flange and hub on a 16 mm shaft, the two pins across the split in the flange, the three pairs of openings, and the M6 bolt and nut through the first pair and the shaft.
7
7
Drill the shaft and fit the collar
Drill the shaft and fit the collar
Mark where the collar's flange must stand and drill a 6.5 mm hole straight across the shaft, 18 mm from that mark, with the shaft in the V-block. Put the two halves round the shaft from the sides, the lugs into the slots, and turn the collar until the 18 mm pair lines up with the hole. Push an M6 x 50 bolt through and tighten a nyloc nut on it. To move the collar, take the bolt out, slide and turn the collar until another pair lines up, and bolt it again.
Материалы для этого шага:
 Набор шестигранных болтов1 штука
 Самоконтрящаяся гайка с нейлоновым кольцом1 штука
Необходимые инструменты:
Сверлильный станокПризма разметочнаяНабор свёрлКернер Разводной ключ
8
8
Troubleshooting
Troubleshooting
Obey collar troubleshooting.
Flow
Loading...
9
9
History and honest limits
History and honest limits
**James F. Obey** of Centerville, Appanoose County, Iowa, US 1,201,863, dated 17 October 1916, filed 3 August 1915. He claimed a shaft with a transverse hole, "a collar mounted thereon consisting of a longitudinally halved cylinder with an annular flange at one end, one half of the flange being provided with lugs, the other half being provided with corresponding slots", pairs of aligned openings at different points along and round the cylinder, and a bolt through the shaft's hole and a chosen pair. His lugs are bent pieces on the face of the flange that hook into yokes on the other half; ours are pins in holes through the flange, which do the same job. His bolt has a round head; ours is a hex bolt with a nyloc nut. The patent gives no sizes or material; every size here is ours.
Материалы
5- Заполнитель
- 1 штукаЗаполнитель
- 2 штукЗаполнитель
- 1 штукаЗаполнитель
- Заполнитель
Требуемые инструменты
24- Заполнитель
- Заполнитель
- Заполнитель
- Заполнитель
- Заполнитель
- Заполнитель
- Заполнитель
- Заполнитель
- Заполнитель
- Заполнитель
- Заполнитель
- Заполнитель
- Заполнитель
- Заполнитель
- Заполнитель
- Заполнитель
- Заполнитель
- Заполнитель
- Заполнитель
- Заполнитель
- Заполнитель
- Заполнитель
- Заполнитель
- Заполнитель
Файлы дизайна
1По этому чертежу делают
Связанные чертежи
Эти чертежи делятся знаниями — техники, материалы или принципы
CC0 Общественное достояние
Этот чертёж выпущен под лицензией CC0. Вы можете свободно копировать, изменять, распространять и использовать эту работу в любых целях без запроса разрешения.
Поддержите мейкера, покупая товары через его чертёж, где он получает Комиссию мейкера установленную продавцами, или создайте новую итерацию этого чертежа и включите его как связь в свой чертёж для распределения дохода.