Сотрудничество
ИСКУССТВО
КРАСОТА И ЗДОРОВЬЕ
РЕМЕСЛО
КУЛЬТУРА И ИСТОРИЯ
РАЗВЛЕЧЕНИЯ
ЭКОЛОГИЯ
ЕДА И НАПИТКИ
ОБРАТНАЯ ИНЖЕНЕРИЯ
НАУКИ
СПОРТ
ТЕХНОЛОГИИ
НОСИМЫЕ УСТРОЙСТВА
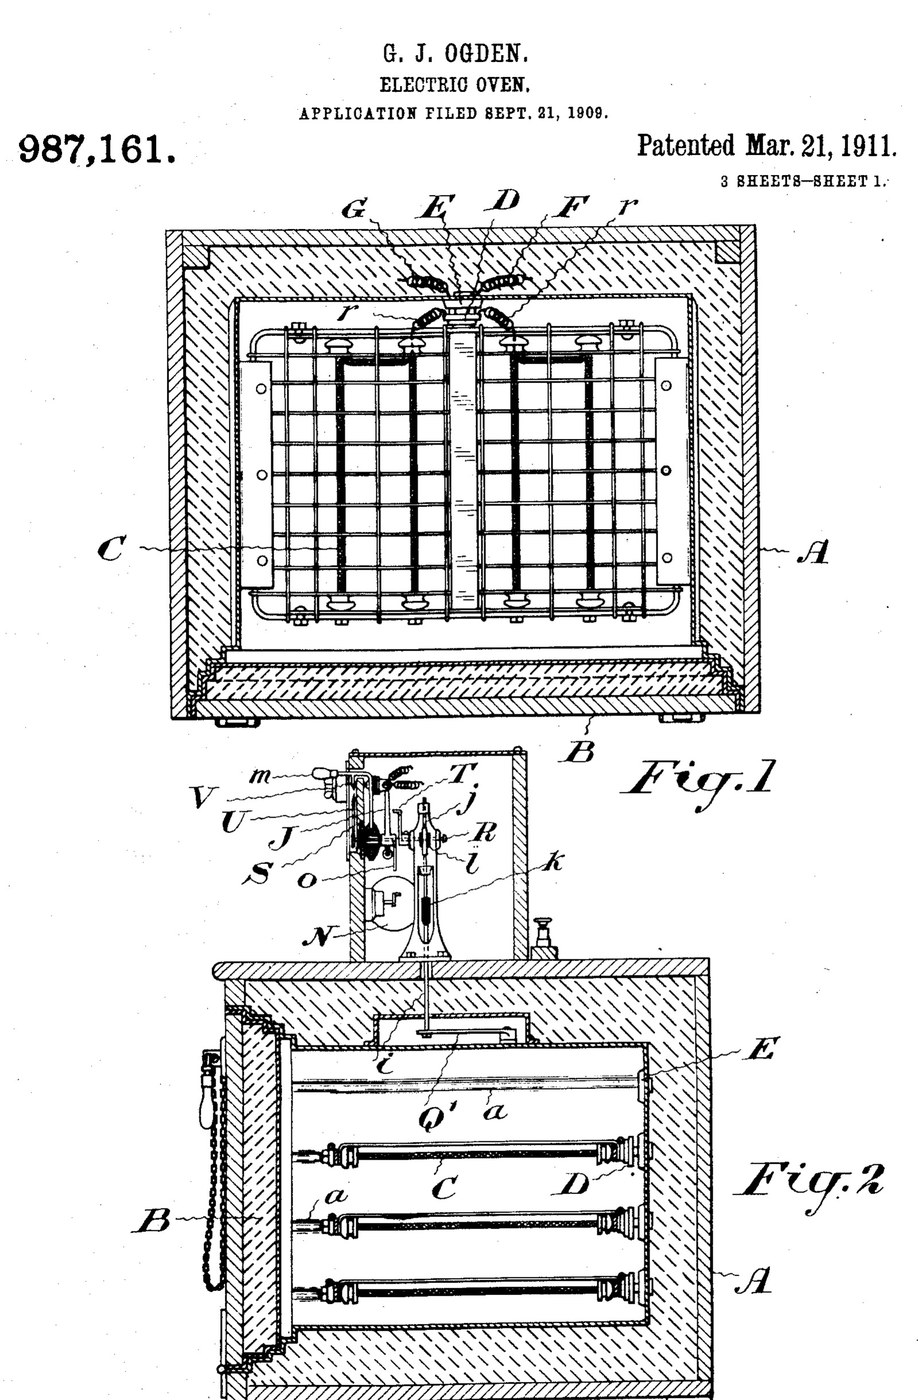


Oven: Insulated Electric Oven with Plug-In Grid Heaters and a Thermostat (Ogden, US 987,161, 1911)
An electric oven built to waste as little heat as possible: a double-walled, packed box with a packed door that seals like a strong-room door. Grid-shaped heating elements slide into grooves in the walls and plug into sockets at the back, and the food rests on them. A thermostat cuts the current when the set temperature is reached and switches it on again as the oven cools.
Result: an oven that bakes, roasts or dries at a set temperature with any number of heating grids.
Source: G. J. Ogden, US 987,161 (1911). Unknown: sizes, metals, packing and temperatures. Picture: the patent drawing.
Продвинутый
Unknown
Инструкции
1
1
Build the insulated casing and door
Build the insulated casing and door
Make the oven chamber as a double-walled casing with packing between the walls, and grooves on the inner side walls to take the heating grids. Fit a door that closes like a fire-proof vault door, also packed, so the casing seals closely. Ours: mild steel sheet. Not given: sizes, the packing.
Материалы для этого шага:
 Лист малоуглеродистой стали1 inner and outer walls, door
 Неизвестный изоляционный материал1 packing
Необходимые инструменты:
 Ножницы по металлу
 Сверлильный станок
 Неизвестные размеры
2
2
Make the plug-in heating grids
Make the plug-in heating grids
Make heating elements in the form of grids that slide into the grooves and on which the food can rest. Fix a porcelain plug to each, carrying spring fingers that push into a socket with matching spring fingers in the back wall. Wire the sockets so all the elements are in parallel; use as many as the temperature and amount of food need. Ours: nichrome wire. Not given: the element type.
Материалы для этого шага:
 Нихромовая проволока1 heating grids
 Неизвестный материал1 porcelain plugs and sockets
 Пружинная стальная проволока1 spring fingers
 Монтажный провод1 circuit wiring
Необходимые инструменты:
 Паяльник
3
3
Fit the thermostat control
Fit the thermostat control
Put a thermostat that bends with heat inside the oven, working a contact finger that plays between two contacts a few degrees above and below the set temperature. A switch-changing device, a small rotary motor, throws the main switch off and on as the finger touches one contact or the other. Mount a setting arm with a pointer over a scale marked in degrees, and a second pointer driven by the thermostat. Add a hand switch to turn the current on or off independently, and a lamp with its own switch to light the oven. Ours: a bimetal strip, toggle switches. Not given: temperatures.
Материалы для этого шага:
 Биметаллическая пластина1 thermostat
 Электродвигатель1 switch-changing motor
 Тумблер3 main, hand and lamp switches
 Неизвестный металл1 contacts, arm, scaleНеизвестный материал1 incandescent oven lamp
Необходимые инструменты:
Паяльник Термометр
Материалы
10- 1 inner and outer walls, doorЗаполнитель
- 1 packingЗаполнитель
- 1 heating gridsЗаполнитель
- 1 incandescent oven lampЗаполнитель
- 1 spring fingersЗаполнитель
- Заполнитель
- 1 thermostatЗаполнитель
- 1 switch-changing motorЗаполнитель
- Заполнитель
- 1 contacts, arm, scaleЗаполнитель
Материалы из связанных чертежей

По этому чертежу делают

CC0 Общественное достояние
Этот чертёж выпущен под лицензией CC0. Вы можете свободно копировать, изменять, распространять и использовать эту работу в любых целях без запроса разрешения.
Поддержите мейкера, покупая товары через его чертёж, где он получает Комиссию мейкера установленную продавцами, или создайте новую итерацию этого чертежа и включите его как связь в свой чертёж для распределения дохода.