Сотрудничество
ИСКУССТВО
КРАСОТА И ЗДОРОВЬЕ
РЕМЕСЛО
КУЛЬТУРА И ИСТОРИЯ
РАЗВЛЕЧЕНИЯ
ЭКОЛОГИЯ
ЕДА И НАПИТКИ
ОБРАТНАЯ ИНЖЕНЕРИЯ
НАУКИ
СПОРТ
ТЕХНОЛОГИИ
НОСИМЫЕ УСТРОЙСТВА
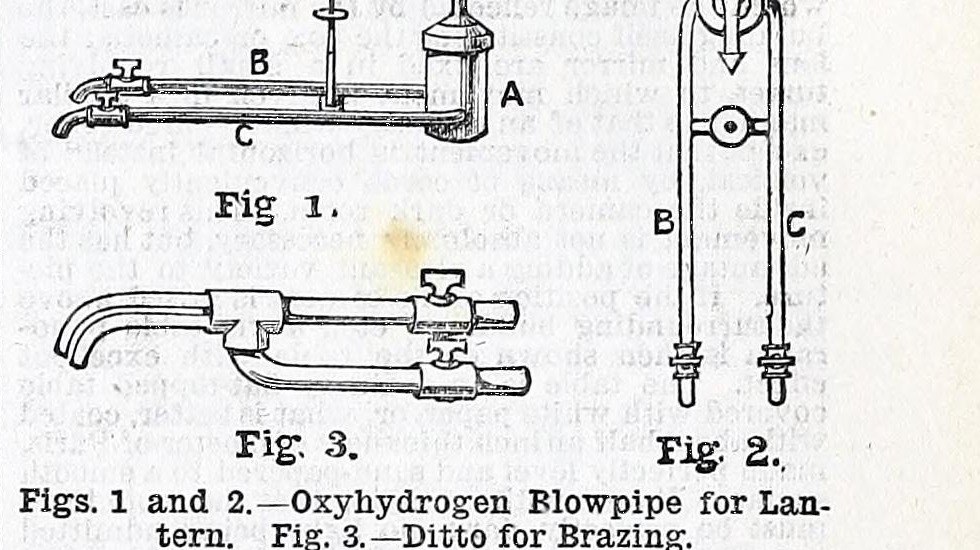


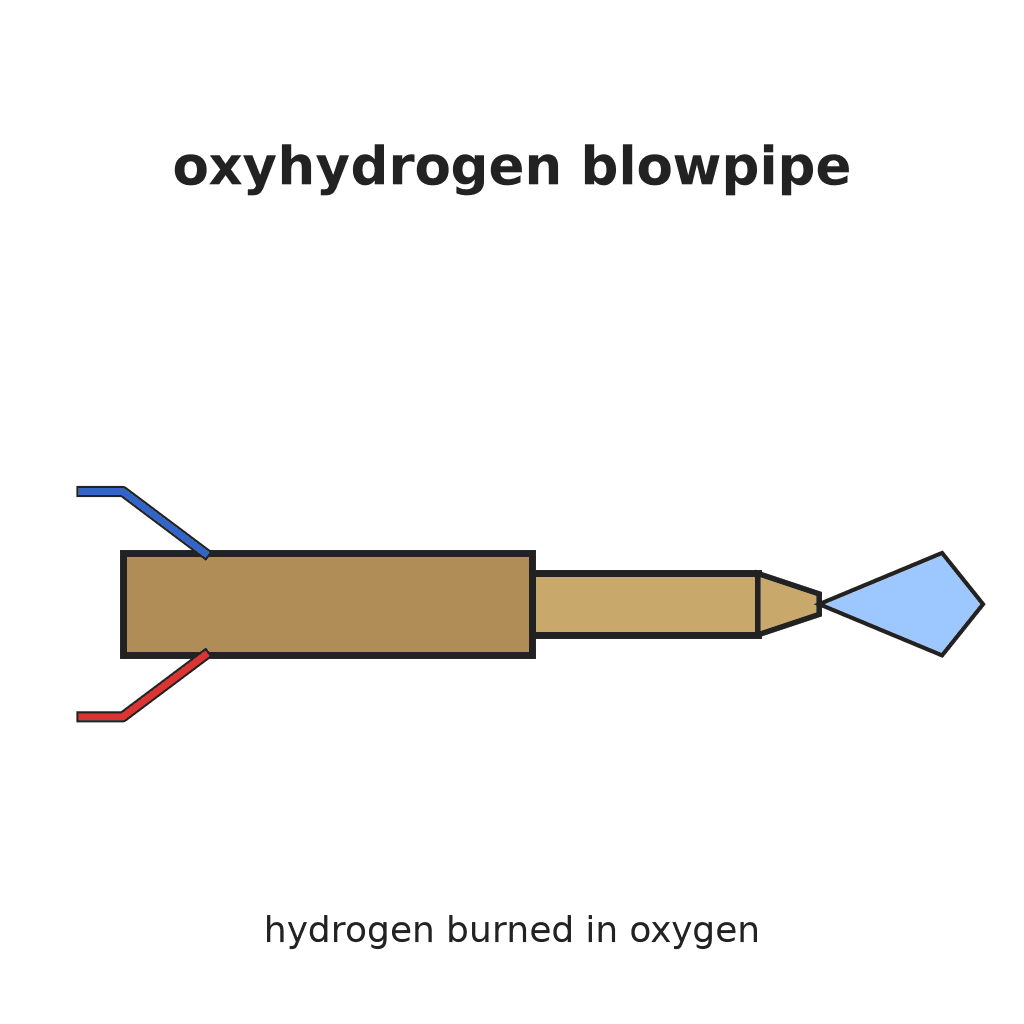
Oxyhydrogen Blowpipe: Brass Tube-in-Tube, the Gases Meeting at the Nozzle (Work, 1892)
A blowpipe that burns hydrogen in a jet of oxygen for a very hot brazing and melting flame. H. B. Stocks (Work, 1892) builds it like his cheap gas blowpipe: a fine brass tube for the oxygen, centred inside an outer brass tube (no more than 1/4 in. bore) that carries the hydrogen, joined by a three-way tube.
The two gases must not mix until they reach the nozzle; each comes from its own reservoir through its own tap.
Source: H. B. Stocks, "How to Prepare Cheap Blowpipes", Work, 2 July 1892, p. 250, with his reply "Oxyhydrogen Blowpipe", Work, 3 December 1892, p. 605 (Fig. 3).
Средний
Unknown
Инструкции
1
1
Read Stocks
Read Stocks
"The oxyhydrogen blowpipe for brazing ... is practically the same as the blowpipe shown at p. 250 ..., but the brass pipe should not be more than 1/4 in. internal diameter; the inner tube for oxygen about 1/12 in. internal diameter, and should reach to the mouth of the outer tube. It can then be filed down, if required."
2
2
Cut the tubes
Cut the tubes
Cut the brass tubes: the outer (hydrogen) tube, not more than 1/4 in. bore, threaded at one end; a curved side tube for the hydrogen supply, threaded at one end; a short straight tube for the oxygen supply, threaded at one end; and the inner oxygen tube, about 1/12 in. bore. For his gas blowpipe Stocks used 4 in., 5 1/2 in. (curved), 3 1/2 in. and 5 1/2 in.; the lengths for the brazing pipe are not given and he says the sizes may be changed. How the tube is curved is not given.
Материалы для этого шага:
 Латунная трубка4 штук
Необходимые инструменты:
 Ножовка по металлу
 Набор метчиков и плашек
 Неизвестный способ формовки
 Неизвестные размеры
3
3
Centre the oxygen tube
Centre the oxygen tube
Cut a small strip of thin sheet brass (Stocks: full 3/4 in. by 1/2 in.), turn it into a ring and solder it on one end of the inner tube. File the ring down until it pushes into the threaded end of the short oxygen tube, and solder it inside.
Материалы для этого шага:
 Латунный лист1 small strip
 Оловянно-свинцовый припой1 штука
Необходимые инструменты:
 Ножницы по металлу
 Напильники (ручной напильник)
 Паяльник
 Флюс
4
4
Assemble
Assemble
Screw the oxygen tube into one end of the three-way tube, screw the outer tube on the other end and see that the inner tube is exactly in its centre. Screw the curved hydrogen tube into the side branch. Fit a tap on each supply (Fig. 3; type not given).
Материалы для этого шага:
 Резьбовой трубный фитинг1 three-way tube
 Неизвестный вентиль2 one per gas
5
5
Set the nozzle
Set the nozzle
The inner oxygen tube should reach to the mouth of the outer tube. Light it with hydrogen in the outer tube and oxygen in the inner, each from its own reservoir; if the flame shows a white patch, the inner tube is off centre or too long: file it down a little until correct. Never let the gases mix before the nozzle.
Необходимые инструменты:
Напильники (ручной напильник) Водород
 Кислород
Материалы
5- 4 штукЗаполнитель
- 1 small stripЗаполнитель
- 1 штукаЗаполнитель
- 1 three-way tubeЗаполнитель
- 2 one per gasЗаполнитель
Требуемые инструменты
10- Заполнитель
- Заполнитель
- Заполнитель
- Заполнитель
- Заполнитель
- Заполнитель
- 2 vendors sell this, none ship to you yetЗаполнитель
- Заполнитель
- Заполнитель
- Заполнитель
По этому чертежу делают
CC0 Общественное достояние
Этот чертёж выпущен под лицензией CC0. Вы можете свободно копировать, изменять, распространять и использовать эту работу в любых целях без запроса разрешения.
Поддержите мейкера, покупая товары через его чертёж, где он получает Комиссию мейкера установленную продавцами, или создайте новую итерацию этого чертежа и включите его как связь в свой чертёж для распределения дохода.