Сотрудничество
ИСКУССТВО
КРАСОТА И ЗДОРОВЬЕ
РЕМЕСЛО
КУЛЬТУРА И ИСТОРИЯ
РАЗВЛЕЧЕНИЯ
ЭКОЛОГИЯ
ЕДА И НАПИТКИ
ОБРАТНАЯ ИНЖЕНЕРИЯ
НАУКИ
СПОРТ
ТЕХНОЛОГИИ
НОСИМЫЕ УСТРОЙСТВА
Twin Loose-Dasher Churn: A Flywheel and Pitman Plunge a Rod, Two Winged Dashers Riding Loose on It Turn Opposite Ways
Buttercup

Создано

Buttercup

11. ноябрь 2026IE
0
0
0
0
0

Twin Loose-Dasher Churn: A Flywheel and Pitman Plunge a Rod, Two Winged Dashers Riding Loose on It Turn Opposite Ways

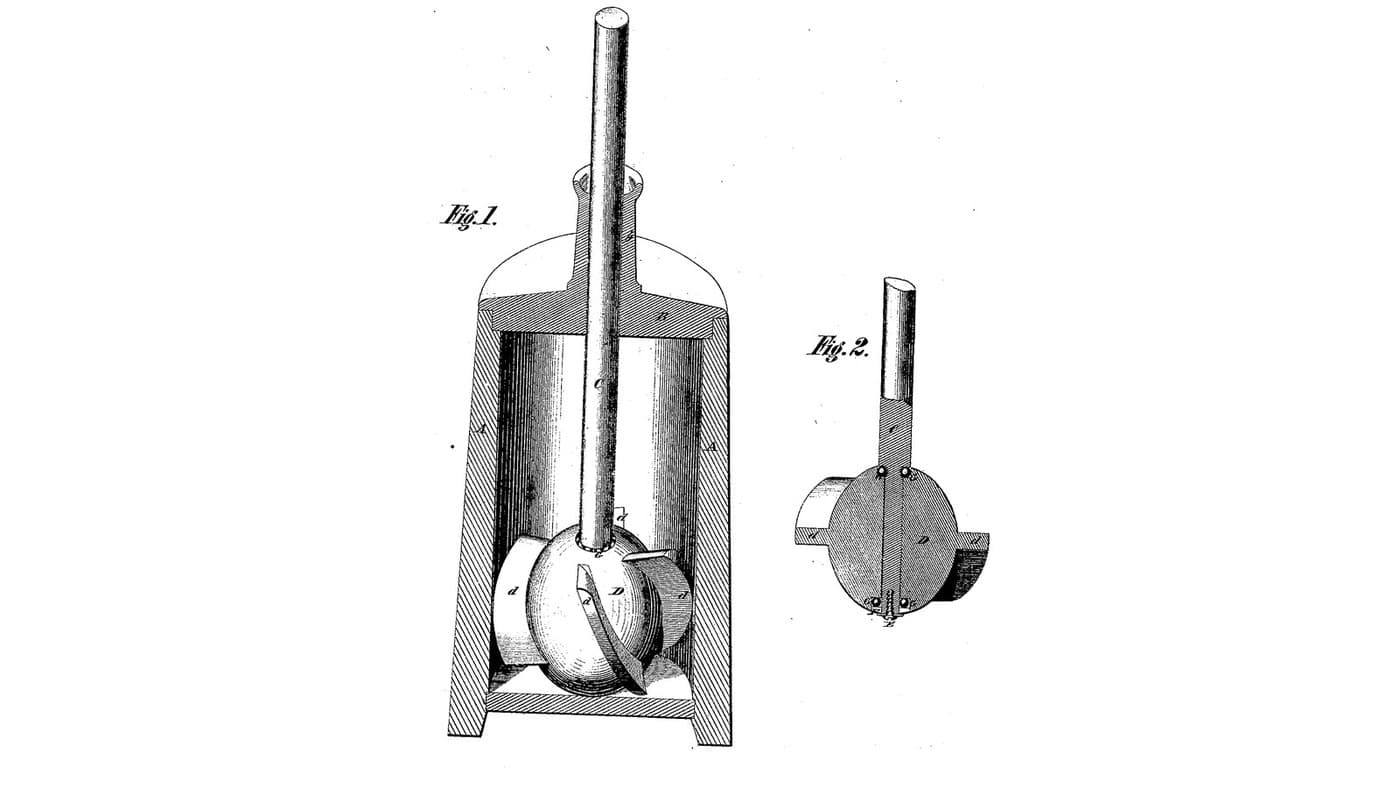
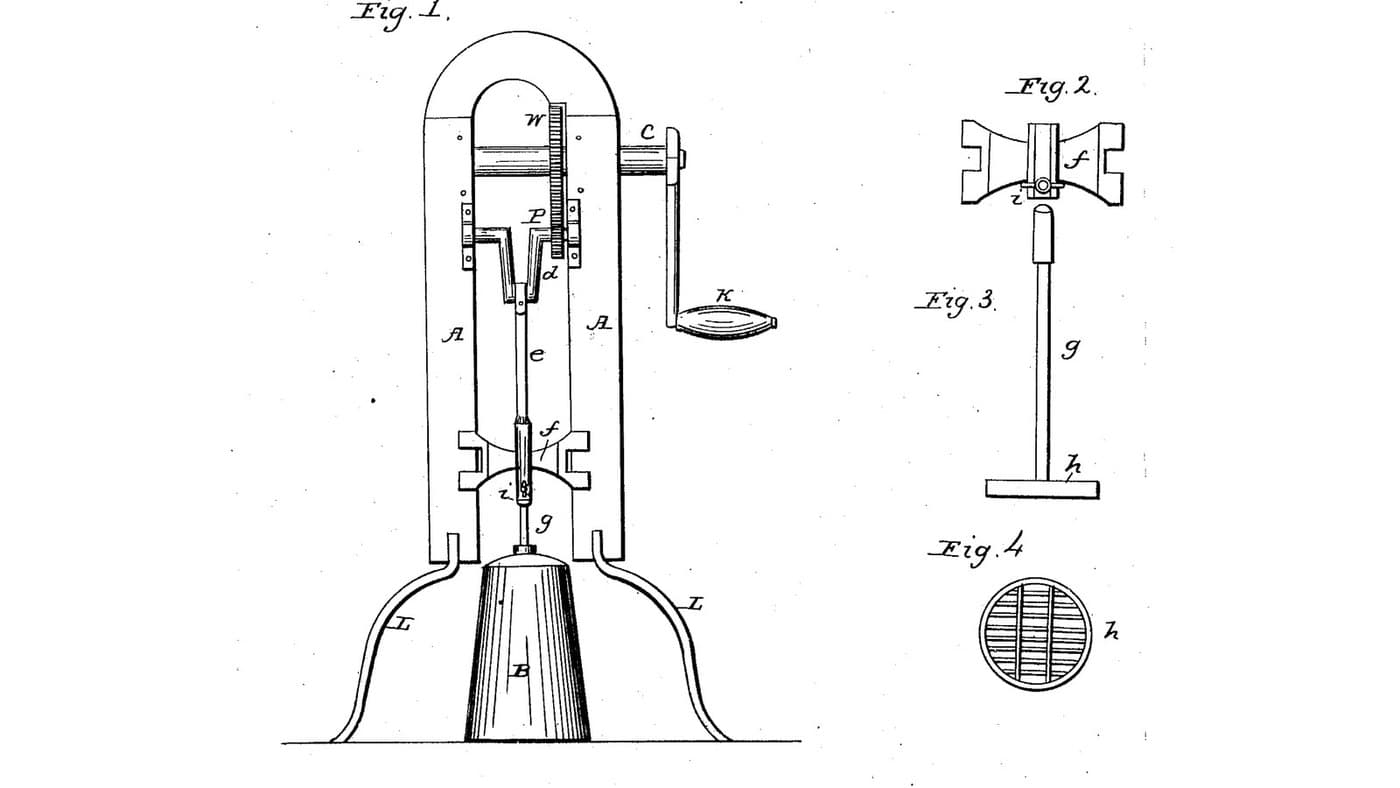
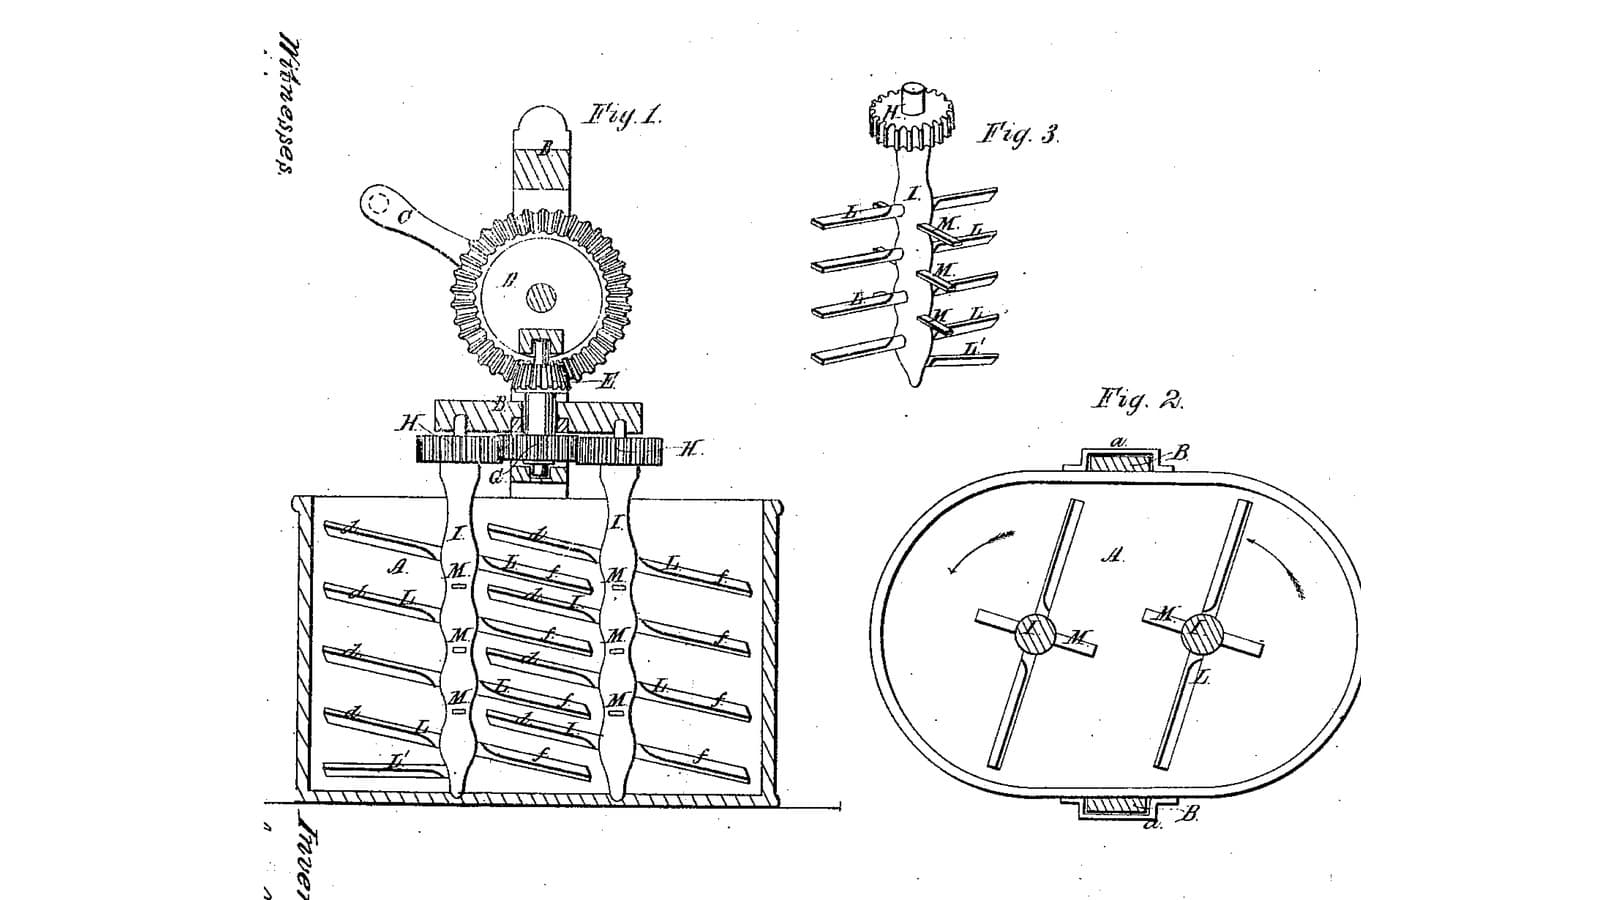
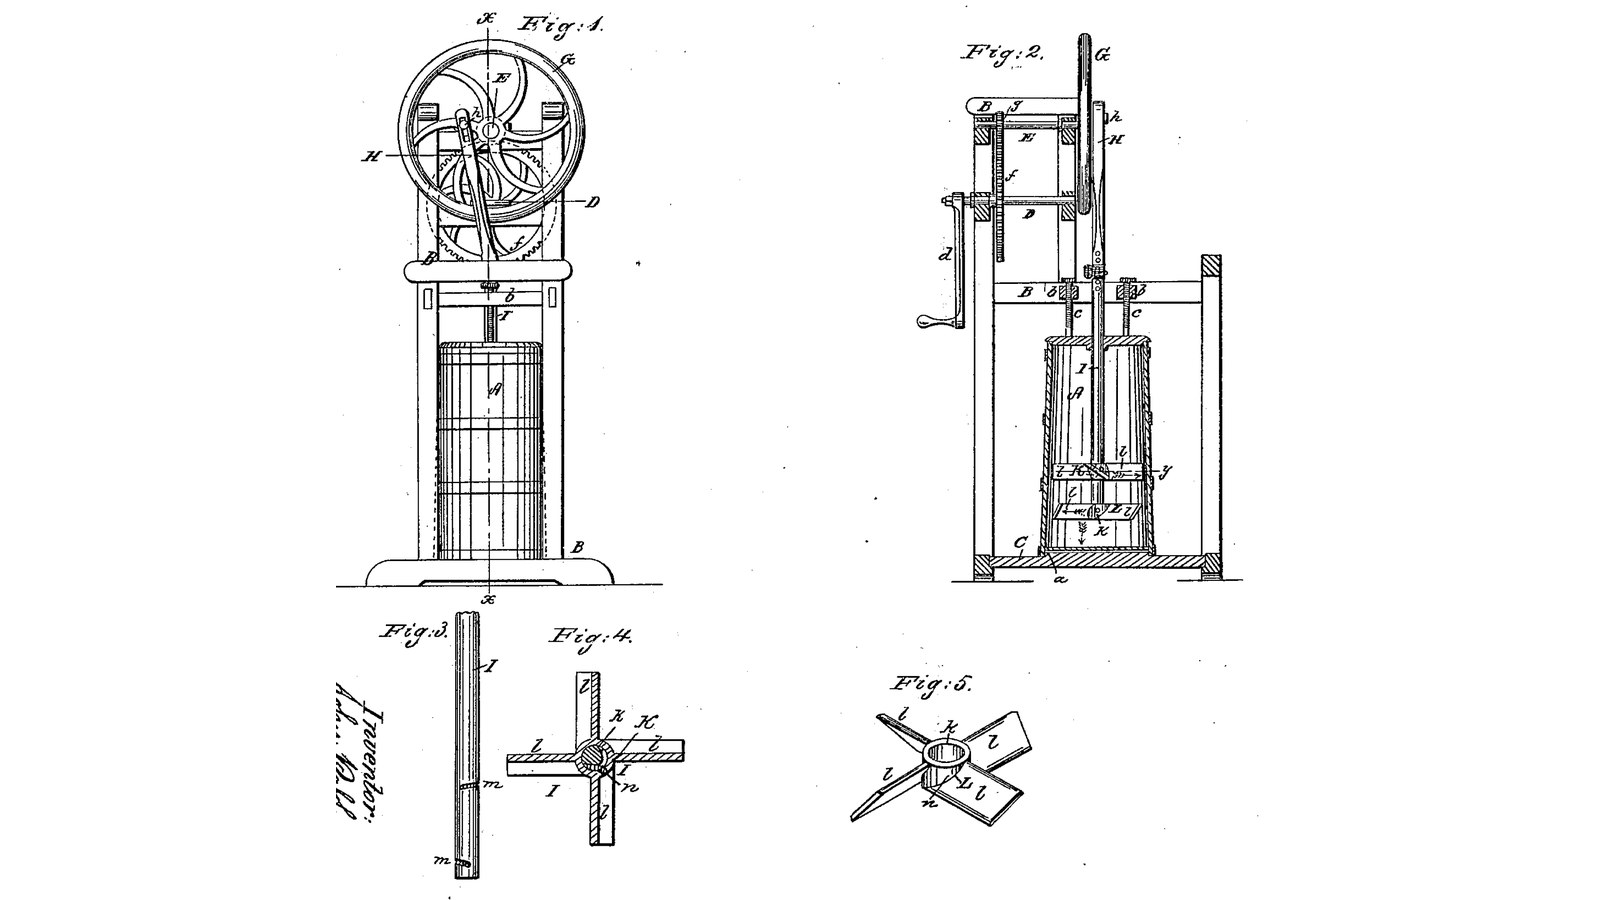
John Paff of Eden, New York, received US 29,189, dated 17 July 1860, for a plunge churn worked by a winch, gears, a flywheel and a pitman. Its rod carries two dashers with sloping wings, the lower sloped one way and the upper the other. They are not fixed: a pin in each hub runs in a short groove round the rod, so the cream pushing on the wings turns the two dashers opposite ways on every stroke, and back on the return. The churn body is held down by two screws. The patent gives no sizes; every size here is ours.
Средний
About 3 days

Инструкции

1

Stroke and the turning dashers

Загрузка блокнота Jupyter…
2

A dasher turned by its own wings, four months before

Stanford's one dasher spins freely all the way round. Paff's two are held to a quarter turn by pin and groove, and turn opposite ways.
3

Read US 29,189

"The dashers being arranged thus loosely on the dasher-rod, and guided and held by means of the grooves m, m, and pins n, n, it will be seen that if they are forced down through the milk or cream, that they will have, in addition to their vertical motion, a horizontal motion imparted to them, by means of the resistance of the fluid on their inclined wings; the lower dasher turning in one direction, while the upper dasher turns in the opposite direction."
4

Frame B, bed C, ring a, cross-pieces b and screws c

Glue up hardwood for a bed C 450 x 420 x 25 mm and two sides 310 mm deep and 900 mm tall, and screw the sides onto the bed 400 mm apart, flush at the back and open at the front. Cut a ring a 20 mm thick, 330 mm outside and 283 inside, and screw it to the bed centred 170 mm from the front, so the bucket's foot just drops into it. Join the sides at the back with a rail 50 mm deep, 400 mm up. Tenon two cross-pieces b, 40 x 50 mm, into the rail, 300 mm apart between centres, reaching forward over the bucket. Let a hex nut into the underside of each over the bucket's rim, and run an M10 threaded rod through it as a screw c, with two nuts locked on top as its head and a washer under its foot. Screw a guide bar 260 x 40 x 25 mm between the cross-pieces over the bucket's centre, with a 29 mm slot open to the front.

Материалы для этого шага:

Доска из твёрдой древесиныДоска из твёрдой древесины4 штук
Столярный клейСтолярный клей1 штука
Шурупы по деревуШурупы по дереву40 штук
Шпилька резьбоваяШпилька резьбовая1 штука
Шестигранная гайкаШестигранная гайка6 штук
Плоская шайбаПлоская шайба2 штук

Необходимые инструменты:

Циркулярный станокЦиркулярный станок
ЭлектролобзикЭлектролобзик
КомпасКомпас
Набор стамесок по деревуНабор стамесок по дереву
Аккумуляторная дрельАккумуляторная дрель
Набор свёрлНабор свёрл
Набор перовых свёрлНабор перовых свёрл
Струбцина с направляющейСтрубцина с направляющей
Набор отвёртокНабор отвёрток
Разводной ключРазводной ключ
РулеткаРулетка
5

Body A and cover

Use a 20-litre food-grade bucket as the body A. Cut a 12 mm HDPE cover to the bucket's top, 304 mm across, with a 32 mm hole in the middle for the rod.

Материалы для этого шага:

Ведро на 20 литровВедро на 20 литров1 штука
Лист ПНДЛист ПНД1 штука

Необходимые инструменты:

ЭлектролобзикЭлектролобзик
Набор перовых свёрлНабор перовых свёрл
Аккумуляторная дрельАккумуляторная дрель
Напильники (ручной напильник)Напильники (ручной напильник)
6

Print the cog-wheel f

The cog-wheel f on the winch shaft D: 60 teeth, module 2.5, 15 mm thick with a hub, 16.2 mm bore. PETG, 0.2 mm layers, 30 % infill, 4 walls.
Файл дизайнаSTLCC0 - Free
7

Print the pinion g

The pinion g on the flywheel shaft E: 20 teeth, module 2.5, 16.2 mm bore. PETG, 0.2 mm layers, 30 % infill, 4 walls.
Файл дизайнаSTLCC0 - Free
8

Shafts D and E, gears, winch d and flywheel G

Cut two hardwood bearing boards 400 x 340 x 25 mm and screw them between the sides, 80 and 200 mm behind the bucket's centre, their tops flush with the sides, so they stand 560 to 900 mm up. Bore both 16.6 mm at 725 mm up for the shaft E and at 625 mm for the shaft D, over the bucket's centre. Cut stainless rod 16 mm for E, 218 mm long, and D, 255 mm long. Pin the pinion g on E and the wheel f on D behind the back board with split pins, meshing, and hold both shafts with shaft collars. Pin a winch d of mild steel flat bar, 120 mm throw, with a hardwood handle, on D's back end. Cut a flywheel G 300 mm across from two 15 mm hardwood boards glued crossgrain, bore it 16 mm at the centre and 10.4 mm at 45, 60 and 75 mm out, and fix it on E's front end between two shaft collars.

Материалы для этого шага:

Доска из твёрдой древесиныДоска из твёрдой древесины2 штук
Пруток из нержавеющей сталиПруток из нержавеющей стали1 штука
Shaft CollarShaft Collar6 штук
ШплинтШплинт4 штук
Полоса из малоуглеродистой сталиПолоса из малоуглеродистой стали1 штука

Шканты из твёрдой древесиныШканты из твёрдой древесины1 штука
Столярный клейСтолярный клей1 штука
Шурупы по деревуШурупы по дереву16 штук
Филамент PETGФиламент PETG1 штука

Необходимые инструменты:

3D-принтер FDM3D-принтер FDM
Циркулярный станокЦиркулярный станок
ЭлектролобзикЭлектролобзик
КомпасКомпас
Аккумуляторная дрельАккумуляторная дрель
Набор свёрлНабор свёрл
Ножовка по металлуНожовка по металлу
Напильники (ручной напильник)Напильники (ручной напильник)
Слесарные тискиСлесарные тиски
Струбцина с направляющейСтрубцина с направляющей
Набор отвёртокНабор отвёрток
Разводной ключРазводной ключ
9

Print the lower dasher K

Dasher K: a hub 50 mm across and 50 long on a 28.8 mm bore, four wings 210 mm across, 45 wide and 5 thick, all pitched 35 degrees one way, and a 4.2 mm radial hole for its pin n. PETG, 0.2 mm layers, 30 % infill, 4 walls.
Файл дизайнаSTLCC0 - Free
10

Print the upper dasher L

Dasher L: the same as K with its wings pitched 35 degrees the other way. PETG, 0.2 mm layers, 30 % infill, 4 walls.
Файл дизайнаSTLCC0 - Free
11

Dasher rod I, grooves m, pins n and pitman H

Cut a 28 mm hardwood dowel 440 mm long for the rod I and bore it 10.4 mm across, 15 mm from the top, for the pin i. Mark a groove m 30 mm from the foot and another 120 mm from the foot. Cut each with a gouge 6 mm wide and 4 deep, a quarter of the way round the rod, rising 6 mm as it goes; the two run opposite ways from their starts. Slide the dasher K up the rod to the lower groove and L to the upper, and drive an M5 stainless screw, its point filed round, into each hub's hole until the point rides in the groove without binding: the pins n. Cut a hardwood pitman H 30 x 15 mm, 230 mm long, bored 10.4 mm at both ends 200 mm apart. Bolt its top to the flywheel's 60 mm hole as the pivot h, stand the rod in the bucket through the cover and the guide slot, and bolt the pitman's foot to it as the pin i, with lock nuts and washers.

Материалы для этого шага:

Шканты из твёрдой древесиныШканты из твёрдой древесины1 штука
Машинные винтыМашинные винты2 штук
Набор шестигранных болтовНабор шестигранных болтов2 штук
Самоконтрящаяся гайка с нейлоновым кольцомСамоконтрящаяся гайка с нейлоновым кольцом2 штук
Плоская шайбаПлоская шайба4 штук
Доска из твёрдой древесиныДоска из твёрдой древесины1 штука

Необходимые инструменты:
Набор резчицких стамесокНабор резчицких стамесок
Набор стамесок по деревуНабор стамесок по дереву
Циркулярный станокЦиркулярный станок
Аккумуляторная дрельАккумуляторная дрель
Набор свёрлНабор свёрл
Напильники (ручной напильник)Напильники (ручной напильник)
Набор отвёртокНабор отвёрток
Разводной ключРазводной ключ
РулеткаРулетка
12

The build in 3D

FreeCAD model of this build, the bucket cut open: the frame with its bed, ring, cross-pieces, screws and guide, the winch, gears and flywheel, the pitman, and the rod with the two dashers whose wings slope opposite ways.
Файл дизайнаBLENDCC0 - Free
13

Churn

Pour about 12 litres of heavy cream at about 15 °C, checked with the thermometer, into the bucket, set it in the ring with the dashers in, put on the cover and turn the screws c down onto it. Bolt the pitman to the rod, and turn the winch steadily, timing it; move the pivot h to the 45 or 75 mm hole for a shorter or longer stroke. When the butter comes, unbolt the pin i, slip the rod forward out of the guide slot, turn back the screws, draw the bucket out and lift out the dashers. Take out the butter, pour the buttermilk into a bowl, wash the butter in cold water until it runs clear, salt and weigh it.

Материалы для этого шага:

Жирные сливкиЖирные сливки12 l
Крупная морская сольКрупная морская соль1 штука
ВодаВода1 штука

Необходимые инструменты:

Термометр с оставляемым щупомТермометр с оставляемым щупом
СекундомерСекундомер
Цифровые кухонные весыЦифровые кухонные весы
Большая миска из нержавеющей сталиБольшая миска из нержавеющей стали
Разводной ключРазводной ключ
14

Troubleshooting

Loose-dasher churn troubleshooting.

Flow

Loading...
15

History and honest limits

**John Paff** of Eden, Erie County, New York, US 29,189, 17 July 1860, "Churn". He claimed "the dashers K, and L, provided with inclined wings l, l, as described, secured one above the other, loosely on the dasher-rod I, the connection with said dasher-rod being effected by means of the grooves m, m, and pins n, n". He knew inclined wings fixed to the rod and two fixed dashers had been used before. His body was the usual staved churn, its chimes fitting over a raised circle on the bed; ours is a bucket in a ring round its foot. The patent gives no sizes and does not say how far the grooves run; every size here is ours.

Материалы

20

Требуемые инструменты

20

Файлы дизайна

5

CC0 Общественное достояние

Этот чертёж выпущен под лицензией CC0. Вы можете свободно копировать, изменять, распространять и использовать эту работу в любых целях без запроса разрешения.

Поддержите мейкера, покупая товары через его чертёж, где он получает Комиссию мейкера установленную продавцами, или создайте новую итерацию этого чертежа и включите его как связь в свой чертёж для распределения дохода.

Обсуждение

(0)

Войти чтобы присоединиться к обсуждению

Загрузка комментариев...