ИСКУССТВО
КРАСОТА И ЗДОРОВЬЕ
РЕМЕСЛО
КУЛЬТУРА И ИСТОРИЯ
РАЗВЛЕЧЕНИЯ
ЭКОЛОГИЯ
ЕДА И НАПИТКИ
ОБРАТНАЯ ИНЖЕНЕРИЯ
НАУКИ
СПОРТ
ТЕХНОЛОГИИ
НОСИМЫЕ УСТРОЙСТВА
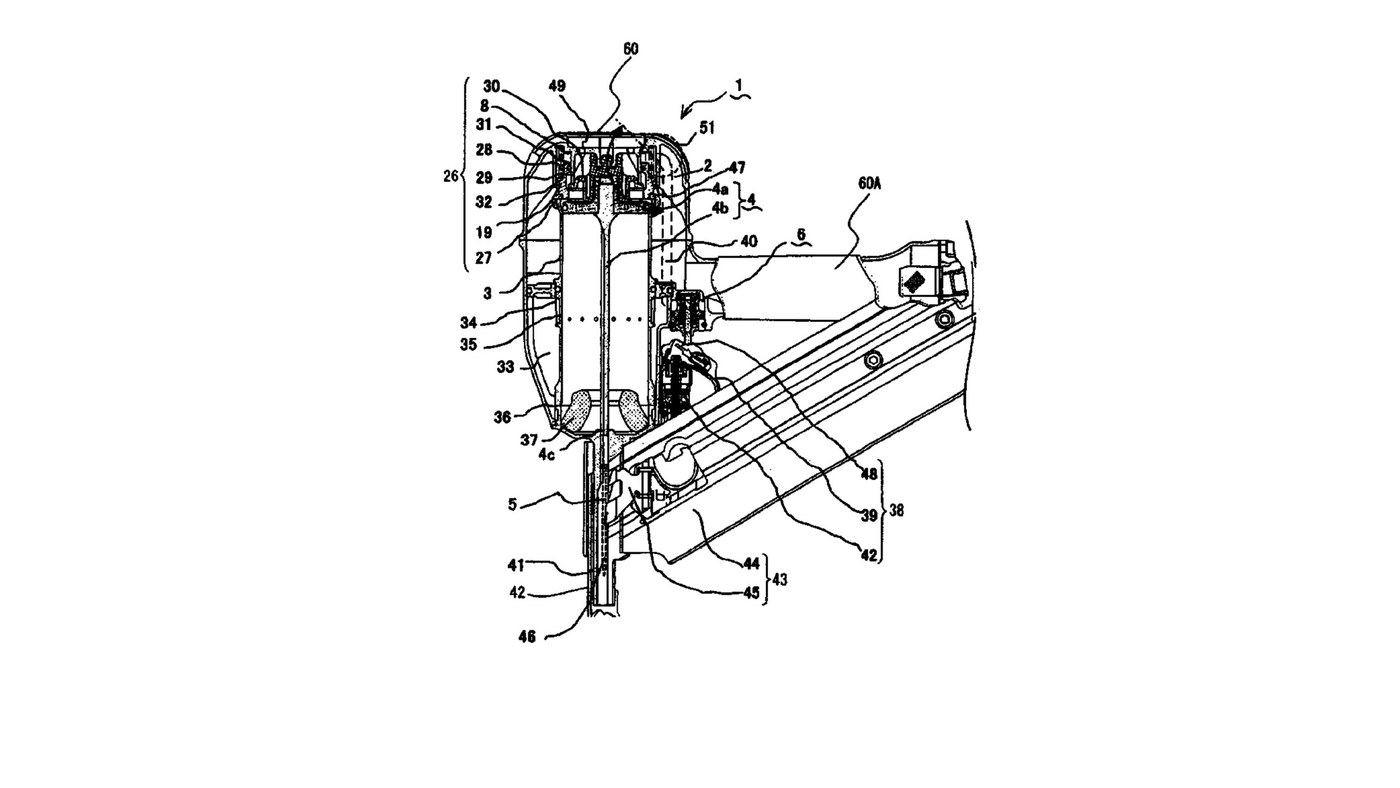


Pneumatic Nail Gun: Main Valve, Return Chamber and Fast Trigger Valve
Hitachi Koki's air nailer (US 7,156,012, 2007). Compressed air stored in the handle holds a main valve shut over the cylinder. Pulling the trigger with the nose pressed to the work vents a small trigger-valve chamber, which vents the main-valve chamber; the main valve jumps up, closes the exhaust and lets stored air throw the piston and driver blade down onto a nail. Air caught below the piston in a return chamber pushes it back up. Hitachi sized the valve chambers against their vents to make the gun fire and reset faster.
The patent gives no materials, bore, stroke, air pressure or nail size. The picture: the patent's Fig. 1.
Продвинутый
2 days
Инструкции
1
1
Use the one-piece frame, handle and nose
Use the one-piece frame, handle and nose
Use a frame (60), handle (60A) and nose (41) made as one outer frame; the space inside the handle and frame is the air accumulator (2). Screw a hose nipple into the handle's end for the air hose.
Материалы для этого шага:
 Корпус двигателя инструмента1 штука
 Резьбовой штуцер для шланга1 штука
Необходимые инструменты:
 Разводной ключ
2
2
Fit the cylinder with its return chamber
Fit the cylinder with its return chamber
Fit the cylinder (3) in the frame with a return chamber (33) round its lower part. Halfway up, a one-way valve (34) lets air pass only from the cylinder into the return chamber; a channel (36) near the bottom joins them always. Seat a piston bumper (37) at the bottom.
Материалы для этого шага:
 Гильза цилиндра1 штука
 Обратный клапан1 штука
 Амортизатор поршня1 штука
Необходимые инструменты:
Разводной ключ3
3
Insert the piston and driver blade
Insert the piston and driver blade
By hand, slide the piston (4a) with its integral driver blade (4b) into the cylinder; the blade's free end (4c) runs down the nose to strike the nail.
Материалы для этого шага:
 Поршень с бойком1 штука
4
4
Fit the main valve section
Fit the main valve section
Over the top of the cylinder fit the main valve rubber (27), the main valve (19) with O-rings (31, 32) sliding in the main valve chamber (8), the main valve spring (28) pushing it down, and the exhaust rubber (30) under the exhaust passage (29) to the top exhaust hole (49).
Материалы для этого шага:
 Главный клапан1 штука
 Кольцо седла клапана2 штук
 Coil Spring1 штука
 Уплотнительное кольцо круглого сечения2 штук
Необходимые инструменты:
Разводной ключ5
5
Fit the trigger valve
Fit the trigger valve
At the base of the handle fix an outer and an inner valve bush (10, 11). Inside them fit the valve piston (9) and the plunger (7), with a spring (12) between them pushing the piston up and the plunger down, and O-rings 15, 17, 18, 21, 23, 24, 25. Join it to the main valve chamber by the control channel (40), a tube with a gentle bend.
Материалы для этого шага:
 Втулка клапана2 штук
 Поршенёк клапана1 штука
 Шток клапана1 штукаCoil Spring1 штукаУплотнительное кольцо круглого сечения7 штук
Необходимые инструменты:
Разводной ключ6
6
Fit trigger, arm plate and push lever
Fit trigger, arm plate and push lever
Fit the trigger (39) with its pivoting arm plate (48) under the plunger, and the push lever (42) sprung out from the nose bottom. Only with both pulled and pressed does the arm plate push the plunger up.
Материалы для этого шага:
 Курок инструмента1 штука
 Контактный предохранитель1 штукаCoil Spring1 штука
Необходимые инструменты:
Разводной ключ7
7
Fit the magazine and feeder
Fit the magazine and feeder
Fit the magazine (44), holding nails side by side, with the feed mechanism (45) that moves each next nail into the injection opening (46) in the nose.
Материалы для этого шага:
 Магазин для гвоздей1 штука
 Подаватель гвоздей1 штука
Необходимые инструменты:
Разводной ключ8
8
Why the valve chambers are small
Why the valve chambers are small
Загрузка блокнота Jupyter…
9
9
Connect and fire
Connect and fire
Ours: connect an air hose from a compressor. At rest the stored air holds the main valve down and the piston up. Press the nose to the work and pull the trigger: the main valve lifts, the piston drives the nail, and the return-chamber air brings it back up.
Необходимые инструменты:
 Воздушный компрессор
 Пневмошланг
Материалы
17- 1 штукаЗаполнитель
- 1 штукаЗаполнитель
- 1 штукаЗаполнитель
- 1 штукаЗаполнитель
- 1 штукаЗаполнитель
- 1 штукаЗаполнитель
- 1 штукаЗаполнитель
- 2 штукЗаполнитель
- 3 штукЗаполнитель
- Заполнитель
- 2 штукЗаполнитель
- 1 штукаЗаполнитель
- 1 штукаЗаполнитель
- 1 штукаЗаполнитель
- 1 штукаЗаполнитель
- 1 штукаЗаполнитель
- 1 штукаЗаполнитель
По этому чертежу делают
CC0 Общественное достояние
Этот чертёж выпущен под лицензией CC0. Вы можете свободно копировать, изменять, распространять и использовать эту работу в любых целях без запроса разрешения.
Поддержите мейкера, покупая товары через его чертёж, где он получает Комиссию мейкера установленную продавцами, или создайте новую итерацию этого чертежа и включите его как связь в свой чертёж для распределения дохода.