Сотрудничество
ИСКУССТВО
КРАСОТА И ЗДОРОВЬЕ
РЕМЕСЛО
КУЛЬТУРА И ИСТОРИЯ
РАЗВЛЕЧЕНИЯ
ЭКОЛОГИЯ
ЕДА И НАПИТКИ
ОБРАТНАЯ ИНЖЕНЕРИЯ
НАУКИ
СПОРТ
ТЕХНОЛОГИИ
НОСИМЫЕ УСТРОЙСТВА
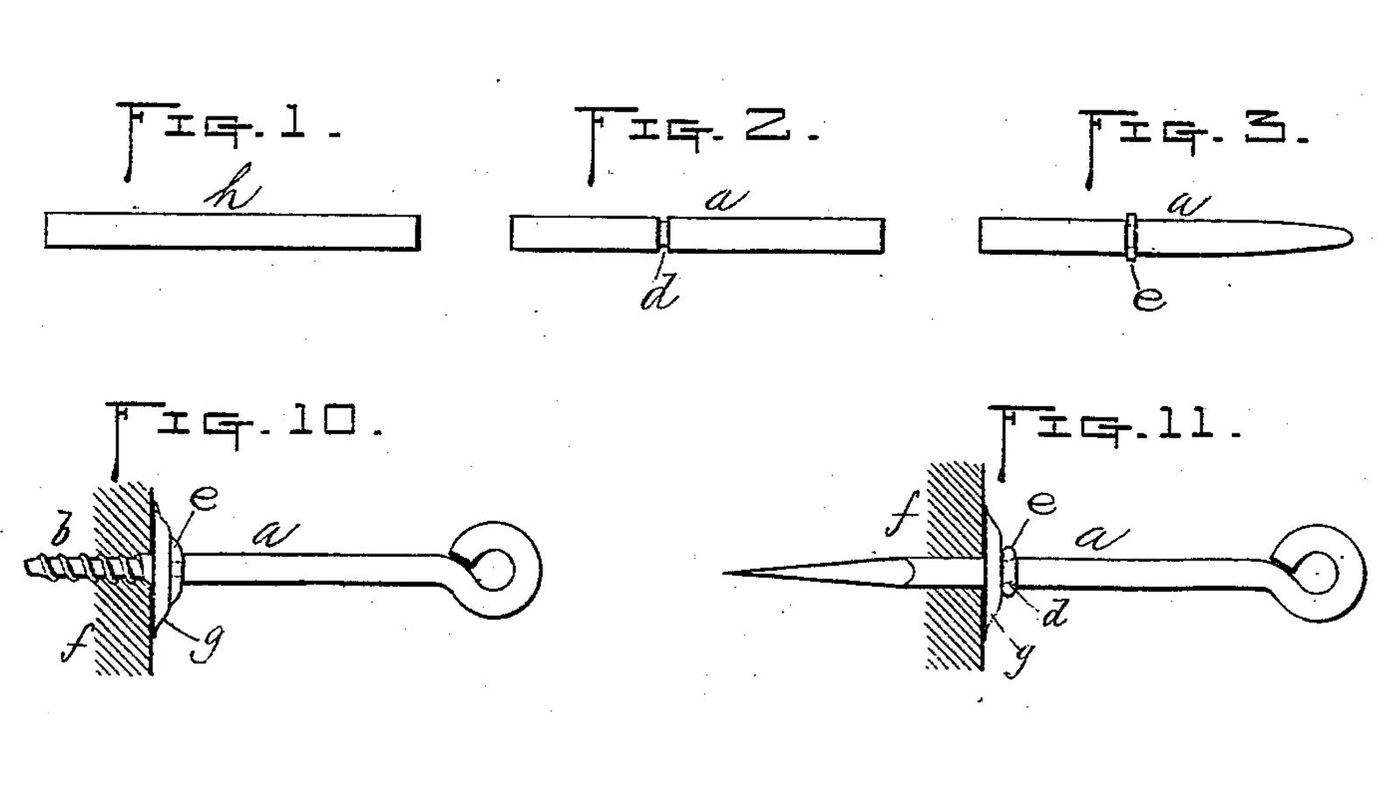


Screw Eye: Parmelee's One-Piece Wire Eye with a Stop-Ring
A screw eye bent from one piece of wire, by Arthur W. Parmelee of Worcester, Massachusetts (US 350,209, 1886). One end is threaded to turn into wood, the other bent into a closed eye. His addition is a ring closed into a groove around the shank: it stops the screw at the right depth, looks neat, and is left a little loose so the eye can turn without marking the wood under it.
The patent gives no metal or sizes. Iron wire, the 3 mm size, the pliers and the die are ours. The picture: Figs. 1-3 and 10-11 of the patent.
Начинающий
30 minutes
Инструкции
1
1
Cut a piece of wire
Cut a piece of wire
Cut a straight piece of iron wire about 3 mm thick (ours), long enough for the screw, the shank and the eye (Fig. 1).
Материалы для этого шага:
 Железная проволока1 штука
Необходимые инструменты:
 Линейка
 Бокорезы
2
2
Cut the groove
Cut the groove
File a narrow groove right round the wire, a screw length from one end (Fig. 2). Parmelee cuts it or presses it in.
Необходимые инструменты:
 Набор надфилей
 Слесарные тиски
3
3
Point the screw end
Point the screw end
File that end to a tapering point (Fig. 3).
Необходимые инструменты:
 Напильник по металлуСлесарные тиски
4
4
Thread the screw end
Thread the screw end
Cut a screw thread on the pointed end "in the usual way". Ours: a die in a die stock, run on as far as the point allows.
Необходимые инструменты:
 ПлашкодержательСлесарные тиски
5
5
Bend the eye
Bend the eye
Bend the other end into a closed round eye, the end turned in against the shank (Fig. 10).
Необходимые инструменты:
 Круглогубцы
 Плоскогубцы
6
6
Make the split ring
Make the split ring
Bend a short piece of the same wire round into an open ring that just slips over the shank (Figs. 9 and 11).
Материалы для этого шага:
Железная проволока1 штукаНеобходимые инструменты:
БокорезыКруглогубцы7
7
Close the ring into the groove
Close the ring into the groove
Slide the ring onto the groove and squeeze it until its two ends meet in a continuous band. Leave it a little loose, so the eye turns while the ring stays still against the wood.
Необходимые инструменты:
Плоскогубцы8
8
Turn it into the wood
Turn it into the wood
Turn the screw into the wood by the eye until the ring meets the surface: the ring is the depth stop. Parmelee also allows washers under the ring; we leave them out.
Материалы
1- 2 штукЗаполнитель
По этому чертежу делают
Связанные чертежи
Эти чертежи делятся знаниями — техники, материалы или принципы
CC0 Общественное достояние
Этот чертёж выпущен под лицензией CC0. Вы можете свободно копировать, изменять, распространять и использовать эту работу в любых целях без запроса разрешения.
Поддержите мейкера, покупая товары через его чертёж, где он получает Комиссию мейкера установленную продавцами, или создайте новую итерацию этого чертежа и включите его как связь в свой чертёж для распределения дохода.