Сотрудничество
ИСКУССТВО
КРАСОТА И ЗДОРОВЬЕ
РЕМЕСЛО
КУЛЬТУРА И ИСТОРИЯ
РАЗВЛЕЧЕНИЯ
ЭКОЛОГИЯ
ЕДА И НАПИТКИ
ОБРАТНАЯ ИНЖЕНЕРИЯ
НАУКИ
СПОРТ
ТЕХНОЛОГИИ
НОСИМЫЕ УСТРОЙСТВА
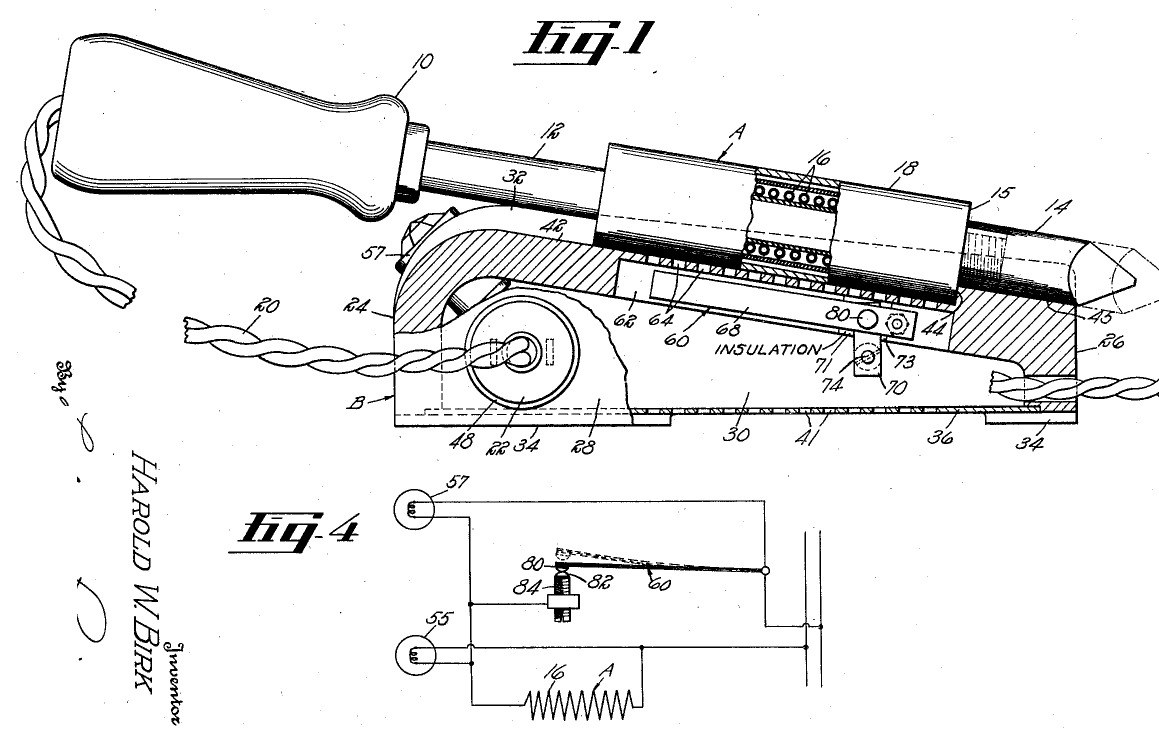


Soldering Station: a Stand Whose Bimetal Switch Reads the Iron's Heat (Birk, Hart Mfg., US 2,248,486, 1941)
A soldering station: an ordinary electric iron plugs into its stand, and the stand controls it. When the iron is laid in the stand's trough, its heater housing sits over a flue with a U-shaped bimetal switch inside; the heat it gives off opens the switch at the temperature you set with a screw, and closes it again as it cools. A red lamp shows the iron heating, a green lamp shows it hot and idling.
Result: a stand that keeps an electric iron at a set temperature between jobs and shows its state.
Source: H. W. Birk (Hart Manufacturing), US 2,248,486 (1941). Unknown: sizes, the bimetal, the lamps. Picture: the patent drawing.
Средний
Unknown
Инструкции
1
1
Make the stand
Make the stand
Cast or form a box-shaped stand in one piece from a fire-resistant material such as porcelain: a high front wall, a low back wall, two side walls and a top sloping down about 10° toward the back, with feet at the corners so air can pass beneath. Close the bottom with a removable plate screwed to a flange and pierced with air holes. In the top, hollow a trough shaped to the iron's heater housing, ending at a shoulder, then a narrower groove for the tip. Cut a flue through the top along the trough, under a cover with holes. Ours: porcelain. Not given: sizes.
Материалы для этого шага:
 Неизвестный материал1 porcelain stand
 Неизвестный металл1 bottom plate, screws
Необходимые инструменты:
 Неизвестные размеры
2
2
Fit the bimetal switch
Fit the bimetal switch
Bend a strip of bimetal into a U whose legs spread apart when cool and close together when hot. Rivet one leg to a metal strip fixed beside the flue (on an insulating bracket if the stand conducts); put a contact on the free leg's end. Face it with a fixed contact on a screw stud threaded through a metal plate and out through the side wall in an insulating sleeve, slotted for a screwdriver: turning it sets the temperature, low for wax melting or high for electric branding irons. Not given: the bimetal, the contact metal.
Материалы для этого шага:
 Биметаллическая пластина1 штукаНеизвестный металл1 strips, plate, contacts, stud
 Неизвестный изоляционный материал1 bracket, sleeve, plate
Необходимые инструменты:
 Клепальный набор
 Набор метчиков и плашек
3
3
Wire the outlet and lamps
Wire the outlet and lamps
Set an outlet in a side wall for the iron's plug, held by a flange and a split ring, and wire it in series with the switch to the supply cord. At the top of the front wall, set two lamp sockets at about 45°, one with a red lens and one with a green: wire the red in parallel with the iron's heater, the green in parallel with the switch. Not given: the lamp ratings, the outlet type.
Материалы для этого шага:
 Неизвестный разъём1 outlet
 Ламповый патрон2 штук
 Лампа накаливания2 штукНеизвестный материал2 red and green lenses
 Гибкий шнур с вилкой1 штука
Необходимые инструменты:
 Набор отвёрток
4
4
Use it
Use it
Set the temperature by turning the slotted stud with a screwdriver. Plug an electric soldering iron into the stand's outlet and lay it in the trough so its heater housing closes the flue. While the bimetal is cool the switch is closed and the red lamp lights: the iron heats. At the set temperature the switch opens; the green lamp glows, the red goes dark and the iron idles. Lift the iron off and air rushes up the flue, cooling the bimetal so the iron heats again. Because it senses the heater, not the tip, the heater cannot burn out even if the tip is loose.
Материалы для этого шага:
 Паяльник1 electric soldering iron
Необходимые инструменты:
Набор отвёртокМатериалы
9- 2 red and green lensesЗаполнитель
- 1 strips, plate, contacts, studЗаполнитель
- 1 штукаЗаполнитель
- 1 bracket, sleeve, plateЗаполнитель
- 1 outletЗаполнитель
- 2 штукЗаполнитель
- 2 штукЗаполнитель
- 1 штукаЗаполнитель
- Заполнитель
Требуемые инструменты
4- Заполнитель
- Заполнитель
- Заполнитель
- Заполнитель
Материалы из связанных чертежей



По этому чертежу делают

CC0 Общественное достояние
Этот чертёж выпущен под лицензией CC0. Вы можете свободно копировать, изменять, распространять и использовать эту работу в любых целях без запроса разрешения.
Поддержите мейкера, покупая товары через его чертёж, где он получает Комиссию мейкера установленную продавцами, или создайте новую итерацию этого чертежа и включите его как связь в свой чертёж для распределения дохода.