Сотрудничество
ИСКУССТВО
КРАСОТА И ЗДОРОВЬЕ
РЕМЕСЛО
КУЛЬТУРА И ИСТОРИЯ
РАЗВЛЕЧЕНИЯ
ЭКОЛОГИЯ
ЕДА И НАПИТКИ
ОБРАТНАЯ ИНЖЕНЕРИЯ
НАУКИ
СПОРТ
ТЕХНОЛОГИИ
НОСИМЫЕ УСТРОЙСТВА
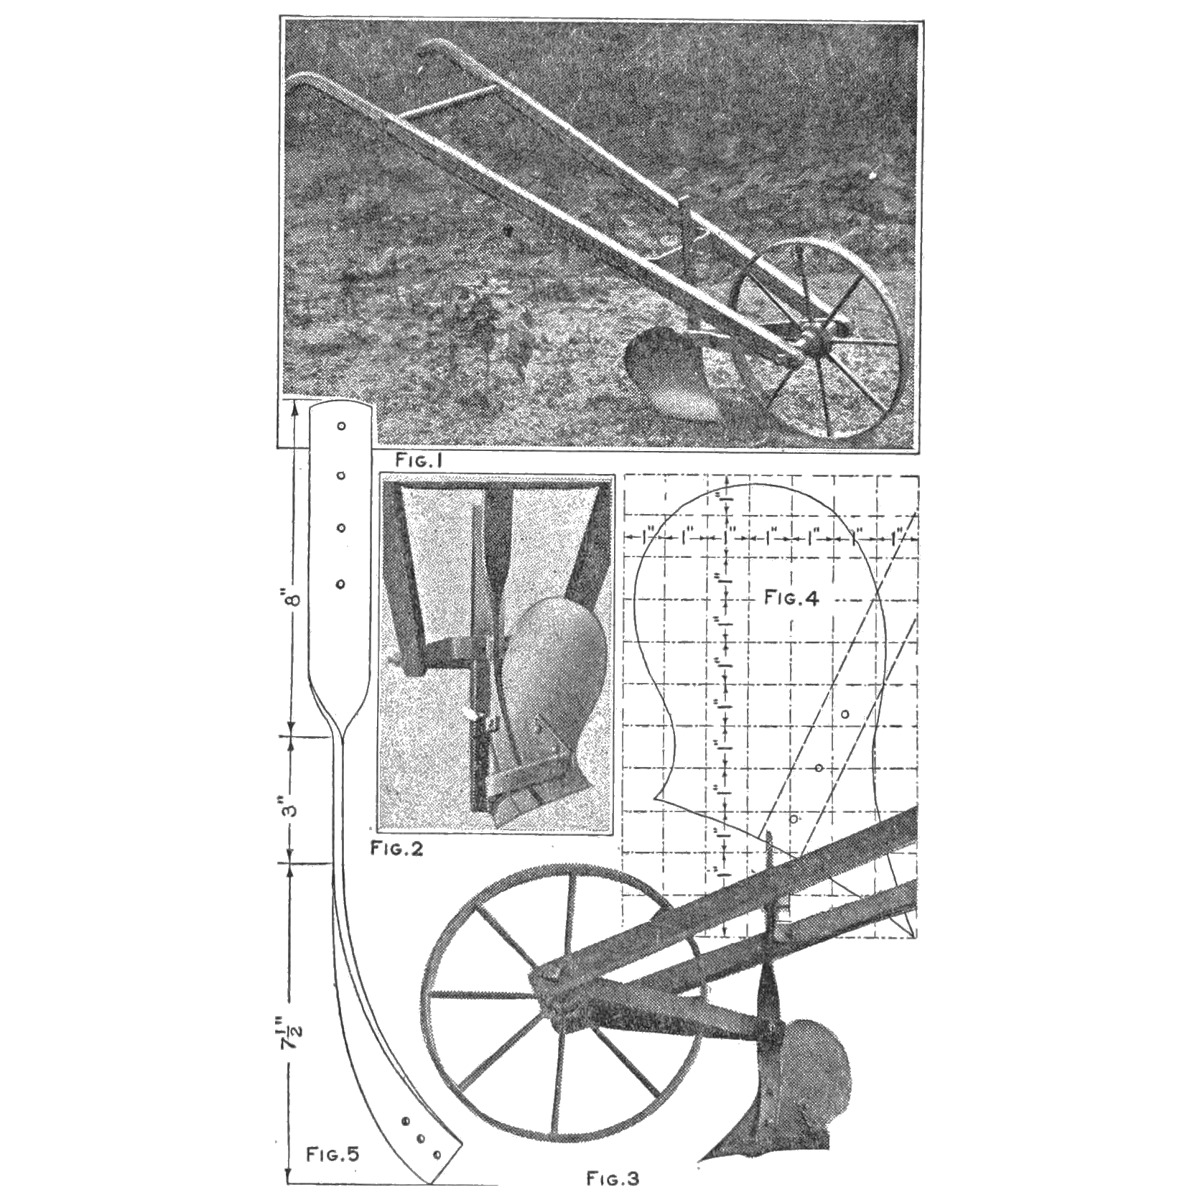


Garden Hand Plow From Scrap: Wheelbarrow Wheel, Ripped Spruce Handles and a Shovel-Blade Moldboard (Boy Mechanic, 1919)
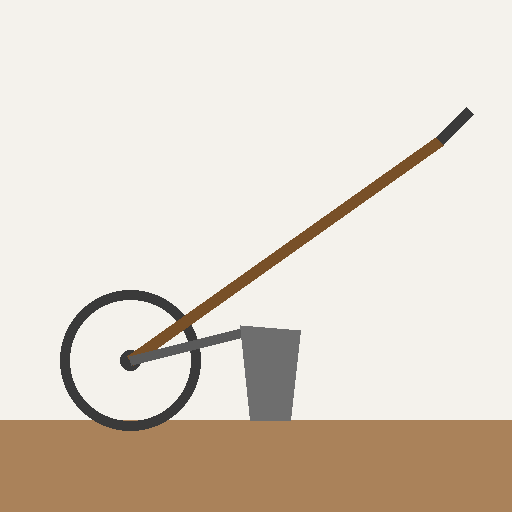
T. T. Sturgeon's hand plow from The Boy Mechanic, Book 3 (1919), "worth about $5 at an outlay of 25 cents": a 16 in wheelbarrow wheel, handles ripped from one spruce strip, iron-strap braces, an adjustable vertical strap, and a moldboard and share cut from an old shovel blade to his grid pattern.
Средний
About 1 day
Инструкции
1
1
His cut list in centimetres
His cut list in centimetres
Загрузка блокнота Jupyter…
2
2
Read The Boy Mechanic, Book 3
Read The Boy Mechanic, Book 3
"The labor of spading a garden of even moderate size is sufficient to warrant the person who undertakes the job in making a hand plow like that shown in the illustration."
3
3
Make the handles
Make the handles
Mark both handles on a 7/8 by 4 in spruce strip 5 ft long, one curved grip at each end on opposite edges. Cut the curves with a keyhole saw, then rip the board into the two handles; smooth them and trim the grips with a sharp knife. Cut a section of broomstick for the upper brace.
Материалы для этого шага:
 Доска из твёрдой древесины1 штука
 Метла1 штука
Необходимые инструменты:
 Лобзиковая пила
 Ножовка для продольного пиления
 Нож для кожи
 Карандаш
4
4
Make the iron parts
Make the iron parts
Lower brace: iron 1/4 by 1-1/4 by 12 in, drilled for 1/4 in bolts, bent at right angles 1-1/2 in from each end, with a 1/4 in hole at the middle. Vertical support: 1/4 by 1-1/4 by 18 in, four 1/4 in adjusting holes 1 in apart at the top, three 1/4 in holes at the bottom for the moldboard, and a 5/16 in hole at the 7-1/2 in mark. Two braces 14 in long of 1/4 by 1-1/4 in, a 3/8 in hole at the front of each for the 3/8 by 10 in axle bolt and a 5/16 in hole at the other end, each 1 in from the end. Landside: 1/8 by 3/4 by 12 in.
Материалы для этого шага:
 Полоса из малоуглеродистой стали3 штук
Необходимые инструменты:
 Ножовка по металлу
 Ручная дрель
 Слесарные тиски
 Молоток
 Напильники (ручной напильник)
 Рулетка
5
5
Cut the moldboard
Cut the moldboard
Draw his moldboard (Fig. 4) on cardboard ruled in 1 in squares, tracing the outline square by square, and mark the bolt holes. Trace it on an old shovel blade, using the thickest part for the point of the share. Cut it out, smooth the edges and sharpen the cutting edge. Drill for 1/4 in bolts to the vertical strap and 3/16 in bolts to the landside.
Материалы для этого шага:
 Лопата1 штука
 Картонные листы для шаблонов1 штука
Необходимые инструменты:
КарандашНожовка по металлу Угловая шлифмашинаНапильники (ручной напильник)Ручная дрель
6
6
Shape and assemble
Shape and assemble
Curve the moldboard and fit it to the supports as in Figs. 1-3. Bend the 12 in landside strip under the moldboard and bolt it on. Assemble on the 16 in wheel and 3/8 in axle bolt, with wheel and landside in line (Fig. 2) and the landside's rear edge raised slightly (Fig. 3); set the vertical strap's height for the operator in its adjusting holes. Paint the plow and oil the smoothed cutting parts.
Материалы для этого шага:
 Колесо тачки1 штука
 Болт с полукруглой головкой6 штук
 Шестигранная гайка6 штук
 Плоская шайба6 штук
 Масляная краска1 штука
 Машинное масло1 штука
Необходимые инструменты:
Слесарные тискиМолоток Широкая малярная кисть
7
7
Troubleshooting
Troubleshooting
Garden plow troubleshooting.
Flow
Loading...
8
8
History and honest limits
History and honest limits
From "Garden Plow Made of Pick-Up Material" by T. T. Sturgeon, in **The Boy Mechanic, Book 3**, Popular Mechanics, 1919 (Project Gutenberg 71856; checked on the archive.org scan boymechanic0003unse, pp. 227-228). The moldboard shape is his Fig. 4 grid. The keyhole saw is a coping saw here; the tools and metric figures are ours.
Материалы
11- 1 штукаЗаполнитель
- 1 штукаЗаполнитель
- Заполнитель
- 1 штукаЗаполнитель
- 1 штукаЗаполнитель
- 1 штукаЗаполнитель
- Заполнитель
- 6 штукЗаполнитель
- 6 штукЗаполнитель
- 1 штукаЗаполнитель
- 1 штукаЗаполнитель
Требуемые инструменты
12- Заполнитель
- Заполнитель
- Заполнитель
- 1 vendor sell this, none ship to you yetЗаполнитель
- Заполнитель
- Заполнитель
- Заполнитель
- Заполнитель
- Заполнитель
- 1 vendor sell this, none ship to you yetЗаполнитель
- 1 vendor sell this, none ship to you yetЗаполнитель
- Заполнитель
По этому чертежу делают
Связанные чертежи
Эти чертежи делятся знаниями — техники, материалы или принципы
CC0 Общественное достояние
Этот чертёж выпущен под лицензией CC0. Вы можете свободно копировать, изменять, распространять и использовать эту работу в любых целях без запроса разрешения.
Поддержите мейкера, покупая товары через его чертёж, где он получает Комиссию мейкера установленную продавцами, или создайте новую итерацию этого чертежа и включите его как связь в свой чертёж для распределения дохода.