ИСКУССТВО
КРАСОТА И ЗДОРОВЬЕ
РЕМЕСЛО
КУЛЬТУРА И ИСТОРИЯ
РАЗВЛЕЧЕНИЯ
ЭКОЛОГИЯ
ЕДА И НАПИТКИ
ОБРАТНАЯ ИНЖЕНЕРИЯ
НАУКИ
СПОРТ
ТЕХНОЛОГИИ
НОСИМЫЕ УСТРОЙСТВА
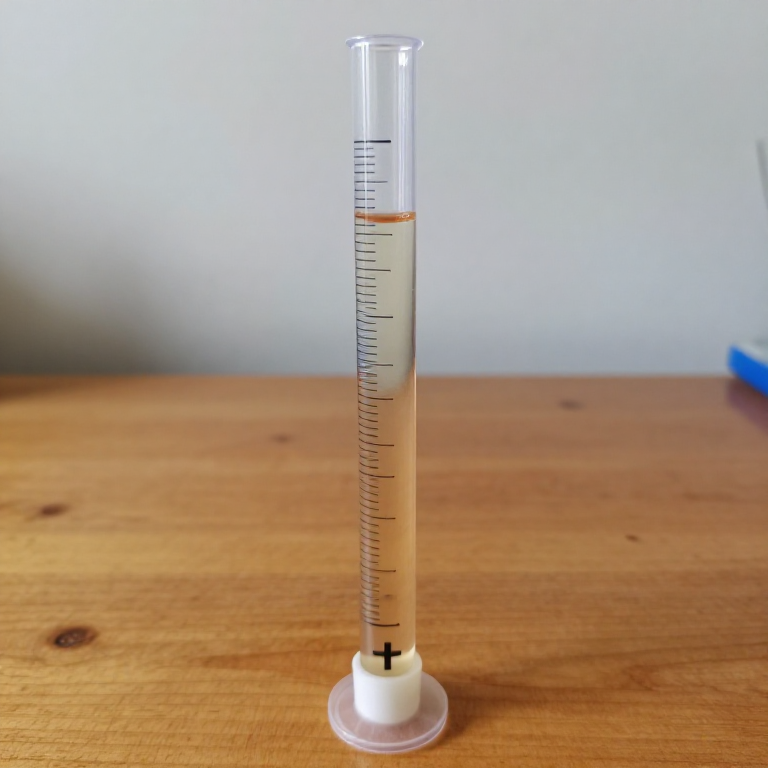


The Turbidity Tube: Measuring Water Before You Treat It
Every other rung in this batch makes water cleaner. This one is the instrument that tells you whether it worked — and it is the rung most often skipped.
Turbidity is how cloudy the water is, and it decides whether disinfection can work at all: a microbe hiding behind a particle of clay receives no chlorine and no ultraviolet. It is the reason the coagulation blueprint exists, the number the SODIS rule of thumb depends on, and the limit written into every UV specification. Yet almost nobody measures it, because the bench instrument is expensive.
It does not have to be. A clear tube, a black cross and the depth at which the cross disappears is a real photometric measurement, and the principle has been in use on lakes since Pietro Angelo Secchi lowered a white disc into the Mediterranean in 1865. Build it, calibrate it against a standard you make yourself, and then use it to do the one thing that turns treatment into engineering: find the chlorine demand of your own water, rather than copying a dose out of a manual.
Начинающий
3 hours
Инструкции
1
1
Make the tube
Make the tube
Cut the top off a tall clear bottle to leave an open cylinder about 50 cm tall and 4 to 6 cm across, and fix a white disc in the bottom with a black cross drawn on it in permanent marker, lines about 2 mm thick.
The cross is the target, and the principle is the same one a Secchi disc has used on lakes since 1865: the depth of water that just hides a standard mark is a measure of how much is suspended in it. Keep the outside clean and unscratched — you are looking through the wall as well as the water.
Материалы для этого шага:
 Пластиковая бутылка для напитков (2 л)1 штука
Необходимые инструменты:
 Рулетка
 Перманентный маркер
2
2
Scale it in centimetres
Scale it in centimetres
Mark a scale up the outside from the disc, every centimetre, starting at zero at the bottom.
You will read the depth at which the cross disappears, so the scale must start at the cross itself and not at the base of the bottle. A centimetre of error at the bottom is a large error in turbidity, because the relationship between depth and cloudiness is strongly non-linear at the murky end.
Необходимые инструменты:
РулеткаПерманентный маркер3
3
Make a standard you can trust
Make a standard you can trust
You cannot calibrate against 'muddy'. Make a reference suspension by weighing dry, fine clay into distilled water — 1 gram in 1 litre, well shaken, then diluted in halves down the series.
This is a home-made stand-in for formazin, the formal turbidity standard, and it is not as good: clay settles and its particles are not uniform, so the readings drift within minutes. Shake immediately before every reading, and re-make the series each session. Knowing exactly how your standard is imperfect is what makes it usable.
Материалы для этого шага:
 Глина5 г
 Дистиллированная вода2 литров
Необходимые инструменты:
 Цифровые весы
 Мерный цилиндр
 Стеклянная воронка с трубкой
4
4
Build the calibration curve
Build the calibration curve
Загрузка блокнота Jupyter…
Необходимые инструменты:
Мерный цилиндр5
5
Borrow the residual test, then push it further
Borrow the residual test, then push it further
**Chlorination and the Residual**, already published here, covers what the residual is and why it matters. Follow its DPD test — dose a measured sample, wait thirty minutes, read the pink against the chart in good light and quickly, because the colour fades. What follows is the part that needs your tube.
Test the SAME sample again at two hours. A residual that read 0.5 mg/l at thirty minutes and zero at two hours means the water had a slow demand you had not finished satisfying, and it was not safe at the moment you declared it so. Now read the turbidity of that sample. The correlation you are about to see between the two is the whole argument for owning the tube.
Необходимые инструменты:
Мерный цилиндр Секундомер
6
6
Plot chlorine demand against turbidity
Plot chlorine demand against turbidity
Dose five identical samples at 1, 2, 3, 5 and 8 mg/l, wait thirty minutes, and measure the residual in each. Plot dose against residual.
The gap between the line you would get if nothing reacted and the line you actually measure is the chlorine demand. Now repeat the whole series on a second source with a different tube reading, and plot demand against turbidity.
Clear water might have a demand under 1 mg/l; cloudy surface water can eat 5 or more, and the tube predicts it before you spend a single reagent. That is what the instrument buys you: a dose chosen from your own bucket rather than copied out of a manual, and a reason to coagulate first that you measured yourself.
Необходимые инструменты:
Мерный цилиндр Стеклянная банка
7
7
Keep a logbook, because the trend is the finding
Keep a logbook, because the trend is the finding
Rule up a simple book: date, source, turbidity depth, dose, residual at thirty minutes, and a line for what you did about it. Fill it in every time.
One reading tells you about one bucket. A month of readings tells you that the spring goes cloudy two days after heavy rain, that the filter needs scrubbing every eleven days, that the chlorine you made in June is weaker in August. Every water works on earth runs on exactly this, and the logbook is the cheapest piece of equipment in this entire batch.
Необходимые инструменты:
Перманентный маркерМатериалы
3- Заполнитель
- 5 гЗаполнитель
- 2 литровЗаполнитель
По этому чертежу делают
Связанные чертежи
Эти чертежи делятся знаниями — техники, материалы или принципы


CC0 Общественное достояние
Этот чертёж выпущен под лицензией CC0. Вы можете свободно копировать, изменять, распространять и использовать эту работу в любых целях без запроса разрешения.
Поддержите мейкера, покупая товары через его чертёж, где он получает Комиссию мейкера установленную продавцами, или создайте новую итерацию этого чертежа и включите его как связь в свой чертёж для распределения дохода.