Сотрудничество
ИСКУССТВО
КРАСОТА И ЗДОРОВЬЕ
РЕМЕСЛО
КУЛЬТУРА И ИСТОРИЯ
РАЗВЛЕЧЕНИЯ
ЭКОЛОГИЯ
ЕДА И НАПИТКИ
ОБРАТНАЯ ИНЖЕНЕРИЯ
НАУКИ
СПОРТ
ТЕХНОЛОГИИ
НОСИМЫЕ УСТРОЙСТВА
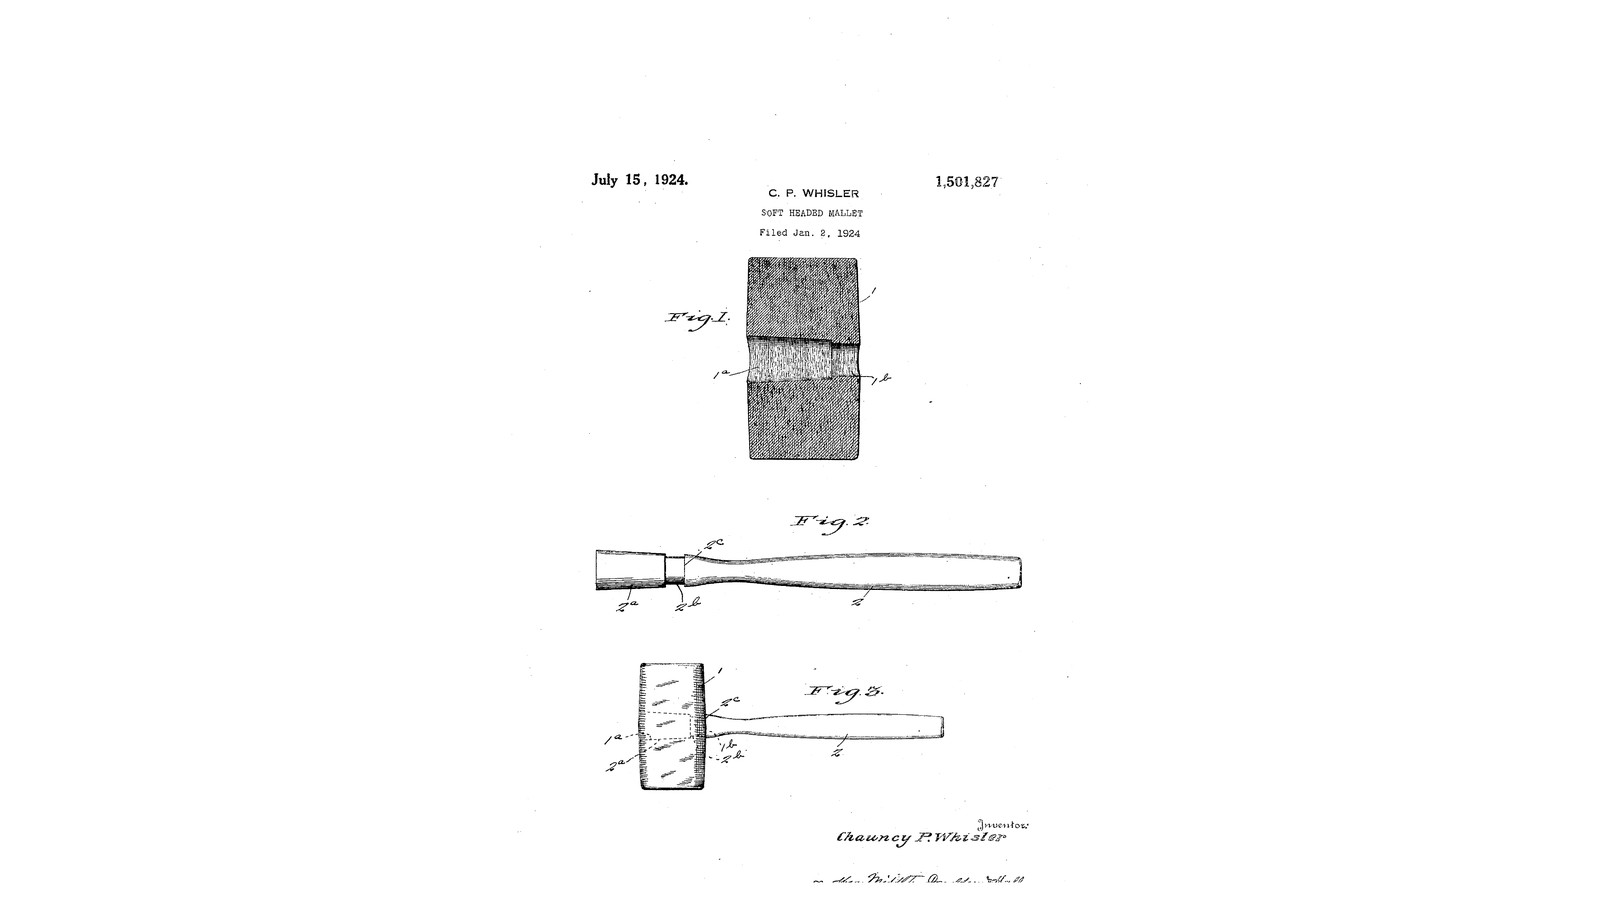


Laminated Rubber Mallet: A Rubber-and-Canvas Head Locked on a Flared Handle by an Internal Rib (Whisler, 1924)
Chauncy P. Whisler of Kenmore, Ohio, received US 1,501,827, dated 15 July 1924, for The Miller Rubber Company of Akron. It solves how to fix a handle in a head that is itself elastic. The rubber-and-fabric head has an eye that flares outwards, with a narrow rib at the handle side. The handle has a matching flared end, a groove for the rib and a shoulder. It is pushed right through the warm head from the outer face until the rib snaps into the groove. The flare stops the head flying off and the rib stops it sliding up the handle.
We build the head from rubber sheet and canvas, ply by ply, as his "stepped conical eye". The sizes are ours.
Начинающий
About 2 days
Инструкции
1
1
The stepped eye and the stretch at the rib
The stepped eye and the stretch at the rib
Загрузка блокнота Jupyter…
2
2
Read US 1,501,827
Read US 1,501,827
"When in position, the flared end 1a of the handle absolutely precludes the head from flying off when delivering blows and the rib and groove engagement prevents any inward displacement of the head."
3
3
Print the ply template
Print the ply template
Full-size A4 template: the 110 x 60 mm ply and the hole circle for each of the 17 plies, largest at the outer face. Print at 100 %; its 50 mm bar must measure 50 mm.
4
4
Cut the plies
Cut the plies
Cut 17 plies of 3 mm natural rubber sheet 110 x 60 mm and 14 of cotton canvas the same size. Glue each paper circle from the template in the middle of its ply, numbered 1 to 17, and cut the hole round it with a sharp craft knife, holding the blade upright. Cut the same hole in a canvas ply for each of plies 1 to 14.
Материалы для этого шага:
 Лист натурального каучука2 штук
 Хлопчатобумажная парусина1 штука
Необходимые инструменты:
 Струйный принтер
 Клей
 Макетный нож
 Комбинированный угольник
5
5
Laminate the head
Laminate the head
Brush contact cement on both faces to be joined, let it go touch-dry, and lay up the stack in order, ply 1 at the bottom: rubber, canvas, rubber, ... with the holes lined up over a 24 mm dowel through the middle, and plies 15, 16 and 17 rubber to rubber with no canvas. Press it between boards in clamps overnight. Trim the sides square with the knife and round the edges of the two striking faces slightly.
Материалы для этого шага:
 Контактный клей1 штука
Необходимые инструменты:
 Шканты из твёрдой древесины
 Струбцина с направляющейМакетный ножКомбинированный угольник
6
6
Turn the handle
Turn the handle
Turn a hardwood handle 330 mm long. At its head end turn the flared part 2a as long as plies 1 to 15 are thick, 32 mm at the end tapering to 24; then the groove 2b, 20 mm across and as long as plies 16 and 17; then the shoulder 2c, 28 mm, to bear on the head's inner face; then the grip, 28 mm tapering to 26 at its end, so it can pass the eye. Check each diameter with the caliper against the plies.
Материалы для этого шага:
 Доска из твёрдой древесины1 штука
Необходимые инструменты:
 Токарный станок по дереву
 Набор токарных резцов по дереву (HSS)
 Цифровой штангенциркуль 6 дюймов
 Защитные очки
7
7
Fit the head
Fit the head
Warm the head for ten minutes in hot water and dry it. Push the grip end of the handle into the eye from the outer face (ply 1) and force it right through, the rib stretching over the grip and the shoulder, until the flared part seats in the eye and the rib snaps into the groove. Let it cool. Strike a board: the head must not move.
Необходимые инструменты:
 Вода
8
8
Troubleshooting
Troubleshooting
Rubber mallet troubleshooting.
Flow
Loading...
9
9
History and honest limits
History and honest limits
**Chauncy P. Whisler** of Kenmore, Ohio, assignor to The Miller Rubber Company, US 1,501,827, dated 15 July 1924, filed 2 January 1924. He claimed "a mallet having a head of elastic material provided with an outwardly flaring handle-receiving eye provided with an annular internal rib adjacent the inner face of the head, and a handle having an outwardly flared end engaging said flared eye, and an annular groove engaged by said annular rib", and "a stepped conical eye". His head was moulded of rubber and fibrous material, as in Maranville and Dabney's application; ours is laminated from rubber sheet and canvas with contact cement. He gives no sizes; every size here is ours.
Материалы
4- Заполнитель
- 1 штукаЗаполнитель
- 1 штукаЗаполнитель
- 1 штукаЗаполнитель
Требуемые инструменты
11- Заполнитель
- Заполнитель
- Заполнитель
- Заполнитель
- Заполнитель
- Заполнитель
- Заполнитель
- Заполнитель
- Заполнитель
- Заполнитель
- Заполнитель
Файлы дизайна
1По этому чертежу делают

Связанные чертежи
Эти чертежи делятся знаниями — техники, материалы или принципы
CC0 Общественное достояние
Этот чертёж выпущен под лицензией CC0. Вы можете свободно копировать, изменять, распространять и использовать эту работу в любых целях без запроса разрешения.
Поддержите мейкера, покупая товары через его чертёж, где он получает Комиссию мейкера установленную продавцами, или создайте новую итерацию этого чертежа и включите его как связь в свой чертёж для распределения дохода.