Сотрудничество
ИСКУССТВО
КРАСОТА И ЗДОРОВЬЕ
РЕМЕСЛО
КУЛЬТУРА И ИСТОРИЯ
РАЗВЛЕЧЕНИЯ
ЭКОЛОГИЯ
ЕДА И НАПИТКИ
ОБРАТНАЯ ИНЖЕНЕРИЯ
НАУКИ
СПОРТ
ТЕХНОЛОГИИ
НОСИМЫЕ УСТРОЙСТВА
Leaning-Scoop Churn: Three Scoops Tilted 10, 5 and 0 Degrees Throw the Cream at Sharp-Topped Ribs and a Slit Cover
Buttercup

Создано

Buttercup

11. ноябрь 2026IE
1
0
0
0
0

Leaning-Scoop Churn: Three Scoops Tilted 10, 5 and 0 Degrees Throw the Cream at Sharp-Topped Ribs and a Slit Cover

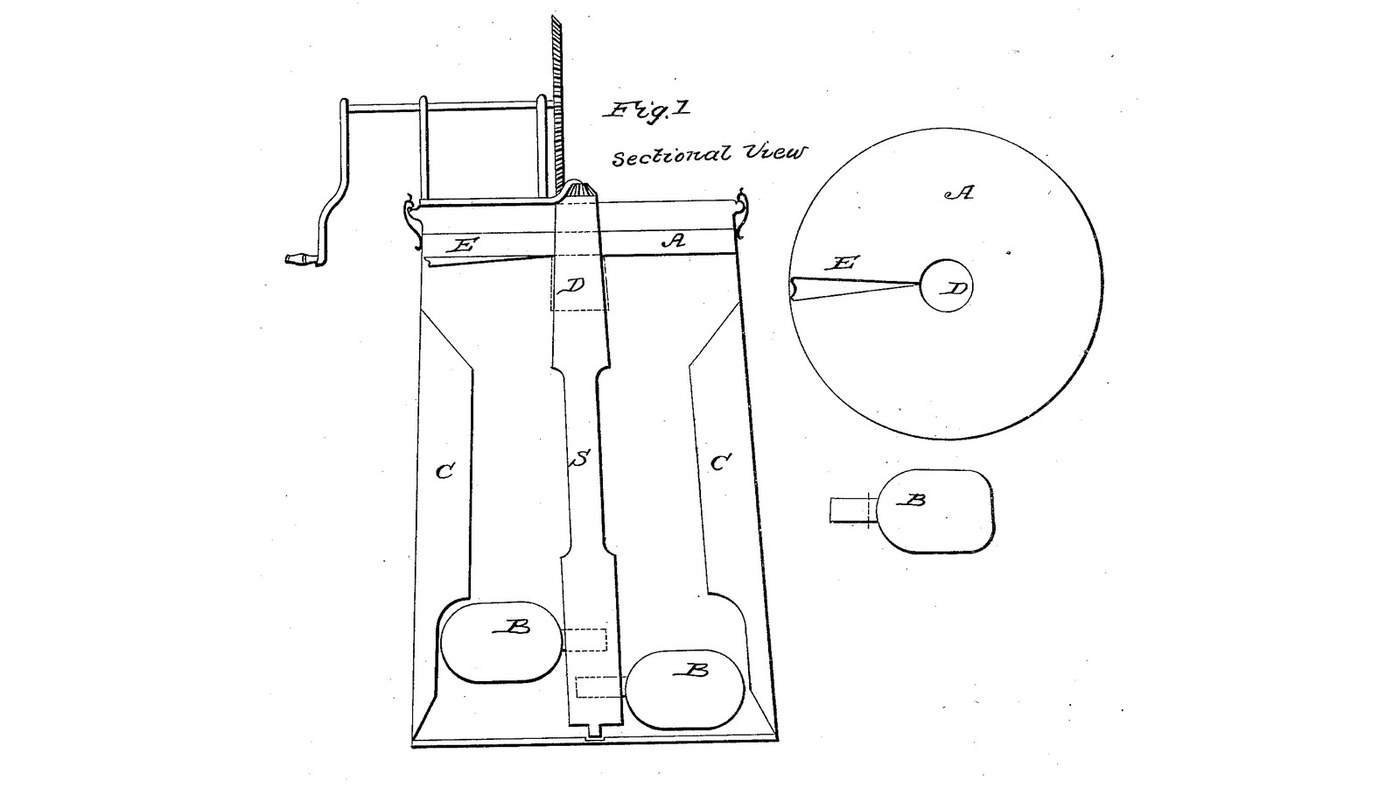
Daniel H. Wiswell of Buffalo, New York, received US 27,504, dated 13 March 1860, for a churn. Three concave scoops on a crank-turned upright shaft lean back by different amounts, 10, 5 and 0 degrees, and throw the cream against ribs on the wall, whose tops slant down to a sharp edge, and up against an inner cover slit on one side with one lip raised over the other. The patent gives no sizes; every size here is ours, and so is our reading of where the scoops sit.
Средний
About 2 days, plus printing

Инструкции

1

Three scoops, three leans

Загрузка блокнота Jupyter…
2

An upright churn worked from the top, one month before

Willson strokes his dasher up and down. Wiswell turns his scoops round an upright shaft.
3

Read US 27,504

"The nature of my invention and improvement consists in the application of the scoops or arms marked B inserted in a shaft marked S, one at the base, the upper edge of which scoop or arm leans backward ten degrees; the second, one third distant to the left, the upper edge of which leans backward five degrees; the third, one third distant from the second and above the other at right angles."
4

Print the scoop leaning 10 degrees

Concave scoop 90 mm long and 64 across, its stem 12 mm, the scoop turned 10 degrees on the stem. PETG, 0.2 mm layers, 40 % infill, 4 walls.
Файл дизайнаSTLCC0 - Free
5

Print the scoop leaning 5 degrees

The same scoop turned 5 degrees on its stem. PETG, 0.2 mm layers, 40 % infill, 4 walls.
Файл дизайнаSTLCC0 - Free
6

Print the upright scoop

The same scoop, upright on its stem. PETG, 0.2 mm layers, 40 % infill, 4 walls.
Файл дизайнаSTLCC0 - Free
7

Print the crown wheel

Crown wheel, 36 teeth on its face, module 2, with a hub; bored 12.4 mm. PETG, 0.2 mm layers, 40 % infill, 4 walls.
Файл дизайнаSTLCC0 - Free
8

Print the pinion

Spur pinion, 12 teeth, module 2, with a hub; bored 12.4 mm. PETG, 0.2 mm layers, 40 % infill, 4 walls.
Файл дизайнаSTLCC0 - Free
9

Shaft S, spindle box F and scoops B

Cut a 35 mm hardwood dowel 348 mm long for the shaft and drill 12 mm stainless spindles 30 mm into each end, the lower one standing out 15 mm, the upper one 70 mm. Screw a hardwood block 60 x 60 x 20 mm to the bucket's floor centre as the spindle box F and bore it 12.6 mm, 15 deep. Bore three 12 mm holes into the shaft for the scoops' stems, a third of a turn apart, 56, 86 and 116 mm above the floor, and glue the scoops in, the 10-degree one lowest, the upright one highest, each leaning back against the way the shaft turns.

Материалы для этого шага:

Ведро на 20 литровВедро на 20 литров1 штука
Шканты из твёрдой древесиныШканты из твёрдой древесины1 штука
Пруток из нержавеющей сталиПруток из нержавеющей стали1 штука
Брусок твёрдой древесиныБрусок твёрдой древесины1 штука
Столярный клейСтолярный клей1 штука
Шурупы по деревуШурупы по дереву2 штук
Силиконовый герметикСиликоновый герметик1 штука
Филамент PETGФиламент PETG1 штука

Необходимые инструменты:

3D-принтер FDM3D-принтер FDM
Ножовка по металлуНожовка по металлу
Аккумуляторная дрельАккумуляторная дрель
Набор свёрлНабор свёрл
Напильники (ручной напильник)Напильники (ручной напильник)
Слесарные тискиСлесарные тиски
ТранспортирТранспортир
Набор отвёртокНабор отвёрток
10

Ribs C

Cut four hardwood ribs 20 mm thick and 25 deep, 100 mm long on the inner edge and with their tops slanting down from the wall to the inner edge over 40 mm; plane both faces of the slant to a sharp edge. Screw them inside the bucket a quarter turn apart, 160 mm up from the floor, and seal each screw hole outside with silicone.

Материалы для этого шага:

Доска из твёрдой древесиныДоска из твёрдой древесины1 штука
Шурупы по деревуШурупы по дереву8 штук
Силиконовый герметикСиликоновый герметик1 штука

Необходимые инструменты:

Циркулярный станокЦиркулярный станок
Наждачная бумагаНаждачная бумага
Аккумуляторная дрельАккумуляторная дрель
Набор свёрлНабор свёрл
Набор отвёртокНабор отвёрток
11

Inner cover A, tube D and slit E

Cut a disc of 3 mm HDPE sheet to fit inside the bucket 300 mm up, with a 40 mm hole in the centre, and fit a printed or hardwood tube D 48 mm across and 60 long in the hole round the shaft. Saw a slit E from the tube to the rim; warm the sheet beside it with the heat gun and lift one side 15 mm so it projects over the other. Screw three small hardwood cleats inside the bucket for the cover to rest on.

Материалы для этого шага:

Лист ПНДЛист ПНД1 штука
Доска из твёрдой древесиныДоска из твёрдой древесины1 штука
Шурупы по деревуШурупы по дереву6 штук
Силиконовый герметикСиликоновый герметик1 штука

Необходимые инструменты:

ЭлектролобзикЭлектролобзик
ТермофенТермофен
Аккумуляторная дрельАккумуляторная дрель
Набор свёрлНабор свёрл
Напильники (ручной напильник)Напильники (ручной напильник)
Набор отвёртокНабор отвёрток
12

Bridge and crank

Cut a hardwood bridge 350 x 205 x 25 mm to sit on the bucket's rim and bore it 13 mm over the centre for the shaft's upper spindle; fit the pinion on the spindle above it. Screw two hardwood chairs on the bridge carrying a 12 mm stainless crank shaft with the crown wheel meshing the pinion, and fit a hardwood crank with a dowel handle on its outer end; hold it with collars.

Материалы для этого шага:

Доска из твёрдой древесиныДоска из твёрдой древесины2 штук
Пруток из нержавеющей сталиПруток из нержавеющей стали1 штука
Шканты из твёрдой древесиныШканты из твёрдой древесины1 штука
Столярный клейСтолярный клей1 штука
Шурупы по деревуШурупы по дереву8 штук
Shaft CollarShaft Collar2 штук
ШплинтШплинт1 штука

Необходимые инструменты:

Циркулярный станокЦиркулярный станок
Аккумуляторная дрельАккумуляторная дрель
Набор свёрлНабор свёрл
Набор перовых свёрлНабор перовых свёрл
Ножовка по металлуНожовка по металлу
Струбцина с направляющейСтрубцина с направляющей
Набор отвёртокНабор отвёрток
РулеткаРулетка
13

The build in 3D

FreeCAD model of this build, the bucket cut through the middle: the shaft S on its spindle box, the three leaning scoops, the ribs, the slit inner cover with its tube, and the bridge with the crank, crown wheel and pinion.
Файл дизайнаBLENDCC0 - Free
14

Churn

Pour about 6 litres of heavy cream at about 15 °C, checked with the thermometer, into the bucket, set the shaft in its box, lay the cover over the shaft on its cleats, and set the bridge and gearing on the rim. Turn the crank steadily, timing it, so the scoops travel with their hollows forward. When the butter comes, lift off the bridge, cover and shaft, take out the butter, pour the buttermilk into a bowl, wash the butter in cold water until it runs clear, salt and weigh it.

Материалы для этого шага:

Жирные сливкиЖирные сливки6 l
Крупная морская сольКрупная морская соль1 штука
ВодаВода1 штука

Необходимые инструменты:

Термометр с оставляемым щупомТермометр с оставляемым щупом
СекундомерСекундомер
Цифровые кухонные весыЦифровые кухонные весы
Большая миска из нержавеющей сталиБольшая миска из нержавеющей стали
15

Troubleshooting

Leaning-scoop churn troubleshooting.

Flow

Loading...
16

History and honest limits

**Daniel H. Wiswell** of Buffalo, New York, US 27,504, 13 March 1860, "Churn", assigned to Chas. W. Adams and Debby Pinner. He claimed the inner cover A, the scoops B, and the sharp edge and slant of the ribs' tops, combined. His text does not make plain where each scoop sits; ours are a third of a turn apart, each higher than the last, the third upright. His spindle box is lignum vitae or hemlock knot; ours is hardwood. Every size here is ours.

Материалы

15

Требуемые инструменты

19

Файлы дизайна

6

CC0 Общественное достояние

Этот чертёж выпущен под лицензией CC0. Вы можете свободно копировать, изменять, распространять и использовать эту работу в любых целях без запроса разрешения.

Поддержите мейкера, покупая товары через его чертёж, где он получает Комиссию мейкера установленную продавцами, или создайте новую итерацию этого чертежа и включите его как связь в свой чертёж для распределения дохода.

Обсуждение

(0)

Войти чтобы присоединиться к обсуждению

Загрузка комментариев...