Сотрудничество
ИСКУССТВО
КРАСОТА И ЗДОРОВЬЕ
РЕМЕСЛО
КУЛЬТУРА И ИСТОРИЯ
РАЗВЛЕЧЕНИЯ
ЭКОЛОГИЯ
ЕДА И НАПИТКИ
ОБРАТНАЯ ИНЖЕНЕРИЯ
НАУКИ
СПОРТ
ТЕХНОЛОГИИ
НОСИМЫЕ УСТРОЙСТВА
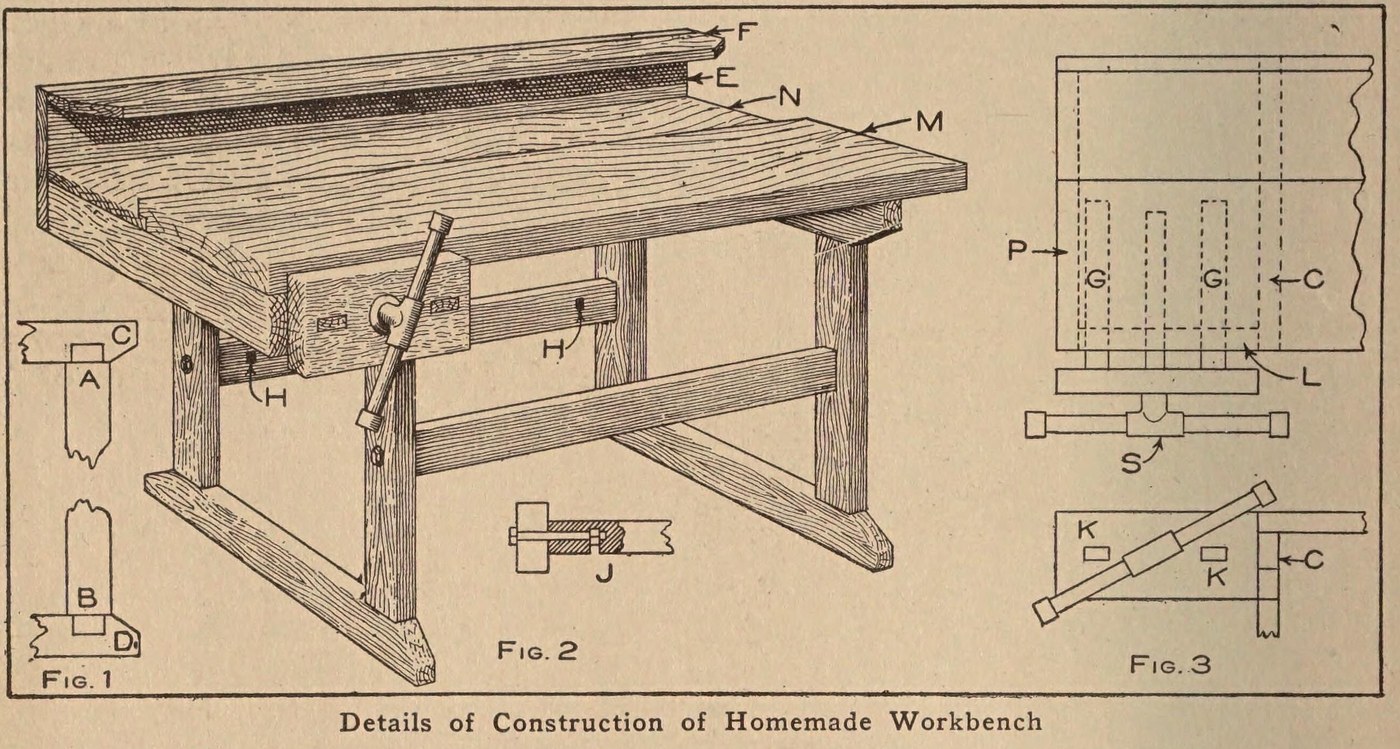


Workbench: a Pine Bench with a Laminated Maple Top and Vise (Boy Mechanic, 1913)
The same pine bench with a harder top: 14 maple strips set on edge, glued and screwed together, with a back board, a tool rack and a wooden vise on an iron bench screw.
Source: C. E. McKinney, Jr., 'Homemade Workbench', The Boy Mechanic, Book 1 (1913), pp. 442-443. Picture: Figs. 1-3 of the book.
Средний
Unknown
Инструкции
1
1
Make the two leg frames
Make the two leg frames
Cut four 2 x 4 in pine legs 23 in long with a tenon on each end 1/2 in thick, 3 1/2 in wide and 1 1/2 in long (Fig. 1, A and B). Cut four crosspieces of the same stock 20 in long, mortised in the narrow edge 1 1/4 in from each end, and slope their corners from the leg out to the middle. Fit each pair of legs to a pair of crosspieces to make the two supports.
Материалы для этого шага:
 Сосновый пиломатериал1 2 x 4 in: legs, crosspieces
Необходимые инструменты:
 Ножовка по дереву
 Долото для гнёзд
 Молоток
2
2
Brace them together
Brace them together
Join the supports with two 2 x 4 in braces 24 in long, ends sawn square. Bore through each leg and 4 in into the centre of each brace end, bore an intersecting hole on the back of each brace for the nut, and draw each joint tight with a 3/8 x 6 in bolt (Fig. 2, J). A cross brace on the back stops rocking when planing.
Материалы для этого шага:
Сосновый пиломатериал1 2 x 4 in: braces Болт с полукруглой головкой4 3/8 x 6 in
Необходимые инструменты:
Ножовка по дереву Коловорот с перкой
 Разводной ключ
3
3
Build up the maple top
Build up the maple top
Make the main top M of 14 maple strips 7/8 in thick, 2 in wide and 3 1/2 ft long, set on edge, each glued and screwed to the next, all with the grain one way so it planes smooth. Rabbet its back edge 1/2 in to take a back board N of the same length, 8 1/2 in wide and 7/8 in thick. Screw the top to the top crosspieces with long screws.
Материалы для этого шага:
 Неизвестный материал14 maple strips 7/8 x 2 in x 3 1/2 ft
 Столярный клей1 штука
 Сосновая доска1 back board
 Шурупы по дереву1 штука
Необходимые инструменты:
Ножовка по дереву Обдирочный рубанок
 Отвёртка плоская
4
4
Add the tool rack
Add the tool rack
Nail a board E 10 in wide to the back of the bench and fasten a 2 1/2 in board F on top of it at right angles; both 7/8 in thick and 3 1/2 ft long. Bore holes or cut notches in F to hold tools.
Материалы для этого шага:
Сосновая доска2 7/8 in, 3 1/2 ft Гвозди1 штука
Необходимые инструменты:
Коловорот с перкойНожовка по деревуМолоток5
5
Fit the vise
Fit the vise
Fasten an iron bench screw in a 2 x 6 in block 12 in long. Mortise two guide rails 7/8 x 1 1/2 in and 20 in long into the block; they slide in mortises in a 2 x 4 piece L bolted under the top, which holds the bench-screw nut between the two mortises. Nail L to a top crosspiece and to a 2 x 4 piece P bolted under the top at the end (Fig. 3).
Материалы для этого шага:
Сосновый пиломатериал1 2 x 6 block, 2 x 4 pieces, guide rails Верстачный винт для резьбы по дереву1 штукаБолт с полукруглой головкой1 for L and PГвозди1 штука
Необходимые инструменты:
Ножовка по деревуДолото для гнёздКоловорот с перкойРазводной ключМолотокМатериалы
8- 1 2 x 6 block, 2 x 4 pieces, guide railsЗаполнитель
- 1 for L and PЗаполнитель
- 14 maple strips 7/8 x 2 in x 3 1/2 ftЗаполнитель
- 1 штукаЗаполнитель
- 2 7/8 in, 3 1/2 ftЗаполнитель
- 1 штукаЗаполнитель
- 2 штукЗаполнитель
- Заполнитель
По этому чертежу делают

CC0 Общественное достояние
Этот чертёж выпущен под лицензией CC0. Вы можете свободно копировать, изменять, распространять и использовать эту работу в любых целях без запроса разрешения.
Поддержите мейкера, покупая товары через его чертёж, где он получает Комиссию мейкера установленную продавцами, или создайте новую итерацию этого чертежа и включите его как связь в свой чертёж для распределения дохода.