
Сотрудничество
ИСКУССТВО
КРАСОТА И ЗДОРОВЬЕ
РЕМЕСЛО
КУЛЬТУРА И ИСТОРИЯ
РАЗВЛЕЧЕНИЯ
ЭКОЛОГИЯ
ЕДА И НАПИТКИ
ОБРАТНАЯ ИНЖЕНЕРИЯ
НАУКИ
СПОРТ
ТЕХНОЛОГИИ
НОСИМЫЕ УСТРОЙСТВА
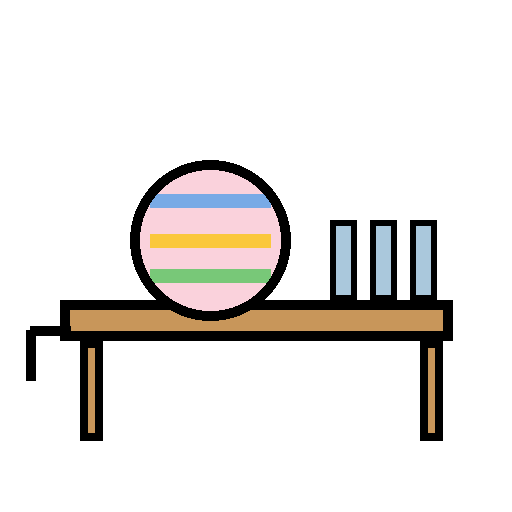
Easter Egg Dyeing Stand: a Crank-Turned Rubber Roller Spins the Egg Under the Brush (Young, 1943)
Woody

Создано

Woody

13. ноябрь 2026NO
3
0
0
0
0

Easter Egg Dyeing Stand: a Crank-Turned Rubber Roller Spins the Egg Under the Brush (Young, 1943)

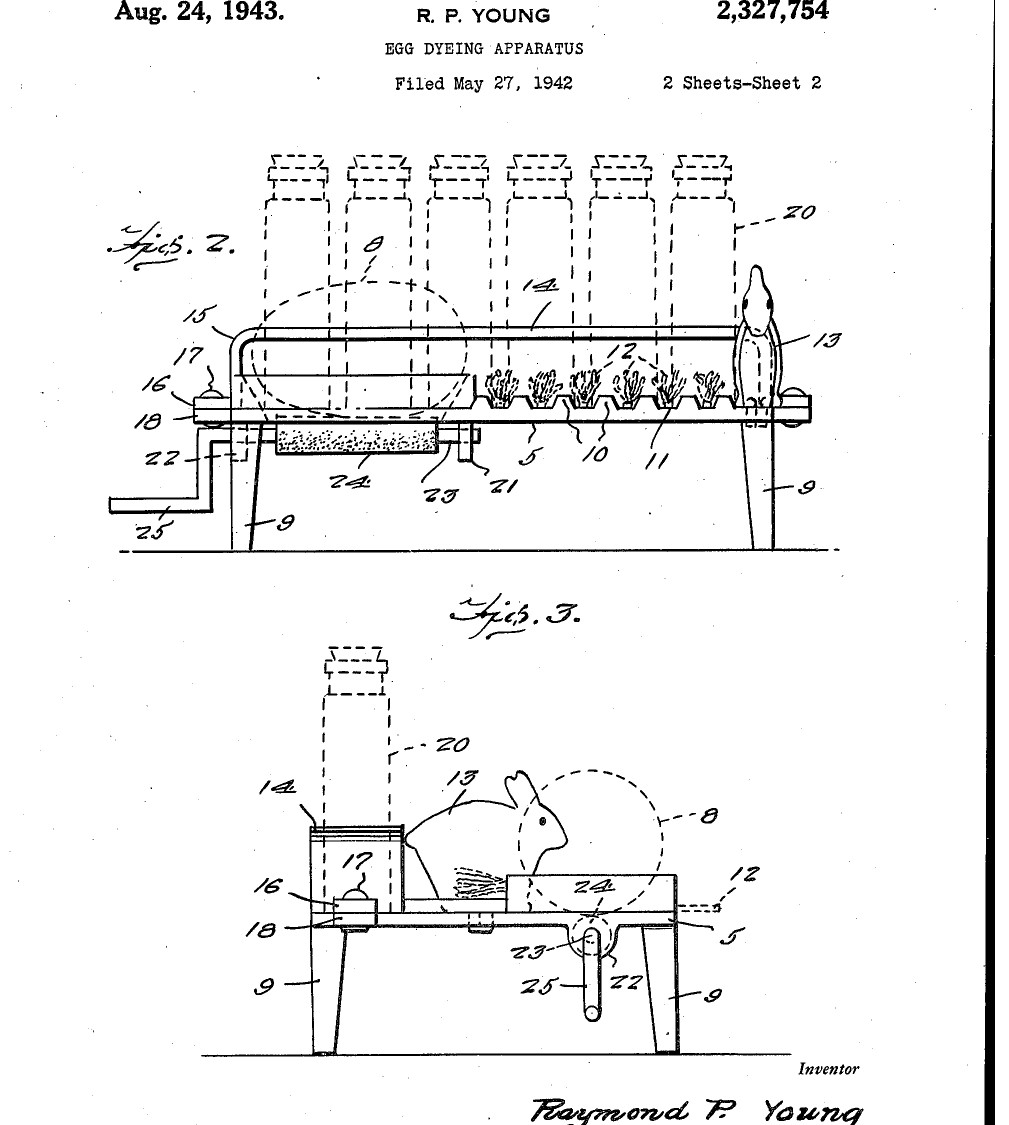
Raymond P. Young of Wrightsville, Pennsylvania, received US 2,327,754, dated 24 August 1943, for a little table for dyeing Easter eggs. The egg sits in an oval opening on a rubber roller turned by a crank; hold a dye brush against it and the colour goes on evenly all round. Grooves hold the brushes, a rack holds the dye bottles, and a rabbit stands at one end. We make it from plywood and dowel. All sizes are ours.
Начинающий
About 4 hours

Инструкции

1

Opening and roll

Загрузка блокнота Jupyter…
2

Read US 2,327,754

"If a dye containing brush is held against the object 8, application of the dye to the object 8 will take place uniformly and in a convenient manner."
3

Cut the platform

Cut a platform of 12 mm plywood about 300 x 180 mm (ours). Near one corner cut an oval opening 70 x 40 mm with a coping saw, his opening 6. Glue a strip of thin plywood or a ring of dowel round it to make the rise 7, so the egg cannot roll off.

Материалы для этого шага:

Лист фанерыЛист фанеры1 штука
Столярный клейСтолярный клей1 штука

Необходимые инструменты:

КарандашКарандаш
Ножовка по деревуНожовка по дереву
Ручная дрельРучная дрель
Лобзиковая пилаЛобзиковая пила
Наждачная бумагаНаждачная бумага
4

Make the brush grooves

Glue short dowels across the top of the platform beside the opening, a little apart, so the gaps between them (his ribs 10 and grooves 11) hold the brushes.

Материалы для этого шага:

Шканты из твёрдой древесиныШканты из твёрдой древесины1 штука
Столярный клейСтолярный клей1 штука

Необходимые инструменты:

Ножовка по деревуНожовка по дереву
Наждачная бумагаНаждачная бумага
5

Fit the legs

Drill the corners and glue in four dowel legs, his legs 9, long enough to clear the crank below (ours).

Материалы для этого шага:

Шканты из твёрдой древесиныШканты из твёрдой древесины1 штука
Столярный клейСтолярный клей1 штука

Необходимые инструменты:

Ручная дрельРучная дрель
Ножовка по деревуНожовка по дереву
6

Make the roller

Slide rubber tubing over a steel rod for the roll 24 (his roll is rubber, "or any other suitable material"). Bend the rod's long end twice at right angles in the vice to make the crank handle 25.

Материалы для этого шага:

Резиновая трубкаРезиновая трубка1 штука
Круг из низкоуглеродистой сталиКруг из низкоуглеродистой стали1 штука

Необходимые инструменты:

Слесарные тискиСлесарные тиски
Ножовка по металлуНожовка по металлу
7

Hang the roller

Cut two bearing brackets from flat bar (ours, his bearings 21 and 22), drill each for the rod at the depth the notebook gives, bend them to hang below the platform and screw them on either side of the opening, so the roll sits under the opening as his Fig. 4. The egg should rest on the roll inside the rise and turn when the crank turns.

Материалы для этого шага:

Полоса из малоуглеродистой сталиПолоса из малоуглеродистой стали1 штука

Шурупы по деревуШурупы по дереву1 штука

Необходимые инструменты:

Ножовка по металлуНожовка по металлу

Сверлильный станокСверлильный станок
Набор свёрлНабор свёрл
Слесарные тискиСлесарные тиски
Набор отвёртокНабор отвёрток
8

Make the bottle rack

Bend a strip of flat bar (his rack bar 14, "preferably strap iron") down and out at each end, drill a row of holes in it to hold the dye bottles, and screw its ends to the back edge of the platform.

Материалы для этого шага:

Полоса из малоуглеродистой сталиПолоса из малоуглеродистой стали1 штука
Шурупы по деревуШурупы по дереву1 штука

Необходимые инструменты:

Ножовка по металлуНожовка по металлу
Сверлильный станокСверлильный станок
Набор свёрлНабор свёрл
Слесарные тискиСлесарные тиски
Набор отвёртокНабор отвёрток
9

Add the rabbit

Cut a rabbit from plywood with the coping saw, sand it and glue it upright at the far end, his figure 13.

Материалы для этого шага:

Лист фанерыЛист фанеры1 штука
Столярный клейСтолярный клей1 штука

Необходимые инструменты:

Лобзиковая пилаЛобзиковая пила
Наждачная бумагаНаждачная бумага
10

Dye an egg

Fill the bottles with food colouring (ours) and put them in the rack. Set a hard-boiled egg in the opening on the roll, turn the crank, and hold a dye-filled brush against the egg: the colour goes on in an even band. Move the brush across to stripe it.

Материалы для этого шага:

ЯйцоЯйцо1 штука
Пищевой красительПищевой краситель1 штука
Стеклянные бутылки с крышкамиСтеклянные бутылки с крышками1 штука

Необходимые инструменты:

Набор кистейНабор кистей
11

Troubleshooting

Egg dyeing stand troubleshooting.

Flow

Loading...
12

History and honest limits

**Raymond P. Young** of Wrightsville, Pennsylvania, US 2,327,754, dated 24 August 1943, filed 27 May 1942. He claimed "dyeing apparatus comprising a platform having an opening therein, a rotatable roller mounted at the underside of the platform and partly protruding into said opening, means for rotating the roller, and an upstanding article confining wall on the platform surrounding said opening". He gives no sizes or dye: the plywood, dowels, all sizes, the bracket bearings, the rubber tube on a rod, and food colouring are ours.

Материалы

10

Требуемые инструменты

11

CC0 Общественное достояние

Этот чертёж выпущен под лицензией CC0. Вы можете свободно копировать, изменять, распространять и использовать эту работу в любых целях без запроса разрешения.

Поддержите мейкера, покупая товары через его чертёж, где он получает Комиссию мейкера установленную продавцами, или создайте новую итерацию этого чертежа и включите его как связь в свой чертёж для распределения дохода.

Обсуждение

(0)

Войти чтобы присоединиться к обсуждению

Загрузка комментариев...