

Twist Drill
Before 1863 a machinist forged his own drills, and a hole was as round as the smith was lucky. The twist drill made a hole a specified size — which is the precondition for a bolt that fits any hole of that name.
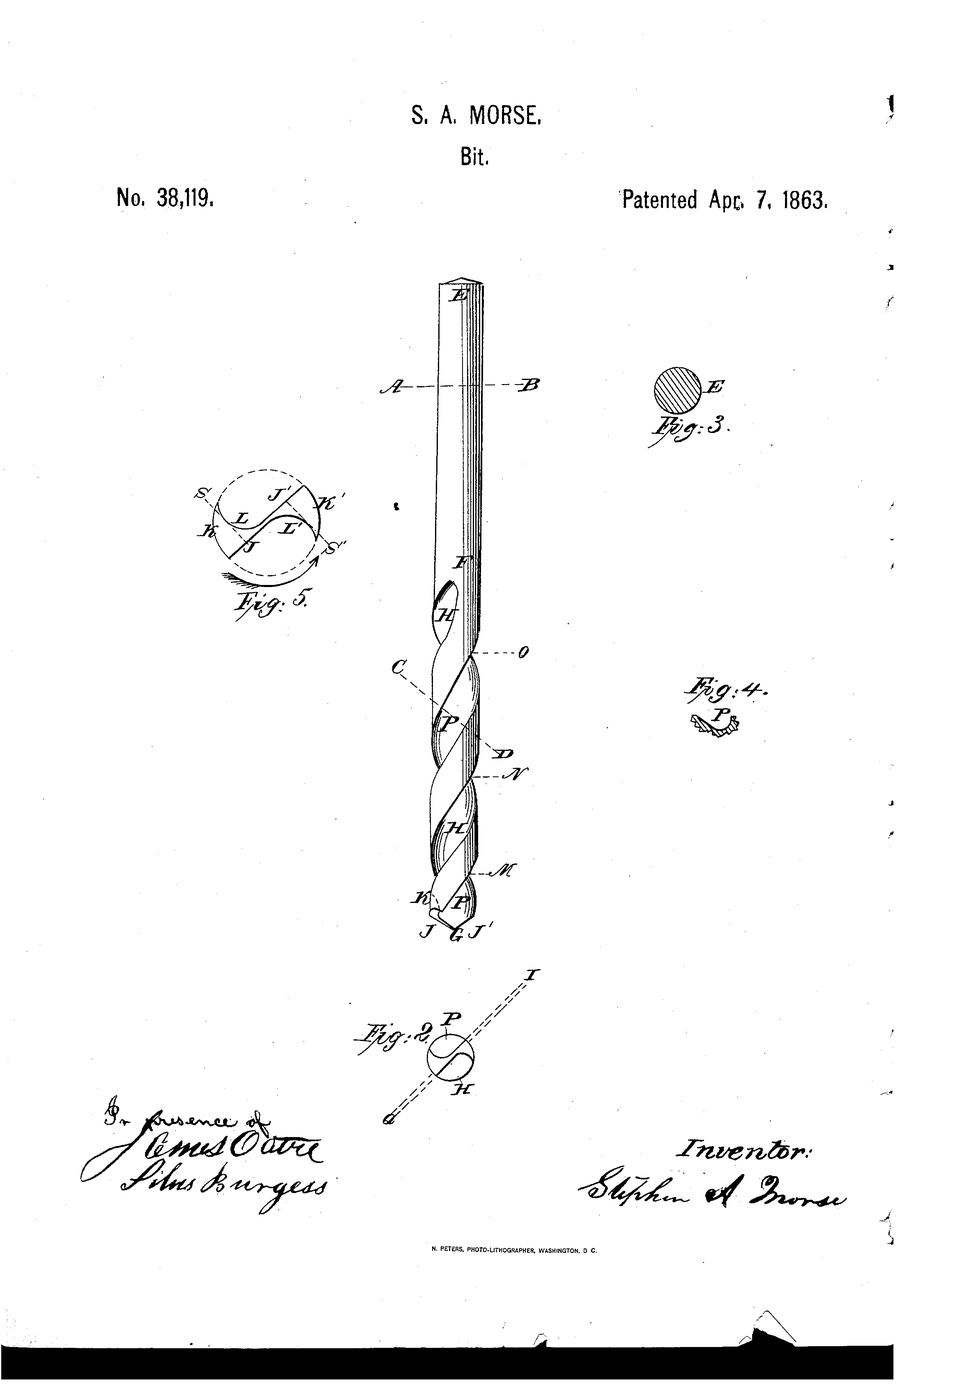
US 38,119, Stephen A. Morse of East Bridgewater, Massachusetts, granted 7 April 1863. The drawing sheet is headed simply “Bit”; the indexes catalogue it as “Improvement in drill-bits”. The claim is the helical flute: not a decorative twist, but a screw-shaped groove that does three jobs at once — it forms the cutting lip, it carries the chip up and out of the hole, and it lets coolant down. A flat spade bit does only the first.
Chip evacuation is the unglamorous half. A drill that cuts beautifully and cannot clear its own swarf packs the hole, seizes and snaps.
Amabwiriza
Read the claim before you build
Read the claim before you build
Morse claims a helical flute doing three jobs: form the cutting edge, eject the chip, admit coolant. Write the three down; you will test each separately.
Look at a real drill under magnification
Look at a real drill under magnification
Examine one bit with the magnifier. Find the two cutting lips, the two flutes, the web between them, and the margin that rubs the hole wall.
Ibikoresho bikenewe:
 Ibyuma Byinshi byo Gucukura
 Indorerwamo Yagura
Measure the shank against the name
Measure the shank against the name
Measure the shank diameter with the caliper and compare with the size stamped on the bit. The stamped name is a promise; check it.
Ibikoresho bikenewe:
Ibyuma Byinshi byo Gucukura Kalipe ya Vernier
Measure the point angle
Measure the point angle
Lay the bit on paper, trace the point, and measure the included angle with the protractor. General-purpose drills are ground to 118°.
Ibikoresho by'iyi ntambwe:
 Urupapuro rw'Imirongo1 urupapuro
Ibikoresho bikenewe:
 Igipima IngoroIbyuma Byinshi byo Gucukura
Model the helix on paper
Model the helix on paper
Cut a right triangle of paper 40 mm tall with a 60 mm base and wrap it around the brass rod. The hypotenuse traces a helix. This is why a flute is a screw.
Ibikoresho by'iyi ntambwe:
Urupapuro rw'Imirongo1 urupapuroIbikoresho bikenewe:
 Umukasi
 Umurongo w'Umuringa w'Umuhondo
Change the helix angle
Change the helix angle
Cut a second triangle 40 mm tall with a 20 mm base and wrap it. The steeper helix is what a drill for soft metal uses — faster chip lift, weaker edge.
Ibikoresho by'iyi ntambwe:
Urupapuro rw'Imirongo1 urupapuroIbikoresho bikenewe:
UmukasiUmurongo w'Umuringa w'UmuhondoMark a centre before drilling
Mark a centre before drilling
Mark a centre on the board. An unmarked start lets the point wander and the hole is oval before it is deep.
Ibikoresho by'iyi ntambwe:
 Ikibaho cy'Igiti Kiringaniye1 igice
Ibikoresho bikenewe:
 Ikaramu Idasibangana
Drill a test hole
Drill a test hole
Drill one hole through the board with a 6 mm bit, steady pressure, letting the flutes clear.
Ibikoresho by'iyi ntambwe:
Ikibaho cy'Igiti Kiringaniye1 igiceIbikoresho bikenewe:
Ibyuma Byinshi byo GucukuraMeasure the hole, not the drill
Measure the hole, not the drill
Measure the finished hole with the caliper. It is almost always larger than the bit. Record the difference — that gap is why reamers exist.
Ibikoresho bikenewe:
Kalipe ya VernierDrill five more and measure each
Drill five more and measure each
Drill five holes and measure all five. The spread, not the average, is what an engineer designs around.
Ibikoresho by'iyi ntambwe:
Ikibaho cy'Igiti Kiringaniye1 igiceIbikoresho bikenewe:
Ibyuma Byinshi byo GucukuraKalipe ya VernierDeliberately pack the flutes
Deliberately pack the flutes
Drill deep without withdrawing. Feel the drill bind as chips pack. Withdraw, clear, continue. This is Morse's second job failing in your hands.
Ibikoresho by'iyi ntambwe:
Ikibaho cy'Igiti Kiringaniye1 igiceIbikoresho bikenewe:
Ibyuma Byinshi byo GucukuraTest whether the hole is a gauge
Test whether the hole is a gauge
Try a #6-32 screw in a hole drilled to fit it. If it passes in every hole you drilled, you have made an interchangeable part.
Ibikoresho by'iyi ntambwe:
 Uruganda rw'imashini #6-326 ibice
Compare with a chisel-cut hole
Compare with a chisel-cut hole
Cut a hole the old way with the craft knife. Measure it. The comparison is the entire argument for the twist drill.
Ibikoresho by'iyi ntambwe:
Ikibaho cy'Igiti Kiringaniye1 igiceIbikoresho bikenewe:
 Icyuma cy'UbukorikoriKalipe ya Vernier
History & Context
History & Context
US 38,119, “Improvement in Drill-Bits”, Stephen Ambrose Morse of East Bridgewater, Massachusetts, granted 7 April 1863. Morse went on to found the Morse Twist Drill and Machine Company of New Bedford in 1864.
Not that Morse. Stephen A. Morse has no connection to Samuel F. B. Morse of the telegraph and the code. The coincidence of surname misleads often enough to be worth stating.
The manufacturing problem behind the patent. A helical flute is easy to draw and hard to cut. Morse's early drills were made by twisting a flat bar — hence ‘twist drill’, a name that describes an obsolete manufacturing method rather than the finished geometry. Milling the flutes into a solid round blank came later and gave a far more consistent tool. Joseph R. Brown's universal milling machine of 1862 was developed at the request of Frederick Howe specifically to machine spiral grooves in twist drills — the drill and the machine that makes it arrive together, each demanding the other.
Why it belongs in a metrology batch. A named drill size is a physical standard distributed to every workshop in the world. When a drawing says ‘6 mm hole’ and any shop can produce one, the drawing becomes portable. The Morse taper — his self-holding shank taper — is still a live standard on machine tools today, which makes it one of the longest-surviving dimensional standards in engineering.
Ibikoresho
3- 1 urupapuroUmwanya
- 1 igiceUmwanya
- 6 ibiceUmwanya
Ibikoresho by'Ibishushanyo Bifitanye Isano


CC0 Umurenge rusange
Iyi blueprint yasohowe munsi ya CC0. Ushobora gukoporora, guhindura, gukwirakwiza no gukoresha nta kwemererwa.
Shyigikira Umuremyi ugura ibicuruzwa binyuze muri Blueprint ye Komisiyo y'Umuremyi byashyizweho n'Abacuruzi, cyangwa kora verisiyo nshya y'iyi Blueprint ukayinjiza nk'isano muri Blueprint yawe kugira ngo musangire inyungu.