التعاون
فنون
الجمال والعناية
حِرَف
الثقافة والتاريخ
ترفيه
البيئة
الطعام والمشروبات
الهندسة العكسية
العلوم
رياضة
التقنية
الأجهزة القابلة للارتداء
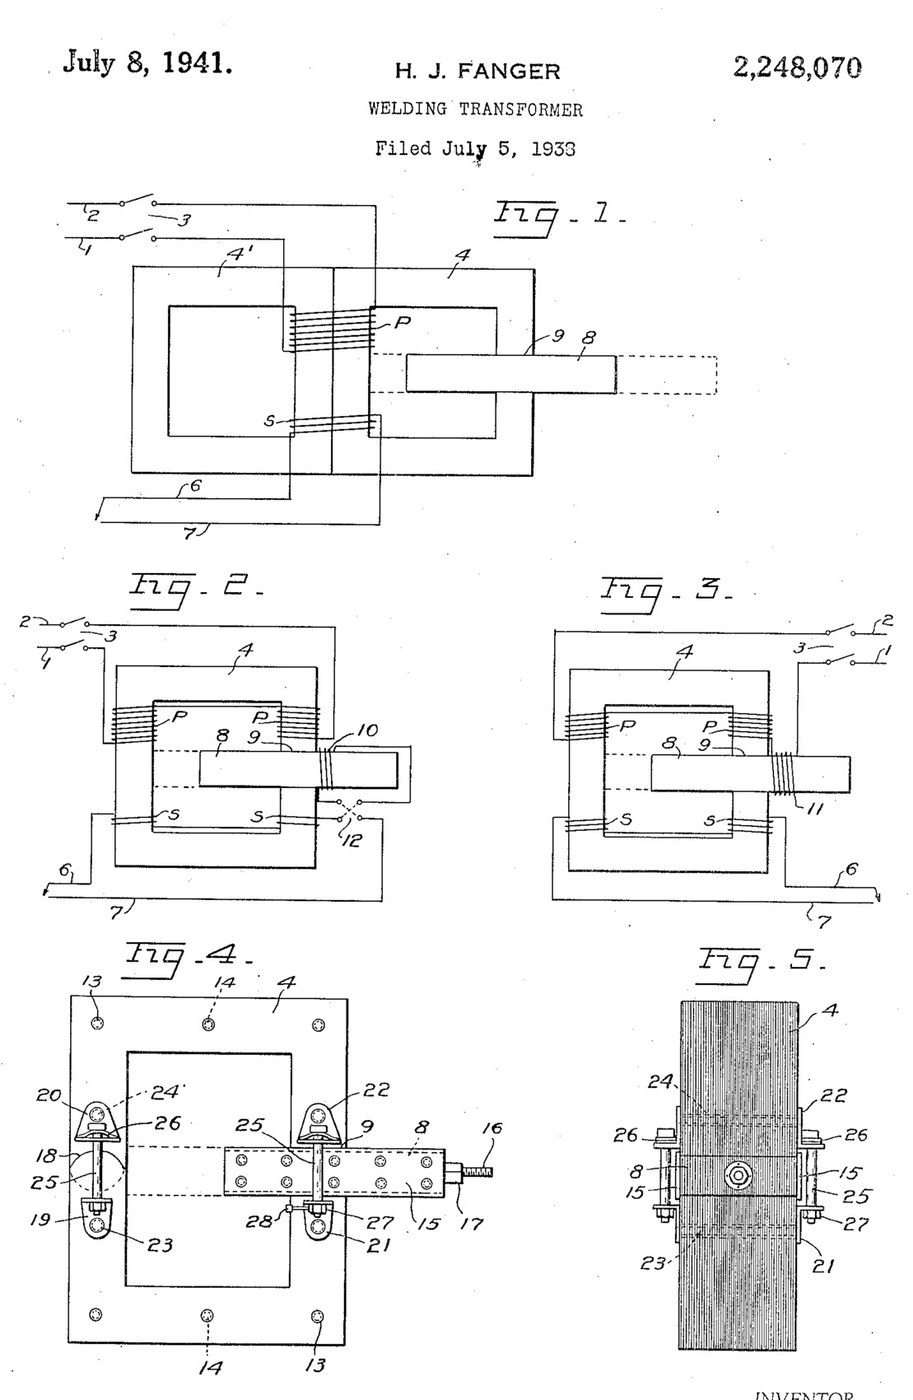


Arc Welder: AC Transformer with a Sliding Shunt Core (Fanger, US 2,248,070)
An AC arc welder is a step-down transformer whose current can be turned up and down. H. J. Fanger (US 2,248,070, 1941) cuts a gap through one leg of a laminated ring core and slides a laminated iron shunt bar through it: pushed in, it carries flux past the secondary and lowers the welding current; pulled out, the current rises.
For arc welding he gives about 60 to 68 volts open circuit, 15 to 200 amps, dropping to 38 or 40 volts at the working arc, with a small coil on the shunt bar in series with the secondary.
Source: H. J. Fanger, "Welding Transformer", US Patent 2,248,070 (filed 1938, granted 1941). Picture: its Figs. 1-5.
متقدم
Unknown
التعليمات
1
1
Read Fanger
Read Fanger
"With arc welding, infinite control of the volume of the secondary current, between maximum and minimum is obtained by adjustment of the slidable shunt core without altering the welding characteristics of the current, also better ignition of the arc is had at a given voltage, and greater stability of the arc".
2
2
Stack the core
Stack the core
Build a single rectangular ring core of insulated iron laminations, held together with brass (or insulated) bolts or rivets in insulating tubes (Fig. 4). Cut a gap straight through one leg, accurately machined and finished, and make a circular joint through the opposite leg with the segments staggered to overlap in successive laminations. Core size, lamination iron and thickness are not given (ours: the tools).
المواد لهذه الخطوة:
 معدن غير معروف1 iron laminations
 تشكيلة براغي سداسية1 brass bolts
 مادة عازلة غير معروفة1 insulating tubes
الأدوات المطلوبة:
 مقصّ صفائح
 مثقاب عمودي
 طقم لقم ثقب
 مبارد (مبرد يدوي)
 أبعاد غير معروفة
3
3
Make the shunt bar
Make the shunt bar
Make the sliding shunt section of the same laminated iron, a snug fit in the gap with its laminations edge-to-edge with the core's, and long enough to fill the gap at every position. Sheath both sides with a slightly wider plate of Bakelite that overlaps the edges of the gap to guide it. Fit a threaded rod on its outer end, working in a nut fixed to the section (or move it by hand, with calibration marks along one edge).
المواد لهذه الخطوة:
معدن غير معروف1 shunt laminations باكليت2 side platesتشكيلة براغي سداسية1 brass bolts
 قضيب مسنّن1 قطعة
 صامولة سداسية1 قطعة
الأدوات المطلوبة:
مثقاب عموديطقم لقم ثقبمبارد (مبرد يدوي)4
4
Wind the coils
Wind the coils
Wind the primary and secondary windings on both legs of the core (Fig. 2), in series or in parallel to suit the line voltage and the current wanted. Wind a small auxiliary coil round the shunt bar's path, fixed so the bar slides through it, and connect it in series with the secondary through a reversing switch (some jobs weld better with the current through it one way). Turns and wire sizes are not given.
المواد لهذه الخطوة:
 سلك نحاسي1 insulation and size not given
الأدوات المطلوبة:
أبعاد غير معروفة5
5
Spring the joints
Spring the joints
On both sides of the gap and of the circular joint fit pairs of confronting angle plates, held by brass bolts in insulating sleeves and drawn together by spring bolts whose heads rest on slightly arched spring plates, so the joints close snugly on the sliding bar. A small lever on the gap-joint nut gives a half turn to release the bar for moving. The angle-plate material is not given.
المواد لهذه الخطوة:
 مادة غير معروفة4 angle platesتشكيلة براغي سداسية1 brass and spring boltsمادة عازلة غير معروفة1 sleeves
 شريط فولاذ نابضي1 arched spring platesصامولة سداسية4 قطع
الأدوات المطلوبة:
مثقاب عموديطقم لقم ثقب مفتاح إنجليزي
6
6
Connect and set
Connect and set
Connect the primary to the line through a line switch, and the secondary leads to the electrode holder and the work. Pull the shunt bar out for more current, push it in for less: Fanger gives about 60-68 volts open circuit and 15-200 amps, dropping to 38-40 volts at the arc.
المواد لهذه الخطوة:
 مفتاح تشغيل وإيقاف1 line switch
الأدوات المطلوبة:
مفتاح إنجليزيالمواد
10- 1 shunt laminationsعنصر نائب
- 1 brass and spring boltsعنصر نائب
- 1 sleevesعنصر نائب
- 2 side platesعنصر نائب
- 1 قطعةعنصر نائب
- 5 قطععنصر نائب
- 1 insulation and size not givenعنصر نائب
- 4 angle platesعنصر نائب
- 1 arched spring platesعنصر نائب
- 1 line switchعنصر نائب
هذا المخطط يصنع

CC0 ملكية عامة
هذا المخطط مُصدر بموجب CC0. يحق لك نسخه وتعديله وتوزيعه واستخدامه لأي غرض، دون طلب إذن.
ادعم الصانع بشراء منتجات عبر مخططه حيث يكسب عمولة الصانع يحددها البائعون، أو أنشئ نسخة جديدة من هذا المخطط وضمّنه كرابط في مخططك لمشاركة الإيرادات.