

Coletando Argila de Barrancos — Do Solo à Massa Cerâmica
التعليمات
Entender o que é argila
Entender o que é argila
Argila é um silicato de alumínio hidratado (Al₂Si₂O₅(OH)₄ para caolinita) formado pela decomposição de feldspato e outros minerais por intemperismo. As partículas de argila são menores que 0,002 mm de diâmetro. Quando úmida, a argila é plástica e moldável. Quando queimada acima de 600°C, torna-se permanentemente dura.
Identificar locais de coleta
Identificar locais de coleta
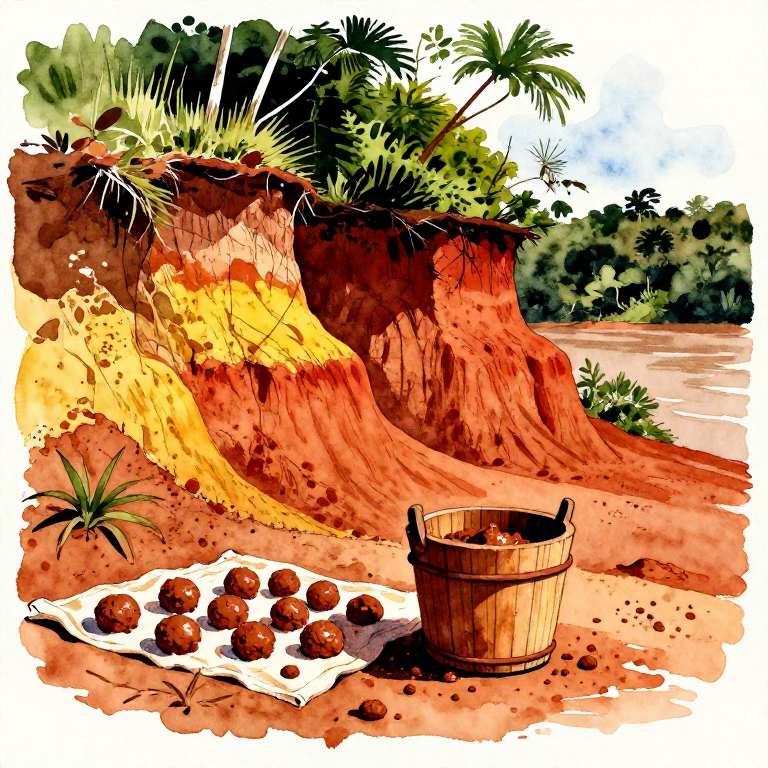
Procure argila em barrancos de rios, cortes de estrada, escavações de construção e encostas erodidas. A argila geralmente aparece como uma camada compacta, lisa, de cor uniforme (vermelha, amarela, cinza ou branca) abaixo do solo orgânico. No Brasil, argilas vermelhas ricas em óxido de ferro são as mais comuns.
Fazer o teste de campo — bola
Fazer o teste de campo — bola
Pegue um punhado do material, umedeça ligeiramente e tente formar uma bola do tamanho de uma laranja. Se o material mantém a forma sem rachar e se você consegue alisar a superfície com o polegar, é argila com boa plasticidade. Se esfarela, é arenoso demais para cerâmica.
Fazer o teste do rolo
Fazer o teste do rolo
Role a argila úmida em um cilindro (cobra) de 1 cm de diâmetro e 15 cm de comprimento. Levante pela ponta: se sustenta pelo menos 5 cm sem quebrar, tem plasticidade suficiente para olaria. Se quebra imediatamente, precisa de mais argila fina ou bentonita como aditivo.
Coletar a argila
Coletar a argila
Com uma pá ou enxada, remova a camada superficial de solo orgânico (10-20 cm). A argila limpa está abaixo. Escave blocos de argila e coloque em baldes. Colete pelo menos 10-15 kg para ter material suficiente após a limpeza. Evite misturar camadas de cores diferentes.
المواد لهذه الخطوة:
 طين خام من ضفة النهر15 kilogram
الأدوات المطلوبة:
 مجرفة حفر
 دلو سعة 20 لترًا
Secar os blocos de argila
Secar os blocos de argila
Espalhe os blocos de argila em uma lona ao sol por 2-3 dias até ficarem completamente secos. Argila seca quebra facilmente em pedaços menores. Quebre em fragmentos do tamanho de uma noz — quanto menor, mais rápido dissolve na água.
الأدوات المطلوبة:
 مشمّع
مشمّعDissolver em água (barbotina)
Dissolver em água (barbotina)
Coloque os fragmentos secos em um balde grande e cubra com água. Proporção: 1 parte de argila seca para 2 partes de água. Deixe de molho por 24-48 horas. A argila se dissolve lentamente, formando uma pasta líquida chamada barbotina. Mexa bem com um pau.
المواد لهذه الخطوة:
 ماء مقطر30 لترات
الأدوات المطلوبة:
 دلو خلط كبير
 عِصيّ خلط الراتنج
Peneirar a barbotina
Peneirar a barbotina
Passe a barbotina líquida por uma peneira de malha 60 (0,25 mm) para remover pedras, raízes, areia grossa e detritos orgânicos. A argila fina passa pela peneira com a água. O material retido na peneira é descartado. Repita se necessário com peneira mais fina (malha 80).
الأدوات المطلوبة:
 منخل دقيق الشبكة
Decantar a argila
Decantar a argila
Deixe a barbotina peneirada repousar em um balde por 24 horas. A argila sedimenta no fundo. A água limpa fica em cima. Sifonear ou inclinar o balde para remover a água clara sem perturbar o sedimento de argila. Repita até a água sair relativamente limpa.
Secar a massa até consistência de trabalho
Secar a massa até consistência de trabalho
Despeje a argila sedimentada sobre uma placa de gesso ou pano absorvente. O gesso absorve o excesso de água rapidamente. Se não tiver gesso, espalhe sobre um pano de algodão ao sol. Vire a massa a cada poucas horas. A argila está pronta quando tem a consistência de massa de modelar.
الأدوات المطلوبة:
 قرص جبس للفخار
Amassar a argila (wedging)
Amassar a argila (wedging)
Amasse a argila como se fosse pão: pressione com a base das mãos, dobre sobre si mesma e gire um quarto de volta. Repita por 5-10 minutos. Isso remove bolhas de ar presas (que explodem no forno) e homogeneiza a umidade. A argila pronta tem textura lisa e uniforme.
الأدوات المطلوبة:
 طاولة عجن الطين
Testar a plasticidade final
Testar a plasticidade final
Faça novamente o teste do rolo: um cilindro de 1 cm deve suportar pelo menos 8 cm sem quebrar. Dobre um cilindro de 1 cm em um arco — se não rachar na curva, a plasticidade está boa. Se rachar, a argila precisa de mais tempo de molho ou adição de argila ball clay.
Embalar e armazenar
Embalar e armazenar
Forme a argila pronta em blocos de 2-3 kg. Embrulhe cada bloco firmemente em plástico filme, eliminando todo o ar. Armazene em local fresco e sombreado. Argila bem embalada mantém a umidade por meses. Antes de usar, reamasse por 2-3 minutos para rehomogeneizar.
المواد لهذه الخطوة:
 غلاف بلاستيكي لاصق1 لفة
Documentar a fonte
Documentar a fonte
Anote o local de coleta, cor da argila, resultado dos testes de campo e data. Argilas de diferentes locais têm composições diferentes — afetam cor após queima, temperatura de fusão e plasticidade. Um bom ponto de coleta fornece material por anos.
الأدوات المطلوبة:
 دفتر ميداني
المواد
3- 15 kilogramعنصر نائب
- 30 لتراتعنصر نائب
- 1 لفةعنصر نائب
الأدوات المطلوبة
9- عنصر نائب
- عنصر نائب
- عنصر نائب
- عنصر نائب
- عنصر نائب
- عنصر نائب
- عنصر نائب
- عنصر نائب
- عنصر نائب
هذا المخطط يصنع
CC0 ملكية عامة
هذا المخطط مُصدر بموجب CC0. يحق لك نسخه وتعديله وتوزيعه واستخدامه لأي غرض، دون طلب إذن.
ادعم الصانع بشراء منتجات عبر مخططه حيث يكسب عمولة الصانع يحددها البائعون، أو أنشئ نسخة جديدة من هذا المخطط وضمّنه كرابط في مخططك لمشاركة الإيرادات.