التعاون
فنون
الجمال والعناية
حِرَف
الثقافة والتاريخ
ترفيه
البيئة
الطعام والمشروبات
الهندسة العكسية
العلوم
رياضة
التقنية
الأجهزة القابلة للارتداء
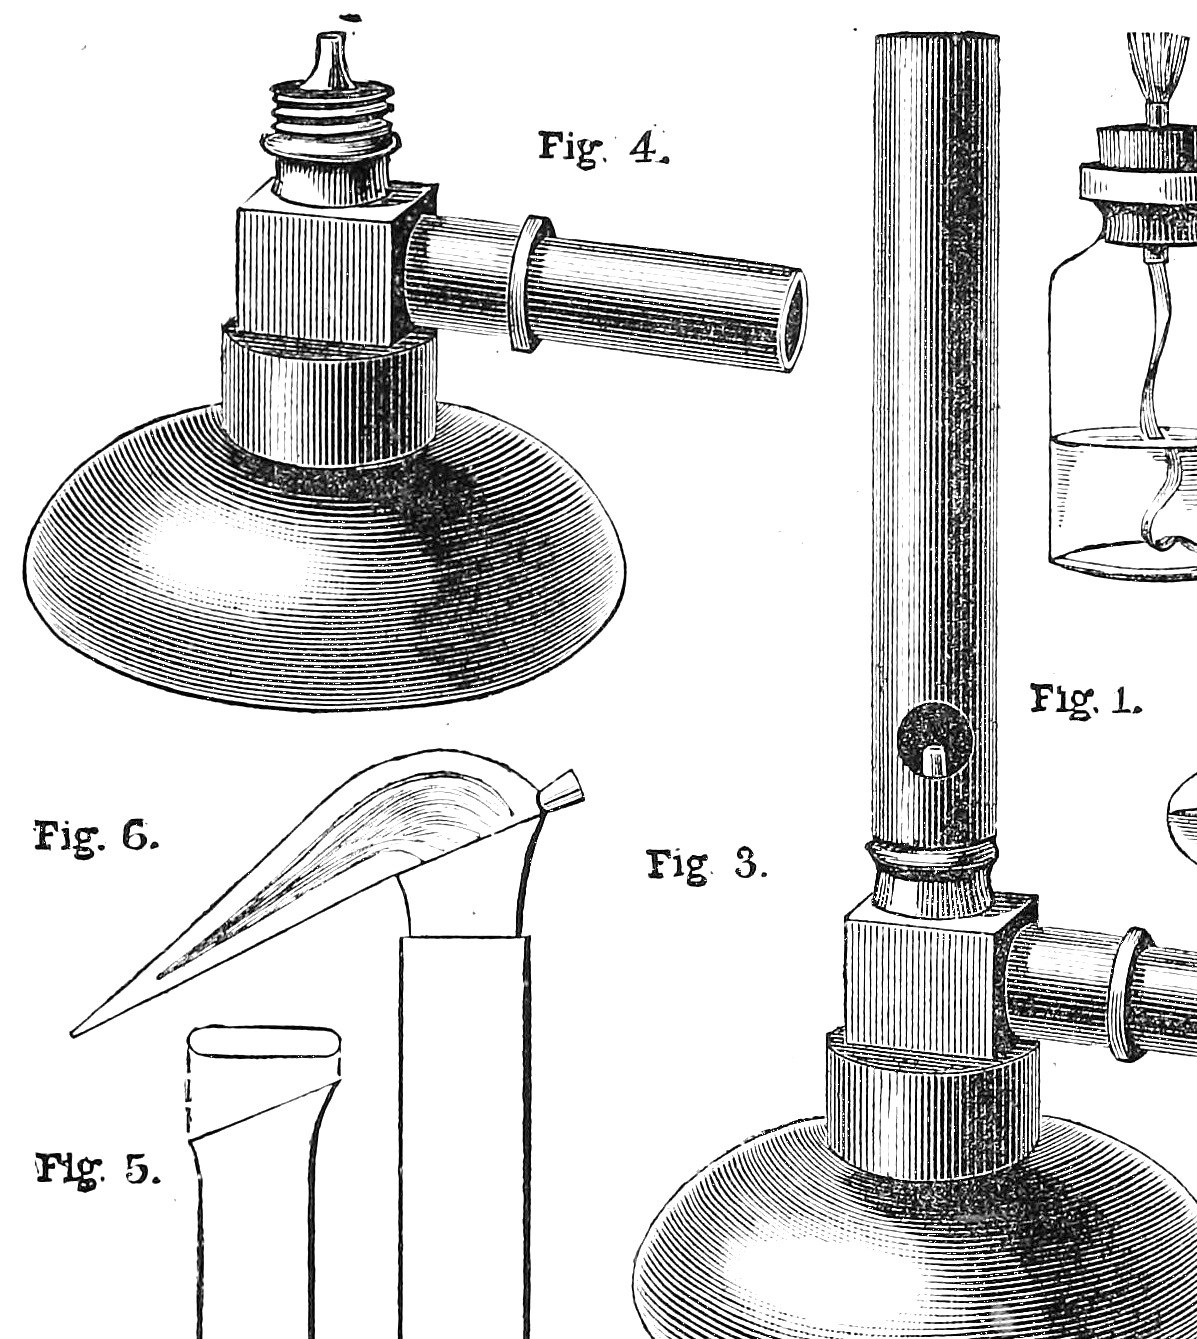


Gas Burner: a Home-Made Bunsen Burner from Brass Tube (Work, 1892)
A Bunsen burner: gas from a fine jet draws air in through two holes at the foot of an upright tube, and the mixture burns at the top with a hot blue flame that leaves no soot. H. B. Stocks (Work, 1892) makes one from a 3 1/2 in. brass tube 1/2 in. across, a short 3/8 in. tube for the gas, a brass boss and elbow from a gas bracket, and a bit of fine-bore tube from an old oil-can as the jet.
A sliding brass collar over the air-holes sets the flame.
Source: H. B. Stocks, How to Make a Cheap Spirit Lamp, Bunsen Burner, Blowpipes, etc., Work No. 167 (28 May 1892), p. 167. Picture: his Figs. 3-4.
متوسط
Unknown
التعليمات
1
1
Read Stocks
Read Stocks
"To make a Bunsen burner the following materials will be necessary:—A piece of brass tube 3 1/2 in. long, 1/2 in. diameter (external); a piece of tube 3/8 in. in diameter, 1 1/2 in. long; a brass boss similar to those on an ordinary bracket, but without a tap; a brass elbow tube; also a piece of tubing with very fine bore (small bit of tube from an old oil-can will do)."
2
2
Solder the elbow on the boss
Solder the elbow on the boss
Solder the brass elbow-piece onto the brass boss, with the tube that has a screw cut for a gallery uppermost.
المواد لهذه الخطوة:
 وصلة أنابيب ملولبة2 boss and elbow
 لحام قصدير-رصاص1 joint
 مساعد صهر1 joint
الأدوات المطلوبة:
 كاوية لحام
3
3
Fit the jet
Fit the jet
Cut the fine-bore tube 3/4 in. to 1 in. long and solder it inside the vertical tube of the elbow-piece so it projects about 1/2 in. If it is too small for the hole, plug round it with a little sheet lead, keeping it perfectly vertical and in the centre of the outer tube, then solder. The metal of the oil-can tube is not given (unknown).
المواد لهذه الخطوة:
 معدن غير معروف1 fine-bore tube
 صفيحة رصاص1 packingلحام قصدير-رصاص1 joint
الأدوات المطلوبة:
كاوية لحام مقصّ صفائح
4
4
Make the burner tube
Make the burner tube
Take the brass tube 3 1/2 in. long, 1/2 in. across. If it is not of very thick brass it will be a little too large: turn a piece of very thin sheet brass 1/2 in. by 1 1/4 in. into a cylinder and solder it inside one end. Tap that end inside to screw onto the male thread of the elbow-piece. At the same end drill two holes about 3/8 in. across, exactly opposite each other, their centres 5/8 in. from the end: the air-holes.
المواد لهذه الخطوة:
 أنبوب نحاس أصفر قطر خارجي 1/2 بوصة1 3 1/2 in.
 صفيحة نحاس أصفر1 1/2 x 1 1/4 in.لحام قصدير-رصاص1 joint
الأدوات المطلوبة:
مقصّ صفائحكاوية لحام طقم أدوات قطع اللولب
 مفتاح إدارة القلاووظ
 مثقب يدوي
5
5
Assemble and test
Assemble and test
Screw the burner tube onto the elbow-piece and screw the 3/8 in. tube, 1 1/2 in. long, into the side opening. Push the india-rubber tube from the gas supply onto the side tube and light. A purplish-blue flame means air and gas are in the right proportion. A yellow tip means too much gas: plug the hole in the jet slightly.
المواد لهذه الخطوة:
 أنبوب نحاس أصفر قطره الخارجي 9,5 مم1 1 1/2 in.
الأدوات المطلوبة:
 أنبوب مطّاطي
6
6
Fit the air collar
Fit the air collar
If the gas burns with a green flame and a hissing noise, the air-holes are too large. Cut sheet brass about 3/4 in. wide and 1 3/4 in. long and drill two holes 3/8 in. across, 1/2 in. from each end (their centres 3/16 in. further in). Turn it into a tube and push it onto the burner tube over the air-holes. Turn it until the two sets of holes do not quite match, so the right amount of air reaches the burner.
المواد لهذه الخطوة:
صفيحة نحاس أصفر1 3/4 x 1 3/4 in.الأدوات المطلوبة:
مقصّ صفائحمثقب يدويالمواد
8- 2 boss and elbowعنصر نائب
- 3 jointعنصر نائب
- 1 jointعنصر نائب
- 1 fine-bore tubeعنصر نائب
- 1 packingعنصر نائب
- 1 3 1/2 in.عنصر نائب
- 1 3/4 x 1 3/4 in.عنصر نائب
- 1 1 1/2 in.عنصر نائب
هذا المخطط يصنع

CC0 ملكية عامة
هذا المخطط مُصدر بموجب CC0. يحق لك نسخه وتعديله وتوزيعه واستخدامه لأي غرض، دون طلب إذن.
ادعم الصانع بشراء منتجات عبر مخططه حيث يكسب عمولة الصانع يحددها البائعون، أو أنشئ نسخة جديدة من هذا المخطط وضمّنه كرابط في مخططك لمشاركة الإيرادات.