ART
BEAUTY & WELLNESS
CRAFT
CULTURE & HISTORY
ENTERTAINMENT
ENVIRONMENT
FOOD & DRINKS
REVERSE ENGINEERING
SCIENCES
SPORTS
TECHNOLOGY
WEARABLES
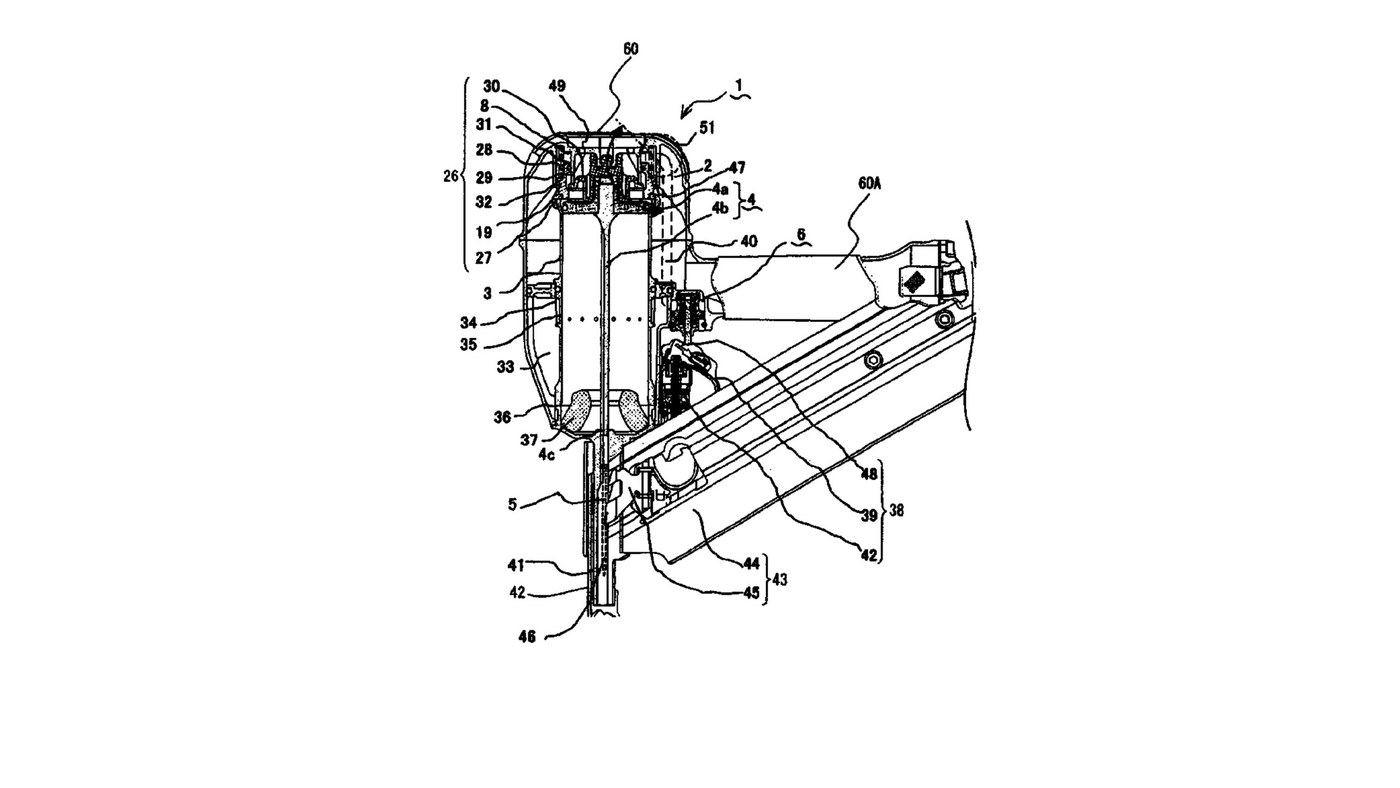


Pneumatic Nail Gun: Main Valve, Return Chamber and Fast Trigger Valve
Hitachi Koki's air nailer (US 7,156,012, 2007). Compressed air stored in the handle holds a main valve shut over the cylinder. Pulling the trigger with the nose pressed to the work vents a small trigger-valve chamber, which vents the main-valve chamber; the main valve jumps up, closes the exhaust and lets stored air throw the piston and driver blade down onto a nail. Air caught below the piston in a return chamber pushes it back up. Hitachi sized the valve chambers against their vents to make the gun fire and reset faster.
The patent gives no materials, bore, stroke, air pressure or nail size. The picture: the patent's Fig. 1.
Advanced
2 days
Instructions
1
1
Use the one-piece frame, handle and nose
Use the one-piece frame, handle and nose
Use a frame (60), handle (60A) and nose (41) made as one outer frame; the space inside the handle and frame is the air accumulator (2). Screw a hose nipple into the handle's end for the air hose.
Materials for this step:
 Tool Motor Case1 piece
 Hose Nipple1 piece
Tools needed:
 Adjustable Wrench
2
2
Fit the cylinder with its return chamber
Fit the cylinder with its return chamber
Fit the cylinder (3) in the frame with a return chamber (33) round its lower part. Halfway up, a one-way valve (34) lets air pass only from the cylinder into the return chamber; a channel (36) near the bottom joins them always. Seat a piston bumper (37) at the bottom.
Materials for this step:
 Cylinder Sleeve1 piece
 Check Valve (Non-Return)1 piece
 Piston Bumper1 piece
Tools needed:
Adjustable Wrench3
3
Insert the piston and driver blade
Insert the piston and driver blade
By hand, slide the piston (4a) with its integral driver blade (4b) into the cylinder; the blade's free end (4c) runs down the nose to strike the nail.
Materials for this step:
 Driver Piston1 piece
4
4
Fit the main valve section
Fit the main valve section
Over the top of the cylinder fit the main valve rubber (27), the main valve (19) with O-rings (31, 32) sliding in the main valve chamber (8), the main valve spring (28) pushing it down, and the exhaust rubber (30) under the exhaust passage (29) to the top exhaust hole (49).
Materials for this step:
 Main Valve1 piece
 Valve Seat Ring2 pieces
 Coil Spring1 piece
 O-Ring2 pieces
Tools needed:
Adjustable Wrench5
5
Fit the trigger valve
Fit the trigger valve
At the base of the handle fix an outer and an inner valve bush (10, 11). Inside them fit the valve piston (9) and the plunger (7), with a spring (12) between them pushing the piston up and the plunger down, and O-rings 15, 17, 18, 21, 23, 24, 25. Join it to the main valve chamber by the control channel (40), a tube with a gentle bend.
Materials for this step:
 Valve Bush2 pieces
 Valve Piston1 piece
 Valve Stem1 pieceCoil Spring1 pieceO-Ring7 pieces
Tools needed:
Adjustable Wrench6
6
Fit trigger, arm plate and push lever
Fit trigger, arm plate and push lever
Fit the trigger (39) with its pivoting arm plate (48) under the plunger, and the push lever (42) sprung out from the nose bottom. Only with both pulled and pressed does the arm plate push the plunger up.
Materials for this step:
 Trigger1 piece
 Contact Trip1 pieceCoil Spring1 piece
Tools needed:
Adjustable Wrench7
7
Fit the magazine and feeder
Fit the magazine and feeder
Fit the magazine (44), holding nails side by side, with the feed mechanism (45) that moves each next nail into the injection opening (46) in the nose.
Materials for this step:
 Nail Magazine1 piece
 Nail Feeder1 piece
Tools needed:
Adjustable Wrench8
8
Why the valve chambers are small
Why the valve chambers are small
Loading Jupyter Notebook...
9
9
Connect and fire
Connect and fire
Ours: connect an air hose from a compressor. At rest the stored air holds the main valve down and the piston up. Press the nose to the work and pull the trigger: the main valve lifts, the piston drives the nail, and the return-chamber air brings it back up.
Tools needed:
 Air Compressor
 Air Hose
Materials
17- 1 piecePlaceholder
- 1 piecePlaceholder
- 1 piecePlaceholder
- 1 piecePlaceholder
- 1 piecePlaceholder
- 1 piecePlaceholder
- 1 piecePlaceholder
- 2 piecesPlaceholder
- 3 piecesPlaceholder
- 9 piecesPlaceholder
- 2 piecesPlaceholder
- 1 piecePlaceholder
- 1 piecePlaceholder
- 1 piecePlaceholder
- 1 piecePlaceholder
- 1 piecePlaceholder
- 1 piecePlaceholder
CC0 Public Domain
This blueprint is released under CC0. You are free to copy, modify, distribute, and use this work for any purpose, without asking permission.
Support the Maker by purchasing products through their Blueprint where they earn a Maker Commission set by Vendors, or create a new iteration of this Blueprint and include it as a connection in your own Blueprint to share revenue.