การทำงานร่วมกัน
ศิลปะ
ความงามและสุขภาพ
งานฝีมือ
วัฒนธรรมและประวัติศาสตร์
ความบันเทิง
สิ่งแวดล้อม
อาหารและเครื่องดื่ม
วิศวกรรมย้อนรอย
วิทยาศาสตร์
กีฬา
เทคโนโลยี
อุปกรณ์สวมใส่
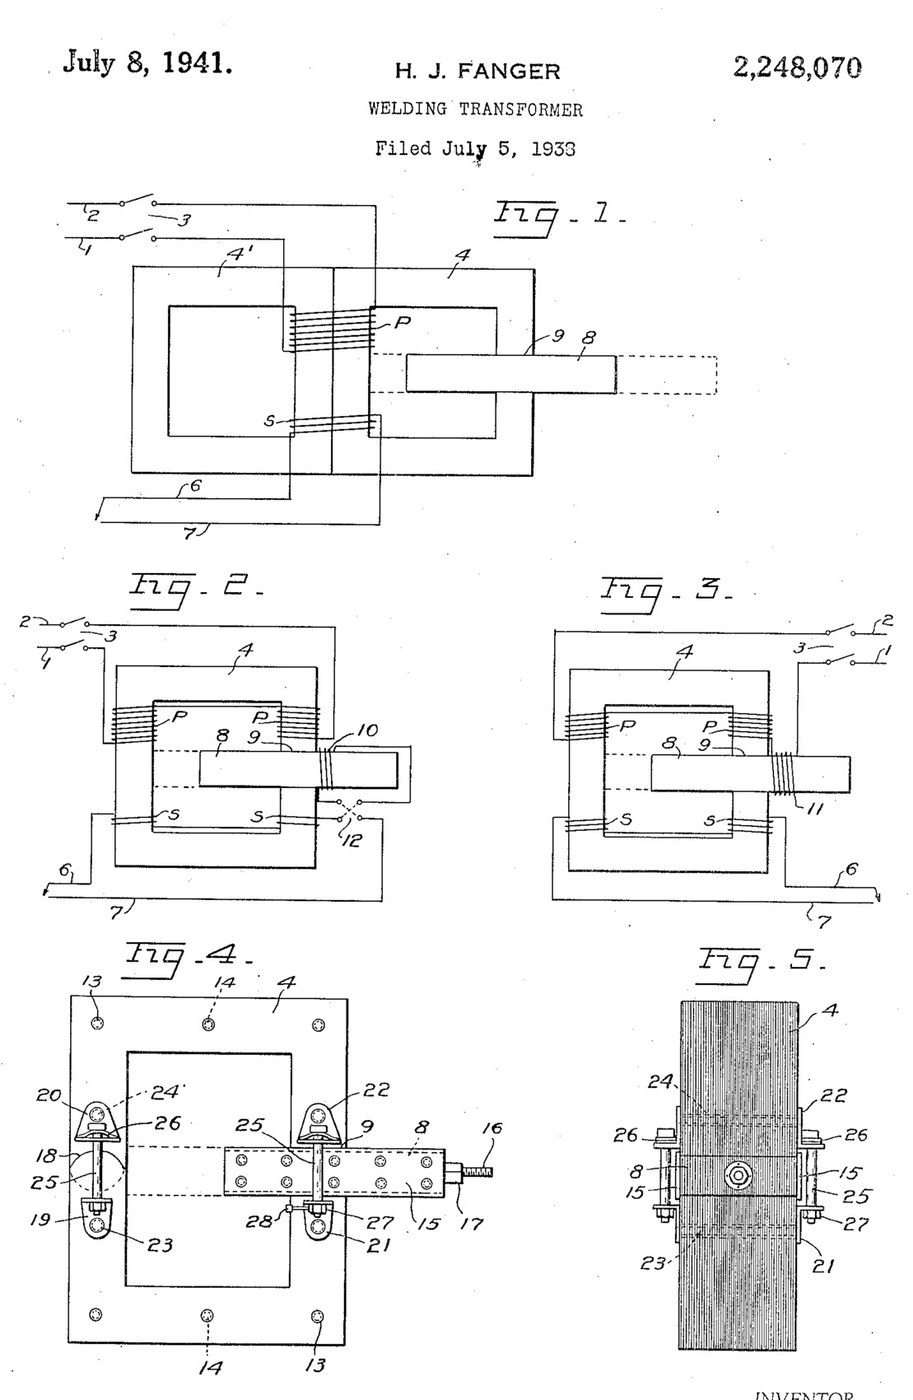


Arc Welder: AC Transformer with a Sliding Shunt Core (Fanger, US 2,248,070)
An AC arc welder is a step-down transformer whose current can be turned up and down. H. J. Fanger (US 2,248,070, 1941) cuts a gap through one leg of a laminated ring core and slides a laminated iron shunt bar through it: pushed in, it carries flux past the secondary and lowers the welding current; pulled out, the current rises.
For arc welding he gives about 60 to 68 volts open circuit, 15 to 200 amps, dropping to 38 or 40 volts at the working arc, with a small coil on the shunt bar in series with the secondary.
Source: H. J. Fanger, "Welding Transformer", US Patent 2,248,070 (filed 1938, granted 1941). Picture: its Figs. 1-5.
ขั้นสูง
Unknown
คำแนะนำ
1
1
Read Fanger
Read Fanger
"With arc welding, infinite control of the volume of the secondary current, between maximum and minimum is obtained by adjustment of the slidable shunt core without altering the welding characteristics of the current, also better ignition of the arc is had at a given voltage, and greater stability of the arc".
2
2
Stack the core
Stack the core
Build a single rectangular ring core of insulated iron laminations, held together with brass (or insulated) bolts or rivets in insulating tubes (Fig. 4). Cut a gap straight through one leg, accurately machined and finished, and make a circular joint through the opposite leg with the segments staggered to overlap in successive laminations. Core size, lamination iron and thickness are not given (ours: the tools).
วัสดุสำหรับขั้นตอนนี้:
 โลหะที่ไม่ทราบ1 iron laminations
 ชุดสลักเกลียวหกเหลี่ยมคละขนาด1 brass bolts
 วัสดุฉนวนที่ไม่ทราบ1 insulating tubes
เครื่องมือที่ต้องใช้:
 กรรไกรตัดแผ่นโลหะ
 สว่านแท่น
 ชุดดอกสว่าน
 ตะไบ (ตะไบมือ)
 ขนาดที่ไม่ทราบ
3
3
Make the shunt bar
Make the shunt bar
Make the sliding shunt section of the same laminated iron, a snug fit in the gap with its laminations edge-to-edge with the core's, and long enough to fill the gap at every position. Sheath both sides with a slightly wider plate of Bakelite that overlaps the edges of the gap to guide it. Fit a threaded rod on its outer end, working in a nut fixed to the section (or move it by hand, with calibration marks along one edge).
วัสดุสำหรับขั้นตอนนี้:
โลหะที่ไม่ทราบ1 shunt laminations เบกาไลต์2 side platesชุดสลักเกลียวหกเหลี่ยมคละขนาด1 brass bolts
 เพลาเกลียว1 ชิ้น
 น็อตหกเหลี่ยม1 ชิ้น
เครื่องมือที่ต้องใช้:
สว่านแท่นชุดดอกสว่านตะไบ (ตะไบมือ)4
4
Wind the coils
Wind the coils
Wind the primary and secondary windings on both legs of the core (Fig. 2), in series or in parallel to suit the line voltage and the current wanted. Wind a small auxiliary coil round the shunt bar's path, fixed so the bar slides through it, and connect it in series with the secondary through a reversing switch (some jobs weld better with the current through it one way). Turns and wire sizes are not given.
วัสดุสำหรับขั้นตอนนี้:
 ลวดทองแดง1 insulation and size not given
เครื่องมือที่ต้องใช้:
ขนาดที่ไม่ทราบ5
5
Spring the joints
Spring the joints
On both sides of the gap and of the circular joint fit pairs of confronting angle plates, held by brass bolts in insulating sleeves and drawn together by spring bolts whose heads rest on slightly arched spring plates, so the joints close snugly on the sliding bar. A small lever on the gap-joint nut gives a half turn to release the bar for moving. The angle-plate material is not given.
วัสดุสำหรับขั้นตอนนี้:
 วัสดุที่ไม่ทราบ4 angle platesชุดสลักเกลียวหกเหลี่ยมคละขนาด1 brass and spring boltsวัสดุฉนวนที่ไม่ทราบ1 sleeves
 แถบเหล็กสปริง1 arched spring platesน็อตหกเหลี่ยม4 ชิ้น
เครื่องมือที่ต้องใช้:
สว่านแท่นชุดดอกสว่าน ประแจเลื่อน
6
6
Connect and set
Connect and set
Connect the primary to the line through a line switch, and the secondary leads to the electrode holder and the work. Pull the shunt bar out for more current, push it in for less: Fanger gives about 60-68 volts open circuit and 15-200 amps, dropping to 38-40 volts at the arc.
วัสดุสำหรับขั้นตอนนี้:
 สวิตช์เปิด/ปิด1 line switch
เครื่องมือที่ต้องใช้:
ประแจเลื่อนวัสดุ
10- 1 shunt laminationsตัวยึดตำแหน่ง
- 1 brass and spring boltsตัวยึดตำแหน่ง
- 1 sleevesตัวยึดตำแหน่ง
- 2 side platesตัวยึดตำแหน่ง
- 1 ชิ้นตัวยึดตำแหน่ง
- 5 ชิ้นตัวยึดตำแหน่ง
- 1 insulation and size not givenตัวยึดตำแหน่ง
- 4 angle platesตัวยึดตำแหน่ง
- 1 arched spring platesตัวยึดตำแหน่ง
- 1 line switchตัวยึดตำแหน่ง
พิมพ์เขียวนี้สร้าง

CC0 สาธารณสมบัติ
พิมพ์เขียวนี้เผยแพร่ภายใต้ CC0 คุณสามารถคัดลอก แก้ไข แจกจ่าย และใช้งานผลงานนี้เพื่อวัตถุประสงค์ใดก็ได้ โดยไม่ต้องขออนุญาต
สนับสนุนเมกเกอร์โดยซื้อสินค้าผ่านพิมพ์เขียวของพวกเขา ซึ่งพวกเขาจะได้รับ ค่าคอมมิชชันเมกเกอร์ ที่ผู้ขายกำหนด หรือสร้างเวอร์ชันใหม่ของพิมพ์เขียวนี้และรวมเป็นการเชื่อมต่อในพิมพ์เขียวของคุณเพื่อแบ่งรายได้