การทำงานร่วมกัน
ศิลปะ
ความงามและสุขภาพ
งานฝีมือ
วัฒนธรรมและประวัติศาสตร์
ความบันเทิง
สิ่งแวดล้อม
อาหารและเครื่องดื่ม
วิศวกรรมย้อนรอย
วิทยาศาสตร์
กีฬา
เทคโนโลยี
อุปกรณ์สวมใส่
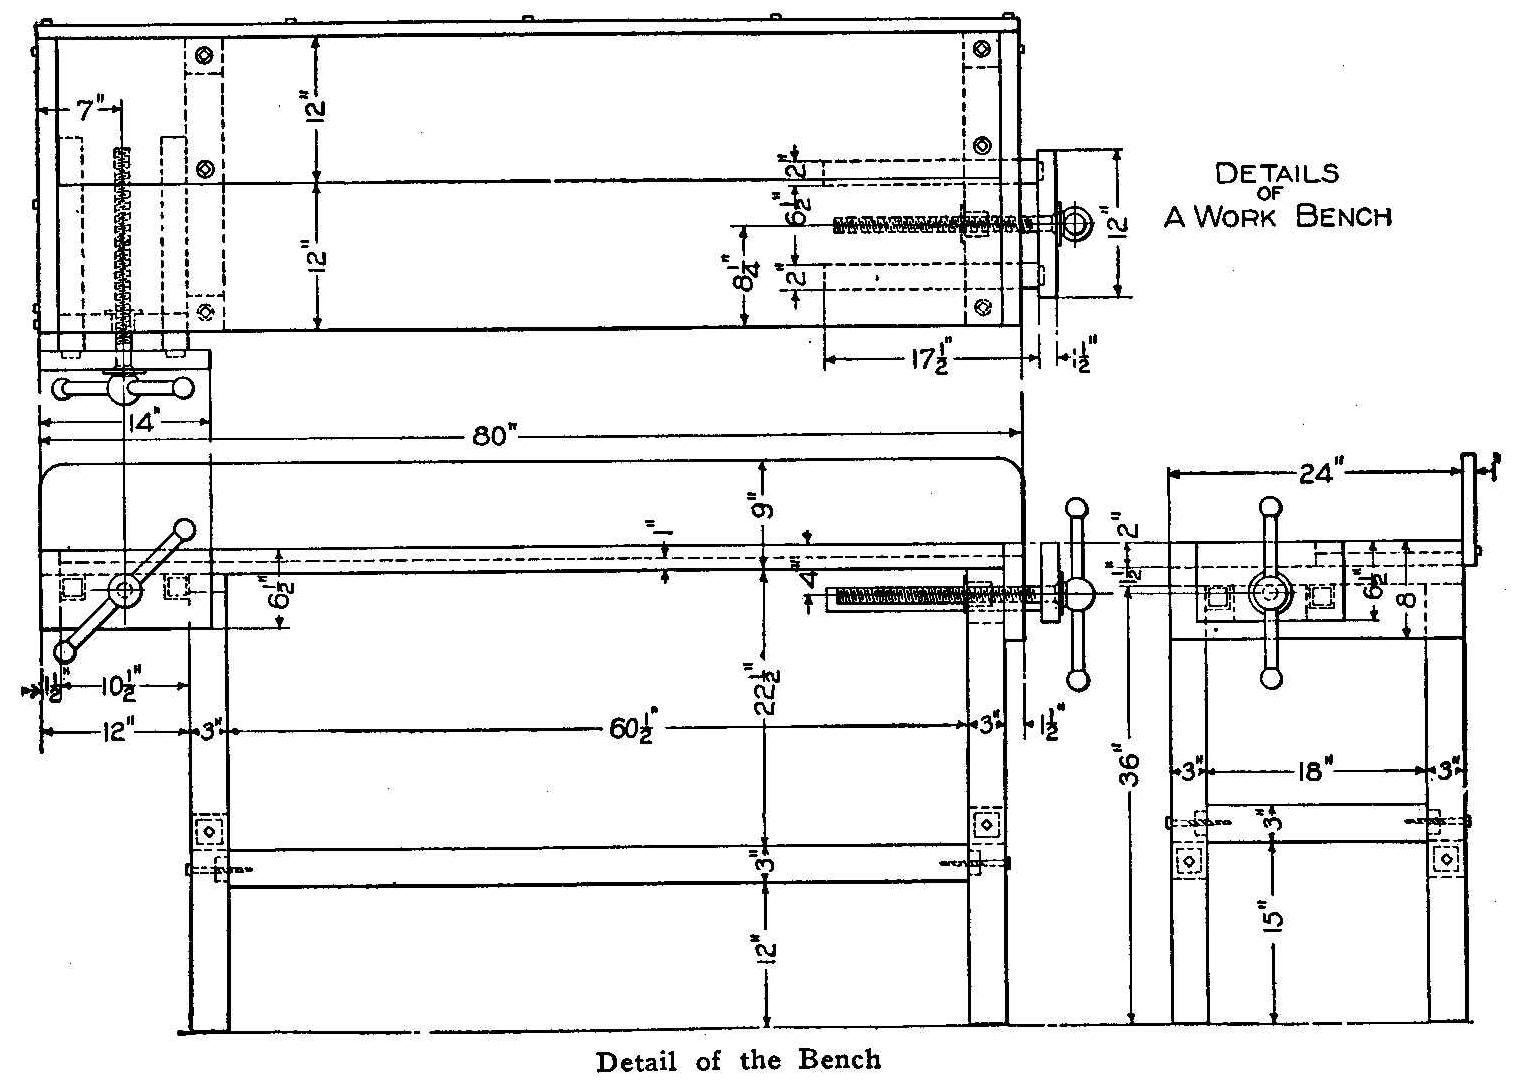


Workbench for the Amateur: Mortised Maple Frame, Two-Board Top, Side and End Vises (Boy Mechanic, 1913)
A full-size woodworking bench from The Boy Mechanic (Popular Mechanics, 1913), "suitable for the amateur woodworker" and made "by anyone who has a few sharp tools and a little spare time": a mortise-and-tenon frame of birch or maple bolted with lag screws, a top of a 2 in and a 1 in board, a side vise and an end vise on square slides, and a back board. All sizes are the book's.
It stands 36 in high, 80 in long and 24 in deep.
ระดับกลาง
About 2 days
คำแนะนำ
1
1
Cutting list
Cutting list
กำลังโหลดสมุด Jupyter…
2
2
Read The Boy Mechanic
Read The Boy Mechanic
"If the stock is purchased from the mill ready planed and cut to length, much of the hard labor will be saved."
3
3
Make the lower frame
Make the lower frame
Cut tenons on the side and end rails and mortise the posts to take them. Fit them together and fasten them securely with 3/8 by 5 in lag screws through the posts into the rails, as the drawing shows.
วัสดุสำหรับขั้นตอนนี้:
 ไม้แปรรูปหน้าตัดสี่เหลี่ยม1 ชิ้น
 สกรูหัวหกเหลี่ยมยึดไม้ (แล็กสกรู)1 ชิ้น
เครื่องมือที่ต้องใช้:
 เลื่อยตัดขวางสองคน
 เลื่อยสันแข็ง
 สิ่วเจาะเดือย
 ค้อนไม้
 ฉากตาย
 สว่านมือหมุนพร้อมดอก
 ประแจเลื่อน
 ดินสอ
4
4
Fit the crosspieces and top
Fit the crosspieces and top
Screw the 1-1/2 by 3 by 24 in crosspieces to the tops of the posts, countersinking the heads (or bore the top boards to clear them). Fasten the front, 2 in top board to the crosspieces with lag screws from underneath; screw the 1 in top board down from the top.
วัสดุสำหรับขั้นตอนนี้:
ไม้แปรรูปหน้าตัดสี่เหลี่ยม1 ชิ้น แผ่นไม้เนื้อแข็งหนา1 ชิ้น
 แผ่นไม้เนื้อแข็ง1 ชิ้นสกรูหัวหกเหลี่ยมยึดไม้ (แล็กสกรู)1 ชิ้น
 สกรูไม้1 ชิ้น
เครื่องมือที่ต้องใช้:
สว่านมือหมุนพร้อมดอก ชุดดอกลบมุมรู
 ชุดไขควงประแจเลื่อน
5
5
Fit the end pieces and vise slides
Fit the end pieces and vise slides
Screw on the end pieces, countersinking the heads at the vise end. Cut 2 in square holes in the 1-1/2 by 4-1/2 by 10 in piece for the side vise slides and fit it in place, and cut square holes in one end piece for the end vise slides.
วัสดุสำหรับขั้นตอนนี้:
แผ่นไม้เนื้อแข็ง1 ชิ้นสกรูไม้1 ชิ้นเครื่องมือที่ต้องใช้:
สว่านมือหมุนพร้อมดอก สิ่วค้อนไม้ชุดดอกลบมุมรูชุดไขควง
6
6
Fit up the two vises
Fit up the two vises
Screw the 2 in square slides (guides) to the two clamp front pieces, countersinking the heads so they are clear of the hands. The clamp screws should be about 1-1/2 in diameter, bought at a hardware store. Fit a block under the crosspiece to hold the end vise's nut. With the slides in place, bore the holes for the clamp screws and fit them.
วัสดุสำหรับขั้นตอนนี้:
ไม้แปรรูปหน้าตัดสี่เหลี่ยม1 ชิ้นแผ่นไม้เนื้อแข็ง1 ชิ้น เกลียวปากกาจับชิ้นงานพร้อมคันโยกเลื่อน2 ชิ้นสกรูไม้1 ชิ้น
เครื่องมือที่ต้องใช้:
สว่านมือหมุนพร้อมดอกชุดดอกลบมุมรูชุดไขควง7
7
Back board and finish
Back board and finish
Screw the back board to the back as the top view shows. Give the bench "a couple of coats of oil" to finish and preserve the wood (boiled linseed oil, ours).
วัสดุสำหรับขั้นตอนนี้:
แผ่นไม้เนื้อแข็ง1 ชิ้นสกรูไม้1 ชิ้น น้ำมันลินสีดต้ม1 ชิ้น
 ผ้าฝ้าย1 ชิ้น
เครื่องมือที่ต้องใช้:
ชุดไขควง8
8
Troubleshooting
Troubleshooting
Workbench troubleshooting.
Flow
Loading...
9
9
History and honest limits
History and honest limits
From **The Boy Mechanic, Volume 1: 700 Things for Boys to Do**, edited by H. H. Windsor, Popular Mechanics, Chicago, 1913 (Project Gutenberg #12655), "A Workbench for the Amateur". All sizes and the fastening are the book's; it names no oil, so boiled linseed oil is ours, as are the metric figures.
วัสดุ
8- ตัวยึดตำแหน่ง
- ตัวยึดตำแหน่ง
- 1 ชิ้นตัวยึดตำแหน่ง
- 1 ชิ้นตัวยึดตำแหน่ง
- 4 ชิ้นตัวยึดตำแหน่ง
- ตัวยึดตำแหน่ง
- 1 ชิ้นตัวยึดตำแหน่ง
- 1 ชิ้นตัวยึดตำแหน่ง
เครื่องมือที่จำเป็น
11- ตัวยึดตำแหน่ง
- ตัวยึดตำแหน่ง
- ตัวยึดตำแหน่ง
- ตัวยึดตำแหน่ง
- ตัวยึดตำแหน่ง
- ตัวยึดตำแหน่ง
- ตัวยึดตำแหน่ง
- 1 vendor sell this, none ship to you yetตัวยึดตำแหน่ง
- ตัวยึดตำแหน่ง
- ตัวยึดตำแหน่ง
- ตัวยึดตำแหน่ง
พิมพ์เขียวนี้สร้าง

บลูพริ้นท์ที่เกี่ยวข้อง
บลูพริ้นท์เหล่านี้แบ่งปันความรู้ — เทคนิค วัสดุ หรือหลักการ

CC0 สาธารณสมบัติ
พิมพ์เขียวนี้เผยแพร่ภายใต้ CC0 คุณสามารถคัดลอก แก้ไข แจกจ่าย และใช้งานผลงานนี้เพื่อวัตถุประสงค์ใดก็ได้ โดยไม่ต้องขออนุญาต
สนับสนุนเมกเกอร์โดยซื้อสินค้าผ่านพิมพ์เขียวของพวกเขา ซึ่งพวกเขาจะได้รับ ค่าคอมมิชชันเมกเกอร์ ที่ผู้ขายกำหนด หรือสร้างเวอร์ชันใหม่ของพิมพ์เขียวนี้และรวมเป็นการเชื่อมต่อในพิมพ์เขียวของคุณเพื่อแบ่งรายได้