ศิลปะ
ความงามและสุขภาพ
งานฝีมือ
วัฒนธรรมและประวัติศาสตร์
ความบันเทิง
สิ่งแวดล้อม
อาหารและเครื่องดื่ม
วิศวกรรมย้อนรอย
วิทยาศาสตร์
กีฬา
เทคโนโลยี
อุปกรณ์สวมใส่
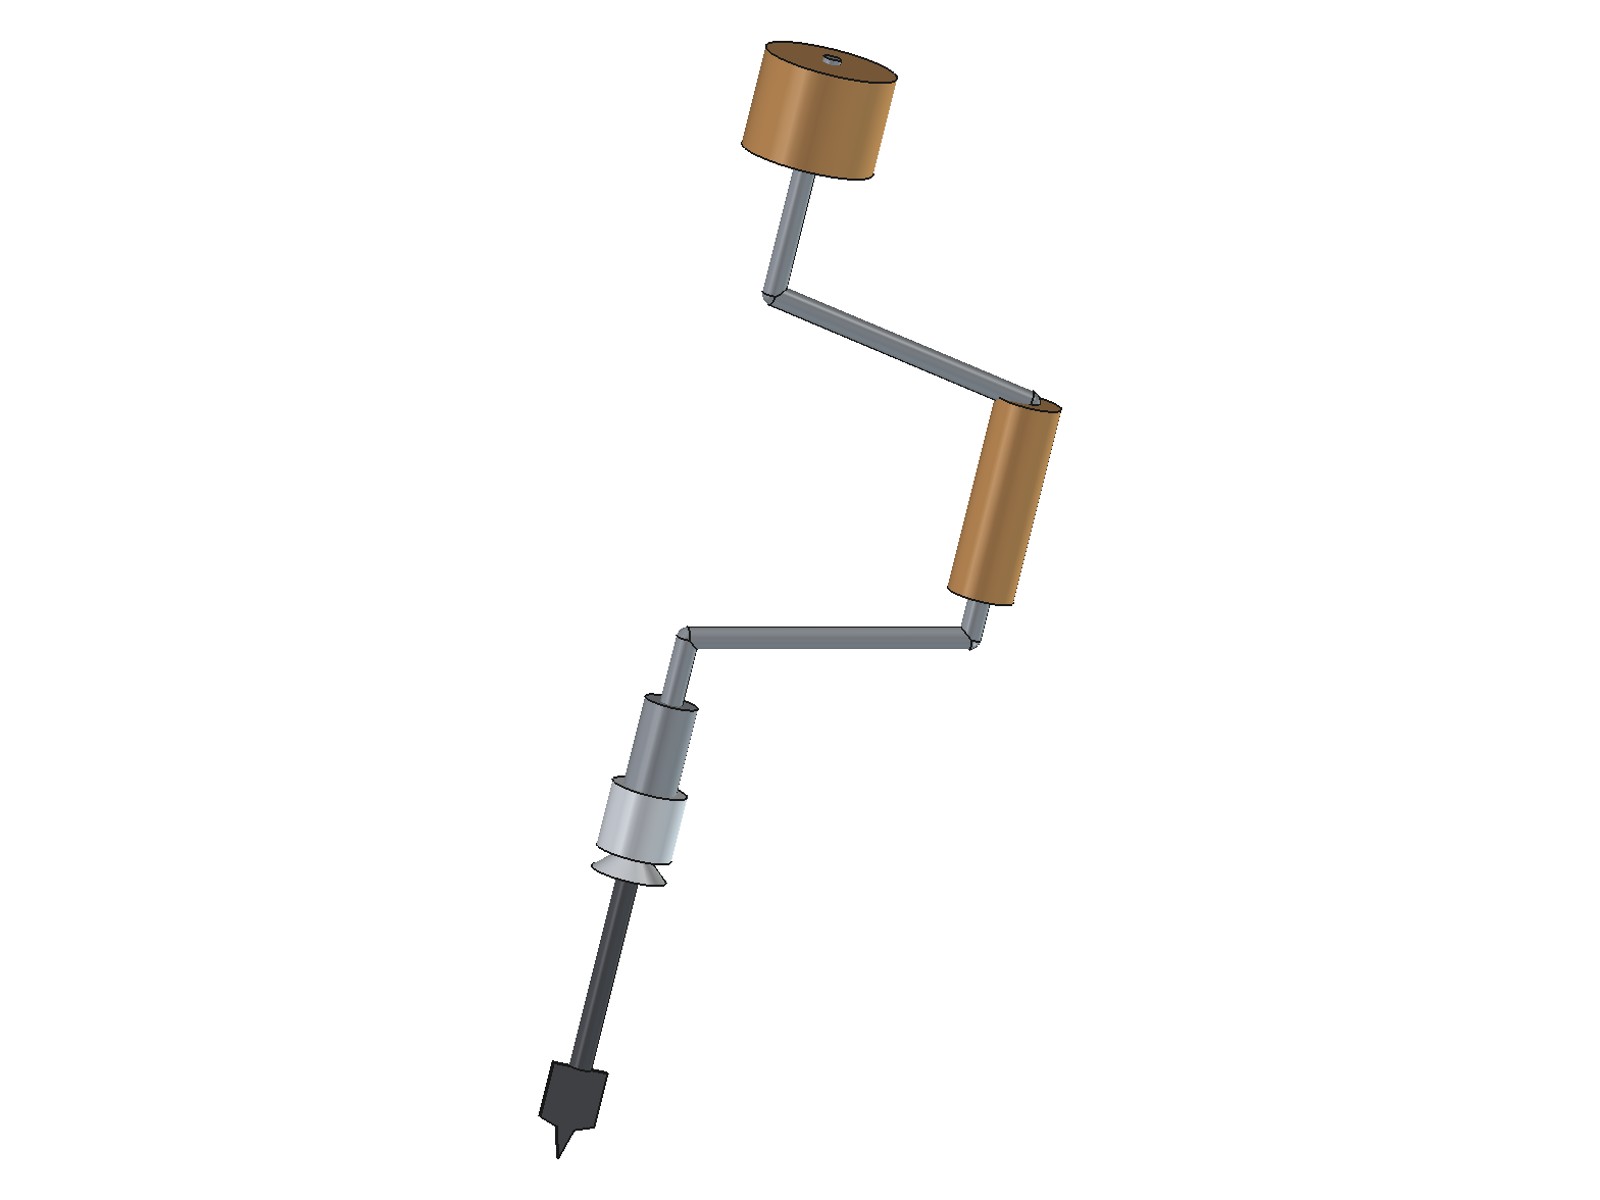


Brace and Bit: a Crank Brace with a Two-Jaw Screw-Thimble Chuck (after Amidon, 1868)
A carpenter's brace: a cranked steel rod with a turning wooden head, a wooden handle sleeve and a chuck that holds the bit. The chuck is Charles Amidon's of 1868: two jaws in a slotted, threaded foot, closed at both ends by a screwed thimble, so they grip a tapered or straight shank firmly. Made on a metal lathe, with a forge for the bends.
ขั้นสูง
About 2 days
คำแนะนำ
1
1
Watch a brace at work
Watch a brace at work
Boring a square, true hole with a brace and bit (Wood By Wright Extra).
2
2
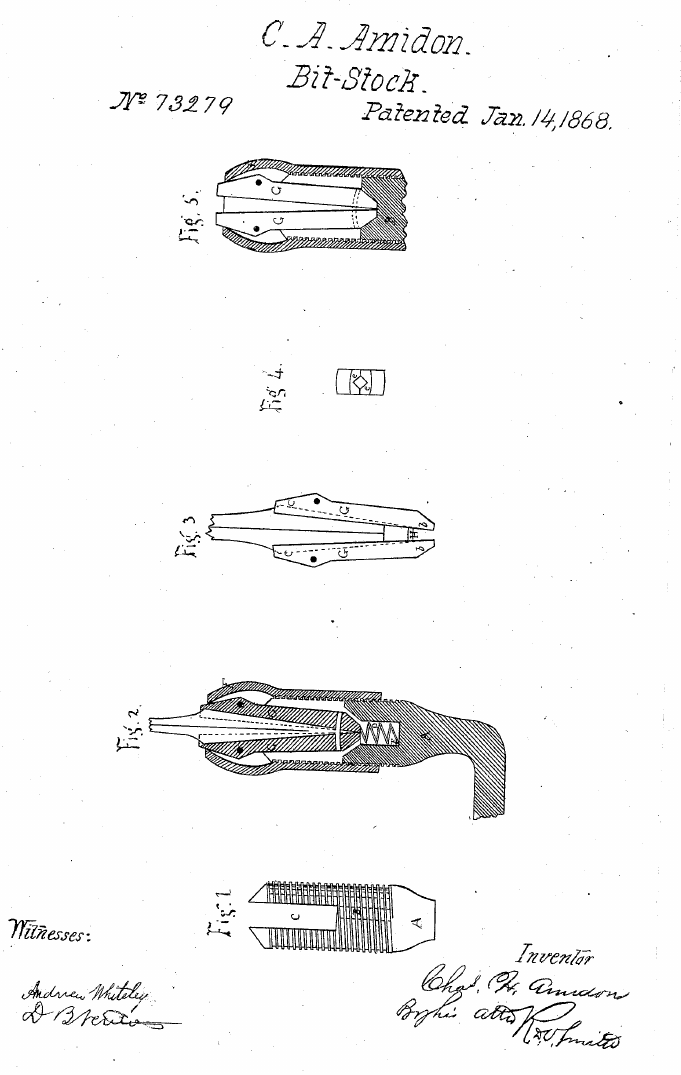
Amidon's chuck, 1868
Amidon's chuck, 1868
US 73,279: the foot of the stock is threaded outside and slotted through; two jaws, loosely pinned at their inner ends, sit in the slot on a spring; grooves in their faces make a tapering square recess for the bit shank. The thimble screws on and its narrowed mouth presses the jaws together at both ends, so they follow the taper of any shank.
3
3
Torque, grip and the rod length
Torque, grip and the rod length
กำลังโหลดสมุด Jupyter…
4
4
Print the drawings
Print the drawings
Page 1: the chuck parts at 1:1; page 2: the crank layout. Print at 100 % and check the 50 x 10 mm box.
5
5
Turn the foot
Turn the foot
From 24 mm round bar, 60 mm long: cut M24 x 1.5 over the front 30 mm; drill a 10 mm socket 22 mm deep at the back for the crank, and the 8 mm cavity with a 90 degree mouth at the front; saw and file the 8 mm slot, 32 mm deep, right through.
วัสดุสำหรับขั้นตอนนี้:
 เหล็กเส้นกลมเหล็กกล้าละมุน1 piece (24 mm x 60 mm)
เครื่องมือที่ต้องใช้:
 เครื่องกลึงโลหะ
 ชุดเครื่องมือกลึง (HSS)
 ชุดดอกสว่าน
 เลื่อยตัดเหล็ก
 ตะไบโลหะ
 เวอร์เนียร์ดิจิทัล 6 นิ้ว
6
6
Make the jaws
Make the jaws
Cut two jaws 46 mm long from 7.5 mm flat bar, 8 mm wide at the pin end widening to 12 mm. File a 90 degree V-groove 3 mm deep along each inner face, bevel both ends 30 degrees, drill the 2 mm pin hole 4 mm from the inner end. Press a 2 mm pin tight into one jaw; it must slide in the other. Check they move freely in the slot.
วัสดุสำหรับขั้นตอนนี้:
 เหล็กแบนกล้าละมุน1 piece (7.5 mm x 12 mm x 100 mm)
 แท่งเหล็กกลมคาร์บอนต่ำ1 piece (2 mm x 12 mm, pin)
เครื่องมือที่ต้องใช้:
เลื่อยตัดเหล็กตะไบโลหะชุดดอกสว่าน เหล็กตอกนำศูนย์
 ปากกาจับชิ้นงานหน้าโต๊ะ
7
7
Turn the thimble
Turn the thimble
From 34 mm bar, 40 mm long: bore and cut M24 x 1.5 inside, 22 mm deep, then a 60 degree cone narrowing to a 12 mm mouth. Knurl the outside. It must screw fully onto the foot.
วัสดุสำหรับขั้นตอนนี้:
เหล็กเส้นกลมเหล็กกล้าละมุน1 piece (34 mm x 45 mm)เครื่องมือที่ต้องใช้:
เครื่องกลึงโลหะชุดเครื่องมือกลึง (HSS) เครื่องมือทำลาย (เนอร์ลิง)เวอร์เนียร์ดิจิทัล 6 นิ้ว
8
8
Bend the crank
Bend the crank
Cut 540 mm of 10 mm rod. Turn 50 mm at one end down to 8 mm (the head journal). Following page 2: make the foot bend, slide the hardwood sleeve (30 mm, bored 10.5 mm, 90 long) onto the rod, make the two handle bends, then the head bend. Heat to a dull red for each bend; keep all bends in one plane and the head and foot legs on one line.
วัสดุสำหรับขั้นตอนนี้:
แท่งเหล็กกลมคาร์บอนต่ำ1 piece (10 mm x 540 mm) ท่อนไม้เนื้อแข็ง1 piece (sleeve, 35 x 35 x 95 mm)
เครื่องมือที่ต้องใช้:
 เตาตีเหล็กของช่างตีเหล็กปากกาจับชิ้นงานหน้าโต๊ะ
 ค้อนหัวกลม
 เครื่องกลึงไม้เครื่องกลึงโลหะ
9
9
Turn the head and fit it
Turn the head and fit it
Turn a hardwood head 60 mm across and 45 mm thick, bore 8.5 mm through and counterbore the top 16 x 5 mm. Slide a washer on the journal, then the head, then a washer in the counterbore; peen the journal end over so the head turns freely but cannot come off. Oil the wood.
วัสดุสำหรับขั้นตอนนี้:
ท่อนไม้เนื้อแข็ง1 piece (head, 65 x 65 x 50 mm) แหวนรองแบน2 piece (8 mm)
 น้ำมันลินสีด20 มล.
เครื่องมือที่ต้องใช้:
เครื่องกลึงไม้ค้อนหัวกลมปากกาจับชิ้นงานหน้าโต๊ะ10
10
Assemble the chuck
Assemble the chuck
Push the crank's foot end into the foot's socket, drill 4 mm through both and drive in a 4 mm pin, peened both ends. Drop the spring into the cavity, put the jaws in the slot (pinned ends in), and screw the thimble on.
วัสดุสำหรับขั้นตอนนี้:
แท่งเหล็กกลมคาร์บอนต่ำ1 piece (4 mm x 26 mm, cross pin) ชุดสปริงกด1 piece (about 6 mm diameter, 15 mm long)
เครื่องมือที่ต้องใช้:
ชุดดอกสว่านค้อนหัวกลมปากกาจับชิ้นงานหน้าโต๊ะ11
11
Fit a bit and bore
Fit a bit and bore
Back the thimble off, put the bit shank between the jaws and tighten the thimble by hand. Press on the head and turn the handle; keep the brace square to the work.
วัสดุสำหรับขั้นตอนนี้:
 ชุดดอกสว่านใบพาย1 piece (one bit, 10 mm octagonal shank)
12
12
Troubleshooting
Troubleshooting
Brace problems and fixes.
Flow
Loading...
13
13
History and honest limits
History and honest limits
Charles H. Amidon, Greenfield, Mass.: US 73,279, "Improvement in Bit-Stocks", 14 January 1868. He compared it with Barber's stock, whose solid socket had to fit the bit head exactly. His patent covers the chuck; the crank and swivel head are the ordinary ones of the time. Ours: every size and the bend order. Not built or tested by us yet.
วัสดุ
8- 1 piece (34 mm x 45 mm)ตัวยึดตำแหน่ง
- 1 piece (7.5 mm x 12 mm x 100 mm)ตัวยึดตำแหน่ง
- 1 piece (4 mm x 26 mm, cross pin)ตัวยึดตำแหน่ง
- 1 piece (head, 65 x 65 x 50 mm)ตัวยึดตำแหน่ง
- 2 piece (8 mm)ตัวยึดตำแหน่ง
- 20 มล.ตัวยึดตำแหน่ง
- 1 piece (about 6 mm diameter, 15 mm long)ตัวยึดตำแหน่ง
- 1 piece (one bit, 10 mm octagonal shank)ตัวยึดตำแหน่ง
เครื่องมือที่จำเป็น
12- ตัวยึดตำแหน่ง
- ตัวยึดตำแหน่ง
- ตัวยึดตำแหน่ง
- ตัวยึดตำแหน่ง
- ตัวยึดตำแหน่ง
- ตัวยึดตำแหน่ง
- ตัวยึดตำแหน่ง
- ตัวยึดตำแหน่ง
- ตัวยึดตำแหน่ง
- ตัวยึดตำแหน่ง
- ตัวยึดตำแหน่ง
- ตัวยึดตำแหน่ง
ไฟล์ออกแบบ
1พิมพ์เขียวนี้สร้าง
บลูพริ้นท์ที่เกี่ยวข้อง
บลูพริ้นท์เหล่านี้แบ่งปันความรู้ — เทคนิค วัสดุ หรือหลักการ
CC0 สาธารณสมบัติ
พิมพ์เขียวนี้เผยแพร่ภายใต้ CC0 คุณสามารถคัดลอก แก้ไข แจกจ่าย และใช้งานผลงานนี้เพื่อวัตถุประสงค์ใดก็ได้ โดยไม่ต้องขออนุญาต
สนับสนุนเมกเกอร์โดยซื้อสินค้าผ่านพิมพ์เขียวของพวกเขา ซึ่งพวกเขาจะได้รับ ค่าคอมมิชชันเมกเกอร์ ที่ผู้ขายกำหนด หรือสร้างเวอร์ชันใหม่ของพิมพ์เขียวนี้และรวมเป็นการเชื่อมต่อในพิมพ์เขียวของคุณเพื่อแบ่งรายได้