การทำงานร่วมกัน
ศิลปะ
ความงามและสุขภาพ
งานฝีมือ
วัฒนธรรมและประวัติศาสตร์
ความบันเทิง
สิ่งแวดล้อม
อาหารและเครื่องดื่ม
วิศวกรรมย้อนรอย
วิทยาศาสตร์
กีฬา
เทคโนโลยี
อุปกรณ์สวมใส่
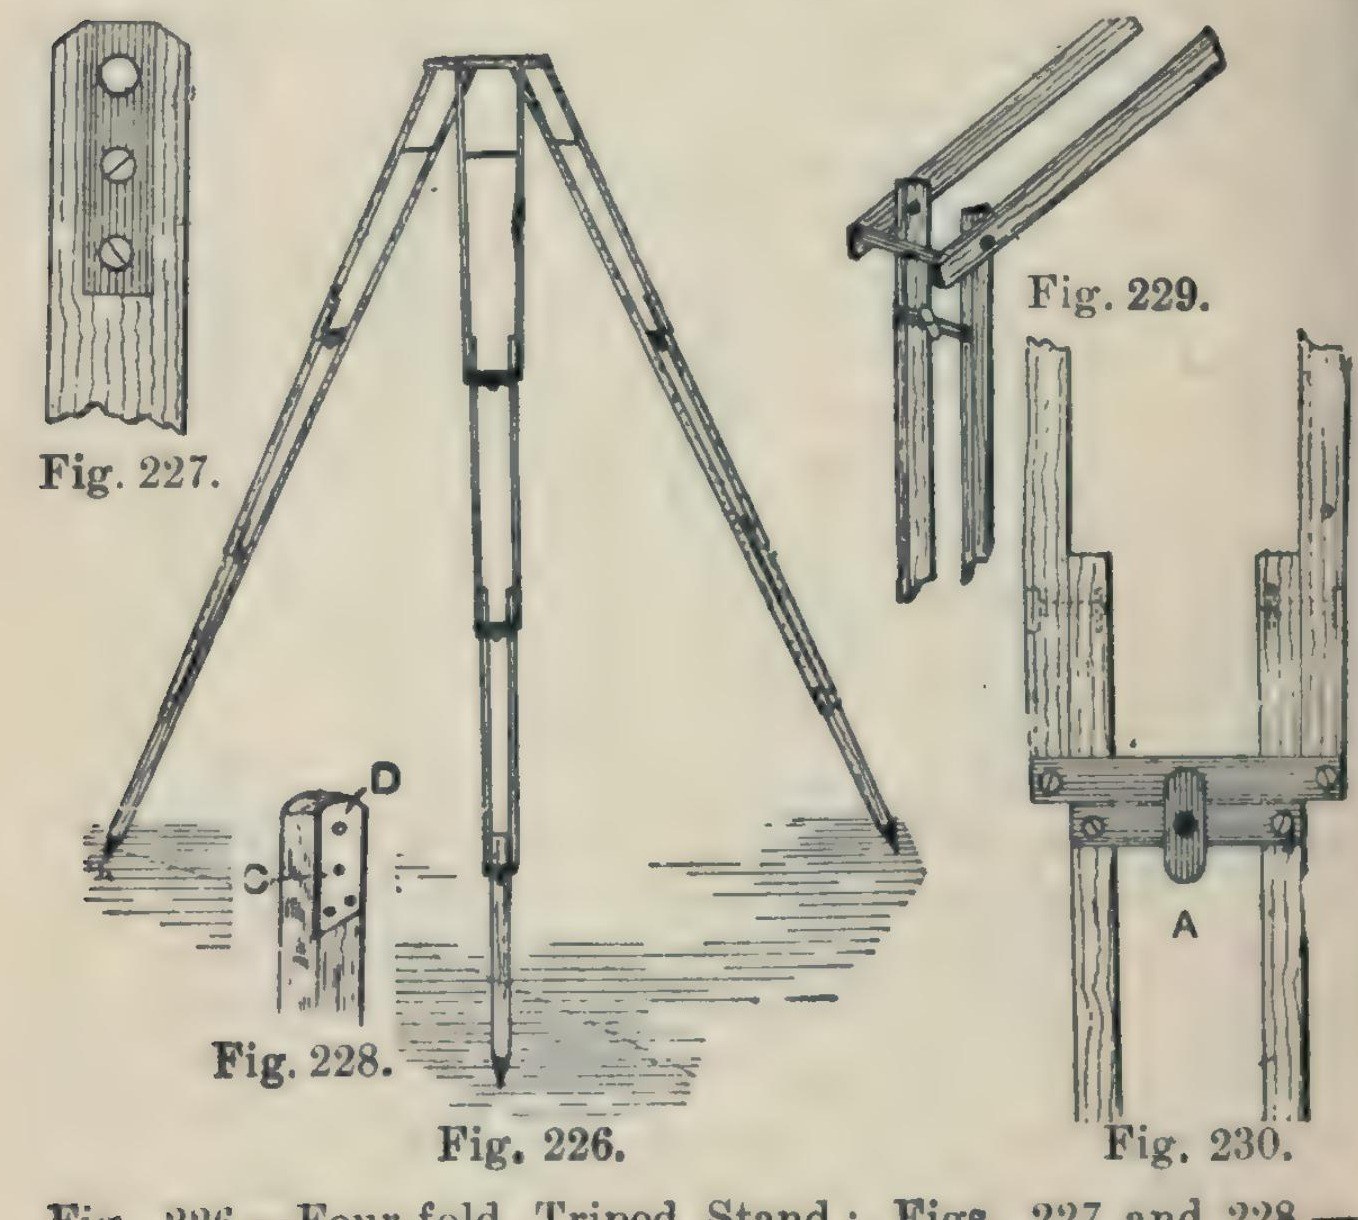


Camera Tripod: a Four-Fold Ash Tripod Stand (Hasluck, 1902)
A light, compact folding camera stand: three legs, each of seven ash laths riveted so it folds in four, locked open by brass buttons, on a triangular ash top with brass pins and a hole for the camera screw.
Hasluck says the same method makes stands that fold in three or two.
Source: Paul N. Hasluck, Photographic Cameras and Accessories (1902), pp. 153-157. Picture: Figs. 226-230 of the book.
ระดับกลาง
Unknown
คำแนะนำ
1
1
Cut the ash laths
Cut the ash laths
Cut laths of good ash, true and square or the stand won't be rigid, and round the edges slightly: six 17 1/4 x 5/8 x 3/8 in, six 16 x 5/8 x 3/8 in, six 15 1/2 x 5/8 x 3/8 in, and three 14 x 5/8 x 5/8 in.
วัสดุสำหรับขั้นตอนนี้:
 ไม้กระดานแอช1 21 laths
เครื่องมือที่ต้องใช้:
 เลื่อยสันแข็ง
 กบมือเล็ก
2
2
Fit the top ends and stretcher
Fit the top ends and stretcher
On each 17 1/4 in lath let in flush a 1/16 in brass plate, 1 1/4 in long, with a 3/16 in hole 1/4 in from the top, held by two countersunk brass screws; bore the wood to match and take off the top corners. On one lath of each pair cut a groove inside, about 3/16 in deep and 3 1/2 in long, starting 2 in from the top, and hinge a 1/8 in brass rod stretcher in it on a pin. On the other lath cut a curved groove 1 1/2 in long, 3/16 in wide, with a small hole at the bottom where the rod catches.
วัสดุสำหรับขั้นตอนนี้:
 แผ่นทองเหลือง1 1/16 in plates
 สกรูไม้1 small brass screws
 แท่งทองเหลือง1 1/8 in stretcher
เครื่องมือที่ต้องใช้:
 โครงเลื่อยตัดเหล็กพร้อมใบ
 ตะไบโลหะ
 สว่านมือ
 สิ่ว
 ไขควงปากแบน
3
3
Bore and rivet the legs
Bore and rivet the legs
Bore the rivet holes: in the long laths 1 3/4 in from the lower end, counterbored so the copper rivet head sits flush, then 1/8 in through; in the 16 in and 15 1/2 in laths 1/2 in and 1 3/4 in from the ends; in each 14 in piece 1/2 in from one end, and taper its other end for a pointed iron shoe or a steel point and ferrule. Rivet the 21 laths into three legs with 1/8 in copper rivets and washers: a 16 in lath inside each 17 1/4 in one, a 15 1/2 in lath inside that, the 14 in foot between the last pair. Rivets flush, just tight enough to fold but not loose.
วัสดุสำหรับขั้นตอนนี้:
 หมุดย้ำทองแดง1 1/8 in, with washers
 โลหะที่ไม่ทราบ3 iron shoes or steel points
เครื่องมือที่ต้องใช้:
 สว่านมือหมุนพร้อมดอกสว่านมือ
 ค้อนย้ำหมุด
4
4
Add cross strips and lock buttons
Add cross strips and lock buttons
Screw 1/16 in brass strips across the bottom ends of each pair of laths (Fig. 229). Under them screw strips carrying a small brass button riveted at the centre; turned, the button hooks over the strip above and locks the joint open (Fig. 230).
วัสดุสำหรับขั้นตอนนี้:
แผ่นทองเหลือง1 cross strips, buttonsสกรูไม้1 ชิ้นเครื่องมือที่ต้องใช้:
โครงเลื่อยตัดเหล็กพร้อมใบตะไบโลหะไขควงปากแบนค้อนย้ำหมุด5
5
Make the top
Make the top
Plane ash to 1/2 in and draw an equilateral triangle with 8 1/2 in sides. Bisect the angles; 2 in from each corner draw a line at right angles, go 1/2 in in along the sides, and mark three rectangles 2 7/8 x 3/4 in; cut the outline (Fig. 231). Fix a 3/16 in brass rod, one end tapered, across each rectangle, bored 3/8 in from the outer edge and projecting about 1/2 in, for the legs to hang on. Bore a 1/4 in hole in the centre for the camera screw and glue felt on top.
วัสดุสำหรับขั้นตอนนี้:
ไม้กระดานแอช1 topแท่งทองเหลือง3 3/16 in pins สักหลาดขนแกะ1 ชิ้น
 กาวสัตว์1 ชิ้น
เครื่องมือที่ต้องใช้:
กบมือเล็กเลื่อยสันแข็งสว่านมือหมุนพร้อมดอกสว่านมือ6
6
Finish
Finish
Glasspaper and varnish the wood, and lacquer the brass.
วัสดุสำหรับขั้นตอนนี้:
 น้ำมันเคลือบเชลแล็ก1 varnish
 วัสดุที่ไม่ทราบ1 brass lacquer
เครื่องมือที่ต้องใช้:
 กระดาษทราย
วัสดุ
10- 1 topตัวยึดตำแหน่ง
- 1 cross strips, buttonsตัวยึดตำแหน่ง
- 1 ชิ้นตัวยึดตำแหน่ง
- 3 3/16 in pinsตัวยึดตำแหน่ง
- 1 1/8 in, with washersตัวยึดตำแหน่ง
- 3 iron shoes or steel pointsตัวยึดตำแหน่ง
- 1 ชิ้นตัวยึดตำแหน่ง
- 1 ชิ้นตัวยึดตำแหน่ง
- 1 varnishตัวยึดตำแหน่ง
- 1 brass lacquerตัวยึดตำแหน่ง
เครื่องมือที่จำเป็น
10- ตัวยึดตำแหน่ง
- ตัวยึดตำแหน่ง
- ตัวยึดตำแหน่ง
- ตัวยึดตำแหน่ง
- ตัวยึดตำแหน่ง
- ตัวยึดตำแหน่ง
- ตัวยึดตำแหน่ง
- ตัวยึดตำแหน่ง
- ตัวยึดตำแหน่ง
- ตัวยึดตำแหน่ง
พิมพ์เขียวนี้สร้าง

CC0 สาธารณสมบัติ
พิมพ์เขียวนี้เผยแพร่ภายใต้ CC0 คุณสามารถคัดลอก แก้ไข แจกจ่าย และใช้งานผลงานนี้เพื่อวัตถุประสงค์ใดก็ได้ โดยไม่ต้องขออนุญาต
สนับสนุนเมกเกอร์โดยซื้อสินค้าผ่านพิมพ์เขียวของพวกเขา ซึ่งพวกเขาจะได้รับ ค่าคอมมิชชันเมกเกอร์ ที่ผู้ขายกำหนด หรือสร้างเวอร์ชันใหม่ของพิมพ์เขียวนี้และรวมเป็นการเชื่อมต่อในพิมพ์เขียวของคุณเพื่อแบ่งรายได้