ศิลปะ
ความงามและสุขภาพ
งานฝีมือ
วัฒนธรรมและประวัติศาสตร์
ความบันเทิง
สิ่งแวดล้อม
อาหารและเครื่องดื่ม
วิศวกรรมย้อนรอย
วิทยาศาสตร์
กีฬา
เทคโนโลยี
อุปกรณ์สวมใส่
Youblob · CC0


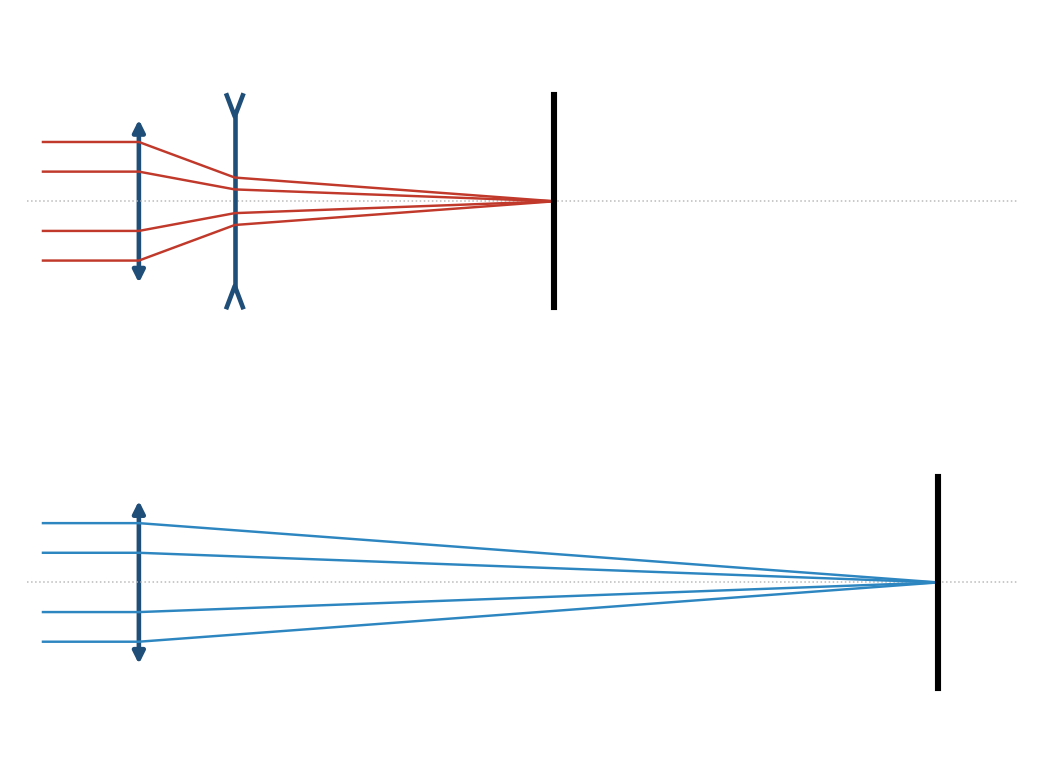
Telephoto Lens
To photograph a distant subject large, you need a long focal length - and a long lens means a long camera. In 1891 Thomas Rudolphus Dallmeyer in London, and Adolf Miethe in Germany, independently put a negative lens behind a positive one. The pair acts like a single lens of much longer focal length, yet it is physically shorter than that focal length. That is what 'telephoto' means, and nearly every long camera lens since uses it.
**No patent number is cited here**: Dallmeyer patented it in Britain, and no US patent for his design was verified, so none is claimed.
**You build one on an optical bench**, measure its focal length from the size of a distant image, and let a ray-trace notebook redesign it.
เริ่มต้น
90 minutes
คำแนะนำ
1
1
Know your lenses
Know your lenses
Focus a distant window onto paper with each convex lens; the lens-to-paper distance is its focal length. Pick one about 100 mm. Take a concave lens about half that (its label gives it; it will not focus alone).
วัสดุสำหรับขั้นตอนนี้:
 ชุดเลนส์นูน1 ชุด
 เลนส์เว้า1 ชิ้น
เครื่องมือที่ต้องใช้:
 ไม้บรรทัด
2
2
Set up the bench
Set up the bench
Mount the convex lens in a holder at one end of the bench, pointing out of a window at something far away. Tape tracing paper to a holder as the screen.
วัสดุสำหรับขั้นตอนนี้:
 ม้วนกระดาษลอกลายแบบตัดเสื้อ1 แผ่น
 เทปกาวย่นบังพื้นที่1 ม้วน
เครื่องมือที่ต้องใช้:
 โต๊ะทัศนศาสตร์และราง
 ชุดที่จับเลนส์
3
3
Image with one lens
Image with one lens
Slide the screen until the far scene is sharp. Measure the height of one chosen feature on the screen - a window, a chimney.
เครื่องมือที่ต้องใช้:
ไม้บรรทัด4
4
Add the negative lens
Add the negative lens
Put the concave lens 60 mm behind the convex one. The image is now far behind; move the screen back until it is sharp again and measure the same feature. Try 55 and 65 mm spacing too.
เครื่องมือที่ต้องใช้:
 ตลับเมตร
5
5
Design it on paper
Design it on paper
กำลังโหลดสมุด Jupyter…
6
6
History & Context
History & Context
**What the 1891 designs did:** a positive front group and a negative rear group, spaced so the system focal length exceeds its length. **Modern build (derived):** two stock lenses on a bench.
Early telephoto attachments screwed behind ordinary lenses; modern long lenses build the idea in. Its limits: spacing is critical, the negative group adds distortion (pincushion), and the image is dimmer at the same aperture diameter because the focal length grew.
วัสดุ
4- 1 ชุดตัวยึดตำแหน่ง
- 1 ชิ้นตัวยึดตำแหน่ง
- ตัวยึดตำแหน่ง
- 1 ม้วนตัวยึดตำแหน่ง
บลูพริ้นท์ที่เกี่ยวข้อง
บลูพริ้นท์เหล่านี้แบ่งปันความรู้ — เทคนิค วัสดุ หรือหลักการ
CC0 สาธารณสมบัติ
พิมพ์เขียวนี้เผยแพร่ภายใต้ CC0 คุณสามารถคัดลอก แก้ไข แจกจ่าย และใช้งานผลงานนี้เพื่อวัตถุประสงค์ใดก็ได้ โดยไม่ต้องขออนุญาต
สนับสนุนเมกเกอร์โดยซื้อสินค้าผ่านพิมพ์เขียวของพวกเขา ซึ่งพวกเขาจะได้รับ ค่าคอมมิชชันเมกเกอร์ ที่ผู้ขายกำหนด หรือสร้างเวอร์ชันใหม่ของพิมพ์เขียวนี้และรวมเป็นการเชื่อมต่อในพิมพ์เขียวของคุณเพื่อแบ่งรายได้